
Pool noodle games for kids turn $1 foam tubes into full backyard activities with no pool required. Cut one noodle in half crosswise for balloon paddles or hockey sticks, bend a whole noodle over two stakes to make croquet arches and goals, slice one lengthwise for a toy car ramp or a bowling lane, and poke holes in another to build a hose sprinkler. Most of the 19 games below cost $1 to $5, set up in under 10 minutes, and work for ages 2 to 12 with small adjustments.
Second week of summer break, 9:40 in the morning. One kid asking for the tablet, one lying face down on the rug announcing there is nothing to do, and the forecast says 94 degrees by lunch.
I went to the garage looking for anything at all and found six faded foam noodles wedged behind the recycling bin, left over from a pool party the summer before.
Twenty minutes later they were sword fighting. Then bowling. Then arguing about croquet rules I never taught them. That bin of foam has rescued more afternoons than any toy I have actually paid real money for.
Pool noodle games for kids work for one boring reason: foam is soft, cheap, and easy to cut, so you can hand a kid something breakable-looking and not care when it breaks. No pool needed for any of the 19 games here. A patch of grass, a driveway, or a garage floor on a rainy day all work.
Seasonal note for 2026: if you are reading this in September or October, this is the cheapest time of year to stock up. Dollar Tree, Walmart, and Big Lots clear out summer stock as soon as school starts, so grab a stack now and stash them for next June. Foam does not expire.
Jump to Any Section
This is a long list, so use the sticky table of contents below to jump straight to what you need and come back without losing your place.
- What You Need Before You Start
- Safety Notes for Pool Noodle Games With Younger Kids
- How to Pick the Right Pool Noodle Games for Kids
- Pool Noodle Games for Kids (all 19)
- Mistakes Parents Make the First Time
- Frequently Asked Questions
- Read Next
- Conclusion
What You Need Before You Start
Buy the wrong noodles and half this list stops working. Here is what actually matters.
Not All Pool Noodles Are the Same
Check for a hollow center. Look at the cut end in the store. Hollow noodles are the ones you need for croquet arches, hockey goals, the sprinkler, and the frisbee balance game, because those all rely on sliding something into the hole or pushing water through it. Solid-core noodles cannot do any of that.
Firm or squishy matters more than color. Dollar Tree noodles are thinner and softer. They are perfect for fish slices, sword handles, balloon paddles, and the obstacle course. They fold over on themselves for hockey sticks and buckle under a tennis ball on the engineering wall. For those two, spend the extra dollar on a firmer noodle like Walmart’s Play Day.
Diameter changes what fits. A standard noodle sliced lengthwise makes a channel that a Hot Wheels car fits in with a little room to spare. If your kid is into wider Matchbox trucks or big rubber balls, get the jumbo noodles instead.
How many to buy: six covers almost every game on this list. Ten to twelve if you are doing a party or an obstacle course plus a second game.
Supplies, and What to Use Instead
Everything below is either a dollar store item or something already in your house. A free or cheap swap is listed for every bought item.
| You need | Cost | Free or cheaper swap |
| Pool noodles | $1 to $3 each | End-of-season clearance, or ask a neighbor with a pool |
| Wooden skewers or chopsticks | $2 | Takeout chopsticks, tent stakes, golf tees for hard ground |
| Frisbees | $2 each | Paper plates, or plastic yogurt tub lids (they wobble more, which is funnier) |
| Hula hoops for goals and targets | $4 each | Laundry baskets, sidewalk chalk circles, two shoes as goalposts |
| Googly eyes | $2 | Sharpie dots, or paper circles with a marker dot |
| Magnetic jewelry clasps | $6 to $8 | Skip magnets entirely: bend a pipe cleaner into a hook and give each fish a pipe cleaner loop |
| Duct tape | $4 | Zip ties hold bent foam better than cheap tape anyway |
| Bowling pins | n/a | Empty water bottles, toilet paper tubes, red Solo cups |
| Stopwatch | n/a | Your phone |
| Hot glue gun | $6 | Cut a slit and wedge the piece in dry, friction holds surprisingly well |
Tools, and Who Is Allowed to Touch Them
A serrated bread knife is the only tool that cuts foam cleanly. Scissors chew it into a ragged mess and leave crumbs everywhere.
Adults only on the bread knife and box cutter. This is not a “let them help” step. Foam grabs the blade, then suddenly lets go, and the knife keeps traveling. Cut on a cutting board on a table, never on your lap or in your hand.
Hot glue guns: an adult does the gluing, or a kid 10 and up with you standing there. Use the low temperature setting, because hot glue on high will melt a dent straight into polyethylene foam.
Practical note: Cut every noodle you need for the whole summer in one sitting, outside, standing over an open trash bag. Foam crumbs hold static and stick to socks, dog fur, car seats, and the inside of your vacuum canister. You want to deal with that exactly once.
Safety Notes for Pool Noodle Games With Younger Kids
Foam feels harmless, which is exactly why parents skip this part. Five of these games have a real hazard in them, and it is almost never the noodle.
A pool noodle is a toy, not a life jacket. This is the big one. Never let a child who cannot swim rely on a noodle for flotation, even in shallow water, even with you nearby. They roll and slide out from under a kid in a second. The Consumer Product Safety Commission and drowning prevention groups are consistent on this: foam toys are not approved flotation devices, and a Coast Guard approved life jacket is the only thing that counts.
Balloons are the actual choking hazard, not the foam. Uninflated balloons and pieces of burst balloons are a choking and suffocation risk for children under 8. That applies to the Balloon Battle and the Water Balloon Race. Count your balloons out, pick up every scrap before anyone goes inside, and check the grass twice. If anyone in the group has a latex allergy, skip latex entirely.
Small foam pieces go in mouths. Any chunk under about 2 inches is mouth-sized for a toddler, and kids absolutely do bite noodles. The bite marks come off in crumbs. If you have a child under 3 in the yard, keep the cut pieces (fish, rockets, track sections) for supervised play only and count them back into a bag when you are done.
Strong small magnets are a serious swallowing hazard. The magnetic jewelry clasps in the fishing game are tiny and powerful. Two swallowed magnets can pinch through the gut wall and that is emergency surgery. Keep that game to ages 4 and up with an adult present, or use the pipe cleaner hook version with younger kids.
Blunt your skewers. Wooden skewers pushed into a lawn sit at exactly face height for a crawling baby or a kid who trips. Snip the sharp points off with kitchen shears first, push them in deep, and count every single one when you take the course down. Nobody wants to find one with a bare foot in August.
Rubber band launchers point up and out, never at a face. The Rocket Flinger fires soft foam, but a snapped rubber band and a wooden skewer are both eye hazards. That rule gets stated before the launcher gets handed over.
Water games mean wet grass, and wet grass is slick. Add shade, a water bottle, and shoes with grip. Bare feet plus a sprinkler on a slope is how you end up icing a chin.
How to Pick the Right Pool Noodle Games for Kids
Scan this, pick two, and hold the rest back for later in the week. Trying to run six games at once is how you end up with a yard full of foam and kids inside anyway.
| Game | Best ages | Prep + play | Mess | Supervision |
| 1. Balloon Battle | 3 to 10 | 5 min + 20 min | Low (balloon scraps) | Constant under 4 |
| 2. DIY Magnetic Fishing Game | 2 to 7 (build: 7+) | 35 min + 45 min | Medium (foam bits, glue) | Hands on to build |
| 3. Kickball Croquet | 4 to 12 | 10 min + 40 min | None | Check in |
| 4. Pool Noodle Bowling | 2 to 7 | 15 min + 25 min | Low | Check in |
| 5. Limbo | 4 to 12 | 0 min + 15 min | None | Light |
| 6. Obstacle Course | 3 to 11 | 20 min + 60 min | None | Check in |
| 7. The Standing Noodle Game | 6 to 14 | 2 min + 15 min | None | Light |
| 8. Relay Race | 5 to 12 | 5 min + 20 min | None | Light |
| 9. Frisbee Balance Race | 6 to 12 | 5 min + 15 min | None | Light |
| 10. Water Balloon Race | 4 to 11 | 20 min + 30 min | Wet, scraps to collect | Constant under 8 |
| 11. Foam Sword Fight | 3 to 10 | 5 min + 20 min | None | Hands on |
| 12. Pool Noodle Sprinkler | 2 to 10 | 10 min + 60 min | Soaked, muddy patch | Constant near water |
| 13. Rocket Flinger | 6 to 12 | 5 min + 15 min | None | Hands on |
| 14. Pool Noodle Hockey | 4 to 12 | 10 min + 40 min | None | Check in |
| 15. Horse and Unicorn Sticks | 2 to 7 | 20 min + open ended | Medium (yarn, glue) | Adult does glue |
| 16. Toy Car Race Track | 2 to 8 | 5 min + 45 min | Low | Check in |
| 17. Ring Toss | 3 to adult | 10 min + 30 min | None | Light |
| 18. Noodle Catapult | 4 to 10 | 3 min + 15 min | None | Hands on |
| 19. The Engineering Wall | 3 to 12 | 20 min + 60 min | Low | Check in |
“Check in” means glance over every few minutes. “Hands on” means you stay in the yard the whole time.
Pool Noodle Games for Kids
Every game below has been played in a regular backyard with no shade and one garden hose. Ages, timing, mess level, and what tends to go wrong the first time are listed for each one.
1. Balloon Battle

1. Balloon Battle
Ages: 3 to 10, sweet spot 4 to 8 | Prep: 5 min | Play: 15 to 25 min | Cleanup: 2 min | Mess: low | Supervision: constant under 4 | Cost: about $3
This is the one I reach for when I have five minutes of warning that the kids need something to do. Two foam paddles, one balloon, done. It is also a solid high-energy game for an impromptu playdate where you did not plan anything.
Why It Works
A balloon falls slowly, so even a 4 year old with terrible timing gets to make contact. That is the whole trick. Kids who lose at every ball sport can win at this one, and the soft foam means a wild swing that connects with a sibling’s arm is a non-event.
Materials & Costs
- 1 pool noodle, cut in half crosswise, $1 at Dollar Tree
- A pack of latex balloons, $2. Swap: a beach ball or a rolled sock ball works with no choking risk for toddlers
- A bread knife, adult use only
- Hula hoops for goals, optional. Swap: two shoes, or a chalk circle
Step-by-Step Instructions
- Cut one noodle in half crosswise, giving you two paddles roughly 20 inches long.
- Blow up one balloon and tie it off. Blow up two or three spares now, because one will pop.
- Hand a paddle to each player and set the rule: keep it off the ground.
- Count out loud as a group. Beating the last count keeps them going far longer than “who wins.”
Pro Tip
Wind kills this game. Anything more than a light breeze and the balloon sails into the neighbor’s yard on the first hit. Play early morning, in the garage, or in a corner of the yard with a fence on two sides.
Common Mistakes to Avoid
- Using water balloons instead of air-filled ones. They are too heavy for foam paddles and burst on the first contact.
- Leaving the noodle full length. A 5 foot paddle is unswingable for a small kid and they give up in a minute.
- Walking off to grab your phone. Under 4, you stay out there, because a popped balloon on the ground is a choking hazard within reach.
Adapt it down: for a 2 or 3 year old, drop the paddle and let them bat the balloon with their hands while an older kid uses the noodle.
Adapt it up: for 9 and older, add hula hoop goals at each end and play two on two.
The trade-off: almost zero prep, but you are on balloon patrol the whole time and the game ends the second the wind picks up.
2. DIY Magnetic Fishing Game
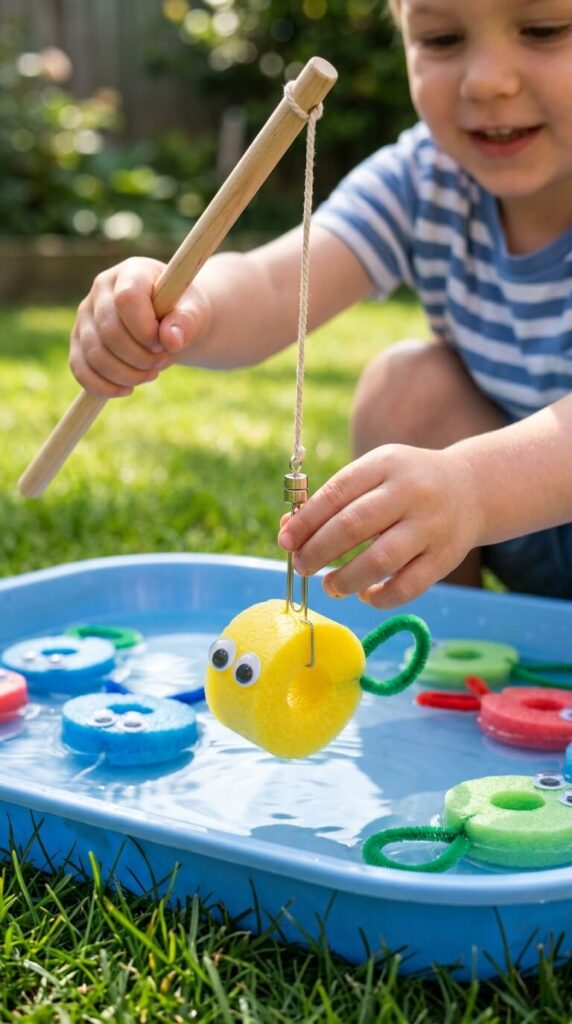
Ages: 2 to 7 to play, 7 and up to help build | Prep: 30 to 40 min | Play: 20 to 45 min | Cleanup: 10 min | Mess: medium, foam bits and hot glue | Supervision: hands on for the build, constant under 4 | Cost: $8 to $12 the first time, free after
This is the only craft-then-play project on the list, and it is worth the setup because it buys you a genuinely quiet 45 minutes. One noodle makes about 18 fish, which is more than any toddler needs.
Why It Works
Sliced noodle rounds look like fat little fish, and the magnet only grabs when the clasp lines up with the paper clip loop. That tiny alignment problem is what holds their attention. Toddlers get fine motor practice, and older kids get an actual lesson in why the magnet fails when the clip is buried too deep.
Materials & Costs
- 1 pool noodle, $1
- Paper clips, $1. Swap: a pipe cleaner loop and a pipe cleaner hook, no magnets needed
- Pipe cleaners for tails, $2. Swap: cut triangles from a cereal box
- Googly eyes, $2. Swap: Sharpie dots
- Magnetic jewelry clasps, lobster style, $6 to $8
- A wooden dowel or a marshmallow roasting stick, $3. Swap: a stick from the yard, a wooden spoon, or an unused curtain rod
- String, a box cutter, and a low temp hot glue gun
Step-by-Step Instructions
- Make the fish. Slice the noodle into rounds about 2 inches thick. Do this outside, the crumbs get everywhere.
- Add the clips. Cut a shallow slit in one flat side and push a paper clip in, leaving the loop sticking up above the foam. If it is flush, the magnet will not catch.
- Add tails. Slit the opposite side and wedge in a folded pipe cleaner. Friction usually holds it, a dot of glue makes it permanent.
- Add eyes. Adult glues, kid points at where they go.
- Build the rod. Tie two feet of string to the dowel, tie the other end to the magnetic clasp. Two feet, not four, or they will whip it around.
- Set up the pond. Scatter the fish on a blue towel, in a laundry basket, or in a shallow tray with an inch of water.
Pro Tip
Write numbers 1 to 10 on the flat bottoms with a Sharpie before you assemble. Catch two fish, add the numbers. It turns into a math game without anyone announcing that it is a math game.
Common Mistakes to Avoid
- Burying the paper clip flush with the foam. The loop must stick up or nothing connects and the kid quits in frustration.
- Using fridge magnets. They do not have the pull. Jewelry clasps or nothing.
- Slicing the rounds thinner than 1.5 inches. Thin slices lose their grip on the clip mid-game.
- Leaving them in water overnight. Paper clips rust and stain the foam orange, and rusty edges are sharper than you think.
Adapt it down: for a 2 year old, skip the magnets, skip the paper clips, and let them scoop the plain foam fish out of a water tray with a kitchen strainer.
Adapt it up: have a 7 or 8 year old build the whole set themselves, then run a timed catching contest.
The trade-off: the best attention span payoff on this list, but it is a 40 minute craft first, and the magnets and small parts mean it is not a walk-away activity with a toddler in the yard.
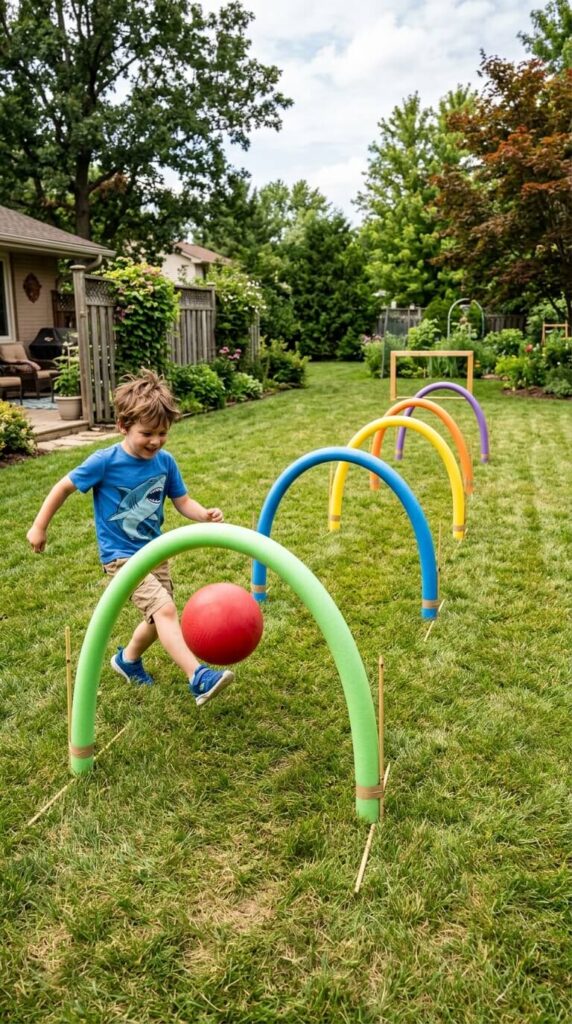
3. Kickball Croquet

Ages: 4 to 12 | Prep: 10 min | Play: 20 to 40 min | Cleanup: 5 min | Mess: none | Supervision: adult sets the stakes, then check in | Cost: about $7
Croquet, except you kick. Nobody has to learn a mallet swing, which is why this beats the real thing for kids under 8. It also stays up all afternoon once it is built, so you can start it and go make lunch.
Why It Works
The arches are huge and forgiving compared to real croquet wickets, so a 4 year old lands their shot often enough to stay interested. The strategy part sneaks in later, when someone realizes angling the kick off the side of the arch works better than powering it straight through. Pairs well with the rest of our classic lawn game lineup for a family cookout.
Materials & Costs
- 5 pool noodles, $5, must be hollow
- 10 wooden skewers or chopsticks, $2. Swap: takeout chopsticks, or tent stakes if your ground is hard
- 1 kickball or soccer ball, already owned
Step-by-Step Instructions
- Snip the sharp tips off the skewers first. Two minutes, worth it.
- Push two skewers into the grass 6 to 8 inches apart, angled slightly toward each other, deep enough to be stable.
- Bend one noodle into an arch and push the hollow ends down over the skewers.
- Repeat until you have 5 arches, then set them out in the pattern of the five dots on a die.
- Players take turns kicking the ball through the arches in order. First one through the whole course wins.
Pro Tip
Angling the skewers inward is what makes the difference between arches that stand all afternoon and arches that fall over on the second kick. The bent foam pulls against the angle and holds itself in tension.
Common Mistakes to Avoid
- Buying solid-core noodles. There is no hole to put the skewer in and the whole game is dead in the store.
- Spacing the arches too far apart, which turns it into a long walk instead of a game.
- Using a tennis ball. It sails straight through with no challenge. A standard playground kickball is the right size.
- Leaving skewers in the lawn afterward. Count them out, count them back in.
Adapt it down: for a 3 or 4 year old, let them carry the ball and roll it through by hand from a foot away.
Adapt it up: add the real croquet rule where hitting another player’s ball sends it backward. That single rule adds twenty minutes of arguing and laughing.
The trade-off: the sturdiest setup here and it survives multiple kids, but you are putting sharp skewers in the ground, so it is not a good pick if a crawling baby will be out there.
4. Pool Noodle Bowling
Ages: 2 to 7 | Prep: 15 min | Play: 15 to 25 min | Cleanup: 5 min | Mess: low | Supervision: adult does the gluing, then check in | Cost: about $3
This is the toddler game on the list. The foam lane acts as bumpers, so a 2 year old who rolls the ball sideways still knocks something down, and knocking things down is the entire point at that age.
Why It Works
Gutter balls are what make regular bowling miserable for little kids. Take those away and every roll produces a satisfying clatter. It is also the clearest cause and effect toy you can build for $3, and toddlers will reset the pins themselves over and over.
Materials & Costs
- 2 pool noodles, $2
- 10 empty plastic water bottles, recycled and free. Swap: red Solo cups, toilet paper tubes, or empty yogurt containers
- A medium rubber playground ball, already owned
- Low temp hot glue gun. Swap: duct tape across the seams on the outside
Step-by-Step Instructions
- Slice both noodles in half lengthwise with a bread knife, giving you four long half-pipe channels.
- Glue or tape them end to end into one continuous lane about 7 feet long. Line up the inside edges carefully.
- Set the lane on flat grass or a patio.
- Set up the bottles in a triangle at the end.
- Roll, cheer, reset. Repeat forty times.
Pro Tip
Put an inch of water in each bottle. Empty bottles blow over in a breeze before anyone bowls, and full bottles will not fall. An inch is the sweet spot.
Common Mistakes to Avoid
- A bump or gap where two pieces join. The ball hops the rail there every time. Run your finger along the seam and check it before you call the kids over.
- Using a basketball or anything heavy. It flattens the foam lane instead of rolling down it.
- Building it on a slope you did not notice. Every roll drifts to one side and toddlers get confused about why.
Adapt it down: for a 2 year old, shorten the lane to 3 feet and use 6 bottles. The wait to see what happens is too long otherwise.
Adapt it up: for a 6 or 7 year old, keep score across ten rolls, or make them roll from a distance without the lane and use it only as bumpers on hard shots.
The trade-off: cheap, quiet, and repeatable, but you are cutting and gluing for 15 minutes to build something a 7 year old will be bored of in ten.
5. Limbo

Ages: 4 to 12 | Prep: none | Play: 10 to 15 min | Cleanup: none | Mess: none | Supervision: light | Cost: $1
Zero setup. One noodle, two people holding it, and you have a game in about four seconds. This is my go-to filler when a party is between activities and the energy is about to turn.
Why It Works
The soft bar is what changes the game. With a broom handle, kids flinch and hold back. With foam, they commit, because bumping it costs nothing but a turn. Balance and flexibility improve fast when nobody is scared of the bar.
Materials & Costs
- 1 pool noodle, $1. Swap: a jump rope held loose does the same job
Step-by-Step Instructions
- Two adults or two taller kids hold the noodle horizontally at waist height, gripping it loosely.
- Line everyone up.
- Each player leans back and walks under without touching it or falling.
- After everyone goes, lower the noodle two inches.
- Touch it or fall and you are out. Keep lowering until one kid is left.
Pro Tip
Play music. It sounds like a small thing, but the rhythm is what gets the shy kid in line to take a turn. Any upbeat playlist works, and it pairs well with our water balloon toss games if you are running a full party rotation.
Common Mistakes to Avoid
- Gripping the noodle tight. Hold it loose so it drops away when a kid clips it, otherwise they get a surprise jolt and stop trying.
- Running it on a patio or driveway. Kids fall backward in this game. Do it on grass.
- Elimination rounds with a 4 year old. They are out first and done crying about it for the rest of the party. Play “everyone keeps going” instead.
Adapt it down: for preschoolers, skip elimination and let them crawl or duck under, not just lean back. Adapt it up: for 10 and older, add a rule that hands cannot touch the ground and no part of them can face forward.
The trade-off: the fastest game to start, but it is over in fifteen minutes and it does not work well with fewer than three kids.
6. Obstacle Course
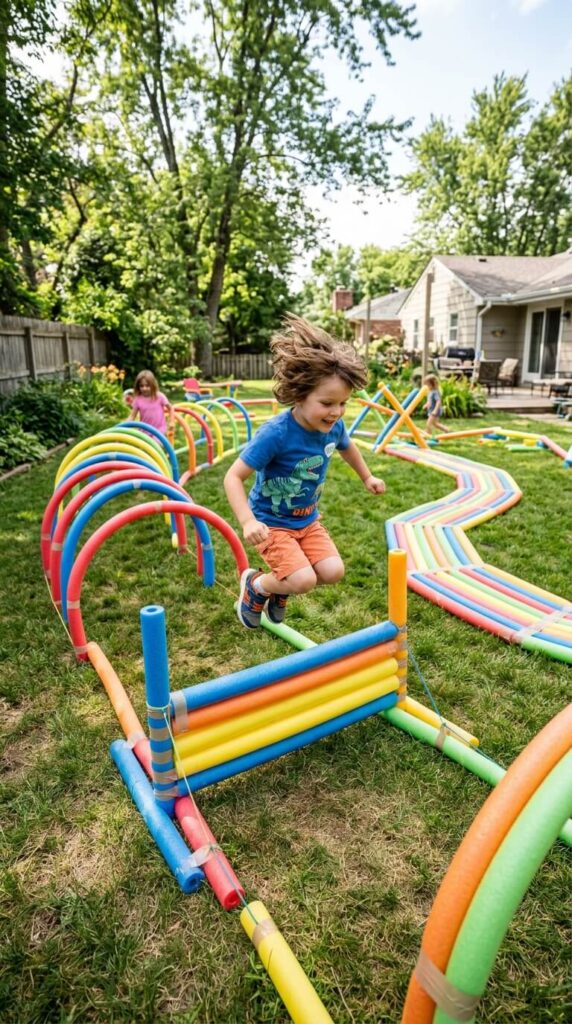
Ages: 3 to 11 | Prep: 15 to 20 min | Play: 30 to 60 min | Cleanup: 10 min | Mess: none | Supervision: check in every few minutes | Cost: about $8
Best time-invested-to-time-played ratio on this list. Twenty minutes of setup usually buys me an hour, sometimes two, because they keep re-running it to beat their own time.
Why It Works
Kids will run the same loop twenty times if there is a number attached to it. The stopwatch does most of the work here. Course memory, agility, and self-competition all come free, and the noodle stations are soft enough that a face-first trip into a hurdle is funny instead of a problem.
Materials & Costs
- 4 to 6 pool noodles, $6
- Wooden skewers or sticks, tips snipped. Swap: tent stakes
- Duct tape
- Your phone as a stopwatch
Step-by-Step Instructions
- The crawl: bend a noodle into an arch over two skewers pushed into the ground.
- The jump: balance a straight noodle across two Y-shaped sticks, or across two upside down buckets, to make a hurdle that falls easily.
- The balance: lay a noodle flat on the grass as a tightrope.
- The target: tape a noodle into a ring and hang it from a low branch to throw a ball through.
- Line the stations up in a clear path with room to run between them.
- Time each kid and write the times on the driveway in chalk.
Pro Tip
Do not rebuild the course when they get bored. Change the rules instead. Backward through the arch, one foot over the hurdle, eyes closed on the balance beam, and it is a brand new course for free.
Common Mistakes to Avoid
- Building a course too long for the age group. Four stations is plenty for a 4 year old. Eight is a slog.
- Hurdles that are actually stable. You want them to fall over when clipped. A rigid hurdle is how shins get bruised.
- Setting it up in the wind without weighting anything down. Light noodles blow across the yard before the first run.
- Building the whole thing yourself while they watch. Let them place two stations. They stay invested much longer.
Adapt it down: For a 3 year old, cut it to three stations, hold their hand on the balance beam, and skip the timer entirely. Adapt it up: For 9 and older, make it a two-lap course, or add a penalty of five push-ups for knocking anything over.
The trade-off: The longest playtime on this list, but it eats your whole supply of noodles and about 20 minutes of your own labor before anyone gets to run.
7. The Standing Noodle Game

Ages: 6 to 14 | Prep: 2 min | Play: 10 to 20 min | Cleanup: 2 min | Mess: none | Supervision: light | Cost: $4 to $12 depending on group size
This one needs a group and it needs coordination, so it is the best pick for a birthday party with older kids and useless for a solo 4 year old. Every round ends in either a dropped noodle or a shriek.
Why It Works
It is a reaction test that the whole group either passes or fails together, which means nobody gets singled out. Tension builds each round because the circle widens, and it takes about ten seconds to explain. Great icebreaker when kids do not all know each other yet.
Materials & Costs
- 1 pool noodle per player, $1 each. Swap: anything long that stands on end works, brooms and yardsticks included, but foam is the only version I would let them dive for
Step-by-Step Instructions
- Everyone stands in a tight circle on flat grass.
- Each player stands a noodle upright with one end on the ground and a palm resting on top.
- Leader counts “3, 2, 1, go.”
- On go, everyone lets go and steps clockwise to catch the next person’s noodle before it lands.
- If any noodle drops, the whole group resets.
- After a clean round, everyone takes one big step back to widen the circle.
Pro Tip
For athletic 10 to 14 year olds, start them much farther apart so they have to lunge or dive. Same game, completely different intensity, and it wears them out in a way the standard version does not.
Common Mistakes to Avoid
- Playing on a windy day. Hollow noodles tip over before anyone moves and the game never gets off the ground.
- Trying it with kids under 6. The timing is beyond most of them and the group resets get demoralizing.
- Using it with a kid who takes group failure hard. When one person drops it, everyone starts over, and that lands badly on some kids. Know your kid.
Adapt it down: For 5 and 6 year olds, let them keep one hand hovering and only step half a step. Adapt it up: widen the circle until they are sprinting, or make them switch direction on a called signal.
The trade-off: No prep and great for groups, but it needs four or more kids, a still day, and a certain amount of coordination, so it can flop hard with a mixed-age group.
8. Relay Race

Ages: 5 to 12 | Prep: 5 min | Play: 20 min | Cleanup: 2 min | Mess: none | Supervision: light | Cost: about $4
A regular relay race is just a speed contest, which means the fastest kid always wins and everyone else stops caring by round two. Balancing a frisbee on the noodle fixes that.
Why It Works
The balance element rewards control instead of raw speed, so the careful kid finally beats the fast kid. That single change is why this game keeps a mixed group of ages interested rather than sorting them into winners and losers in the first thirty seconds.
Materials & Costs
- 2 pool noodles, $2
- 2 cheap plastic frisbees, $2. Swap: paper plates or yogurt tub lids, which wobble more and are funnier
- A cone or marker. Swap: a shoe, a bucket, or a chalk X
Step-by-Step Instructions
- Split into two teams.
- Mark a start line and put a cone about 20 yards out.
- Give the first player a noodle held horizontally with a frisbee balanced flat in the center.
- On go, they walk or run to the cone, around it, and back without dropping the frisbee.
- Hand the noodle and frisbee to the next player.
- Drop the frisbee and you go back to the start line and run your leg again.
Pro Tip
For 4 and 5 year olds, make it speed walking only. The “go back and start over” rule is too harsh for that age, so change it to “pick it up where you dropped it and keep going.”
Common Mistakes to Avoid
- Heavy frisbees. A cheap light disc wobbles, and the wobble is the fun part.
- Letting kids hold the noodle with hands spread wide apart. That makes it too easy. Hands close together in the center.
- Running this with two kids. It needs at least four to feel like a race.
Adapt it down: for 4 and 5 year olds, cut the distance to 10 yards and let them use two hands on the frisbee if they need to.
Adapt it up: add two full circles around the cone before heading back, or make them switch hands halfway.
The trade-off: almost no prep and it evens out mixed abilities, but it needs a group and a decent stretch of open lawn.
9. Frisbee Balance Race
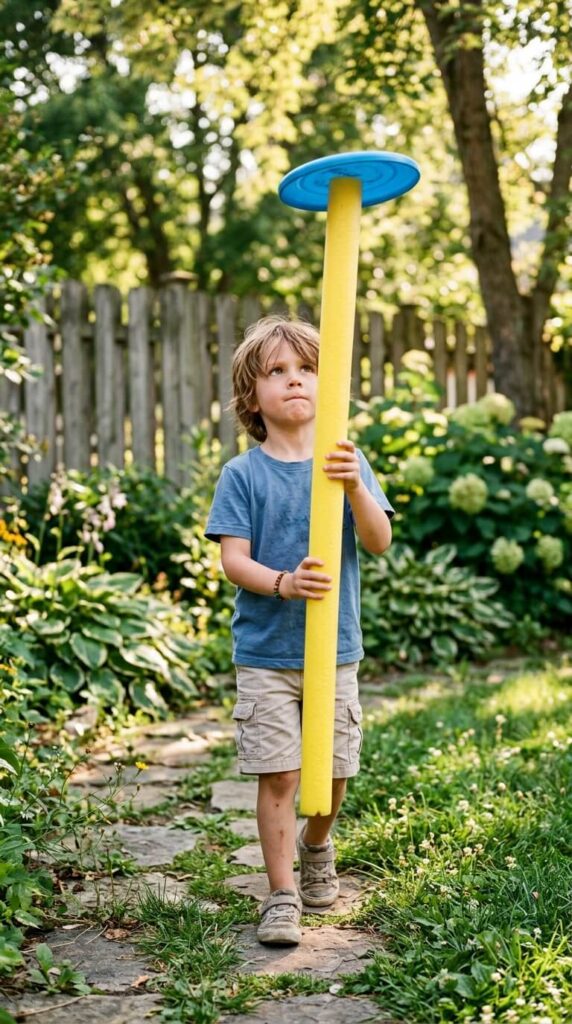
Ages: 6 to 12 | Prep: 5 min | Play: 10 to 15 min | Cleanup: 2 min | Mess: none | Supervision: light | Cost: about $4
Same idea as the relay, turned vertical and much harder. Balancing a frisbee on top of an upright noodle looks easy for about two seconds, which is exactly why older kids keep trying it.
Why It Works
Holding a noodle upright means the top end sways with every step, so the player has to make constant small corrections. Because the noodle is tall, they cannot cheat by cupping a hand over the disc. It is one of the few games here that a 12 year old finds genuinely difficult.
Materials & Costs
- 1 or 2 pool noodles, $2
- 1 or 2 light frisbees, $2. Swap: paper plates, which are actually harder in any breeze
- Cones to mark a path. Swap: shoes, water bottles, chalk marks
Step-by-Step Instructions
- Set a winding path with cones or markers.
- Player stands the noodle vertically, gripping it near the bottom like a staff.
- Balance the frisbee flat on the top opening.
- Walk the whole path without the frisbee falling.
- Run it as a timed solo challenge, or two kids side by side.
Pro Tip
Tell them to look at the frisbee, not their feet. Smooth gliding steps, no stopping and starting. The second they glance down, the disc goes.
Common Mistakes to Avoid
- Playing on a lumpy lawn. Hidden dips make it impossible and the kid decides the game is broken.
- Trying it with a 4 or 5 year old. The noodle is taller than they are and the frisbee is out of their sight line. Skip it.
- Running it with a kid who hates failing at things. This game is mostly failing. Some kids love that, some will throw the noodle.
Adapt it down: For a 5 or 6 year old, cut the noodle in half so the top is at their eye level. Adapt it up: for 10 and older, make them do it while walking backward, or race two at a time on a narrow path.
The trade-off: Almost no setup and a real challenge for older kids, but it is short, needs level ground, and frustrates younger or perfectionist kids fast.
10. Water Balloon Race

Ages: 4 to 11 | Prep: 20 min, mostly filling balloons | Play: 15 to 30 min | Cleanup: 10 min of scrap hunting | Mess: wet grass and balloon scraps | Supervision: constant under 8 | Cost: about $6
Two foam ramps, two water balloons, and a very loud finish line. Half physics experiment, half demolition derby, and the kids do not notice the physics part.
Why It Works
Kids will test the same variable forty times if the payoff is a possible pop. Ramp angle, balloon size, how hard they let go: they figure out which one matters by trial and error, and they get soaked either way.
Materials & Costs
- 4 pool noodles, $4
- Duct tape, Duck Brand or similar. Cheap tape lets go when wet
- Small water balloons, $2
- A porch step or lawn chair for elevation
Step-by-Step Instructions
- Duct tape two noodles end to end to make one 10 foot ramp. Tape the foam while it is dry.
- Do the same with the other two noodles for a second ramp.
- Prop the top ends on a porch step, a chair, or a stack of books so they slope down.
- Fill a batch of small balloons. Fill more than you think, they pop constantly.
- Two kids release at the same time. First balloon to the grass without popping wins.
Pro Tip
Angle the two ramps at clearly different steepnesses and ask them which one will win before they race. Steeper is faster but pops more often, and watching a 7 year old work that out on their own is the best part of this game.
Common Mistakes to Avoid
- Big balloons. They build up too much speed and explode on landing every time. Small and firmly filled roll better.
- Taping wet foam. The tape peels off in the middle of the race. Build it dry, then bring the water.
- Skipping the scrap hunt. Burst balloon pieces are a choking hazard for kids under 8 and they hide in grass. Walk the yard before anyone goes inside, and again before you mow.
Adapt it down: For a 4 year old, forget racing and just let them roll balloons down one ramp over and over.
Adapt it up: for 9 and older, make them measure the ramp height with a tape measure and record which angle gave the fastest unpopped run.
The trade-off: High excitement and real learning, but you spend 20 minutes filling balloons for 20 minutes of play, and you are picking rubber scraps out of the lawn afterward.
11. Foam Sword Fight

Ages: 3 to 10 | Prep: 5 min | Play: 10 to 30 min | Cleanup: none | Mess: none | Supervision: hands on | Cost: about $3
The most obvious use for a foam tube, and the one they will invent themselves within ten seconds of you handing one over. You may as well make it official and add a handle.
Why It Works
Rough and tumble play is a real developmental need, and this is the safest version of it I have found. Foam takes the sting out of a full swing to the arm or back, so they can go hard without anyone getting hurt.
Materials & Costs
- 2 pool noodles, $2
- Duct tape, silver or black, $4. Swap: any tape you already own, or skip the handle entirely
- A Sharpie for details
Step-by-Step Instructions
- Set the rules first, before anyone is holding a noodle. See the note below.
- Wrap the bottom six inches of each noodle in tight overlapping duct tape to make a handle.
- Repeat for the second sword.
- Mark a boundary in the yard so the duel stays where you can see it.
- Let them go.
Practical note: Hand out the rules before you hand out the swords. The instant a kid is holding a foam tube, they are not listening to you anymore. Three rules is enough: nothing above the shoulders, no jabbing with the end, and it stops when someone says stop.
Pro Tip
Silver duct tape on the handle plus a few Sharpie buttons gets you a passable lightsaber, and different colored tape makes teams for a bigger group battle. Kids care about which color they get far more than about the sword itself.
Common Mistakes to Avoid
- Skipping the no-headshots rule. Foam is soft, but a poke to the eye with the end of a noodle genuinely hurts and can scratch a cornea. This is the one rule I do not bend on.
- Giving them full length noodles. Five feet of floppy foam is unwieldy. A full noodle is fine for kids over 7, cut them in half for anyone smaller.
- Playing indoors near a lamp. Foam does not hurt kids, but a swinging noodle clears a shelf beautifully.
Adapt it down: For a 3 year old, use half a noodle and be the opponent yourself so you can control the intensity.
Adapt it up: For 8 and older, add a rule that a hit on the sword arm means switching hands, which slows the whole thing down and makes it a skill game.
The trade-off: instant fun, zero prep, and the one game most likely to end in tears if you walk away. Two kids who escalate each other should not be handed swords and left alone.
12. Pool Noodle Sprinkler
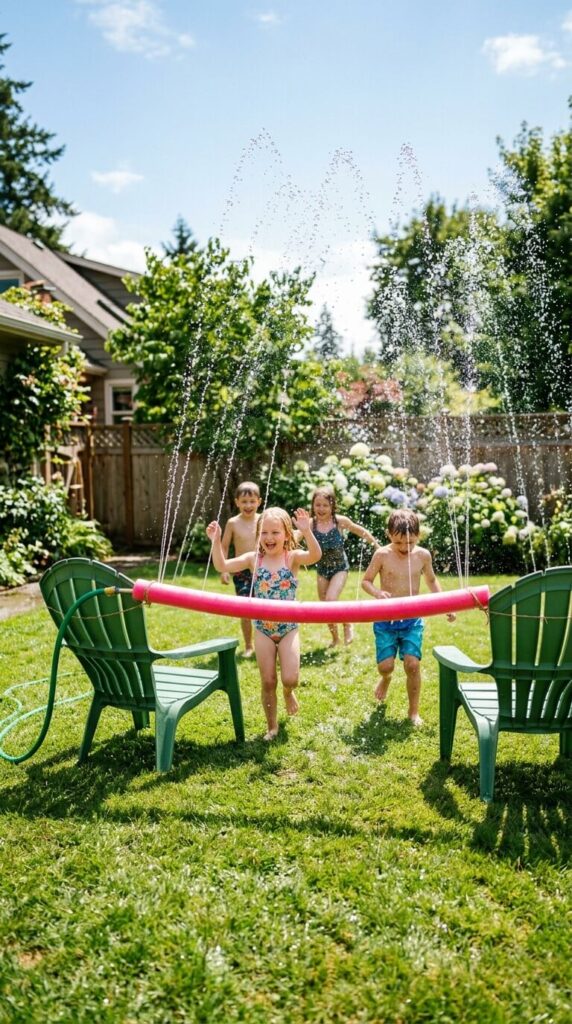
Ages: 2 to 10 | Prep: 10 min | Play: 30 to 60 min | Cleanup: 5 min | Mess: everyone soaked, one muddy patch of lawn | Supervision: stay outside, constant with toddlers near water | Cost: about $2
A store sprinkler toy runs twenty dollars and has hard plastic parts that hurt when a running kid lands on them. This version costs about two dollars, is entirely soft, and you control exactly where the water goes.
Why It Works
Instant relief on a hot day with nothing rigid to land on. You can lay it flat for toddlers to stomp through or hang it up as an arch for bigger kids to sprint under, which is rare for a $2 build.
Materials & Costs
- 1 pool noodle, hollow center required, $1
- A thin nail, skewer, or pen for the holes
- Duct tape
- Your garden hose
- Zip ties if you want to hang it, $1. Swap: shoelaces or twine
Step-by-Step Instructions
- Lay the noodle flat and poke 10 to 15 holes in a line along the top, spaced 2 to 3 inches apart. Push all the way through to the hollow center.
- Push the hose end firmly into one end of the noodle.
- Seal the far end with duct tape, wrapped tight.
- Turn the water on low first, then up. Low first tells you where it leaks before you soak yourself.
Pro Tip
Do not leave it on the ground. Zip tie it between two lawn chair backs or two low branches and you have a water arch they can run through instead of a puddle maker. Hung up, it holds their attention roughly three times as long.
Common Mistakes to Avoid
- Holes that are too big. Water dribbles instead of spraying. Use a thin nail, and start with fewer holes than you think, because you can always add more. You cannot un-poke one.
- A loose hose connection. Wrap the metal hose fitting in a few layers of duct tape first to thicken it, then push it in. Otherwise most of your water fountains out at the joint.
- Setting it up on the flattest part of the lawn. That spot becomes a mud pit in twenty minutes. Put it somewhere the water can run off, or over gravel.
- Cranking the pressure to full. The noodle whips around and flips over, and it startles small kids right out of the game.
Adapt it down: For a 2 year old, lay it flat on the grass at low pressure so it burbles instead of sprays. Adapt it up: for 8 and older, hang two of them facing each other to make a tunnel, and add a timed run through it.
The trade-off: Cheapest water play you will ever build, but the game only ends when the water goes off, everyone comes inside soaked, and you will have one muddy patch to explain.
13. Rocket Flinger
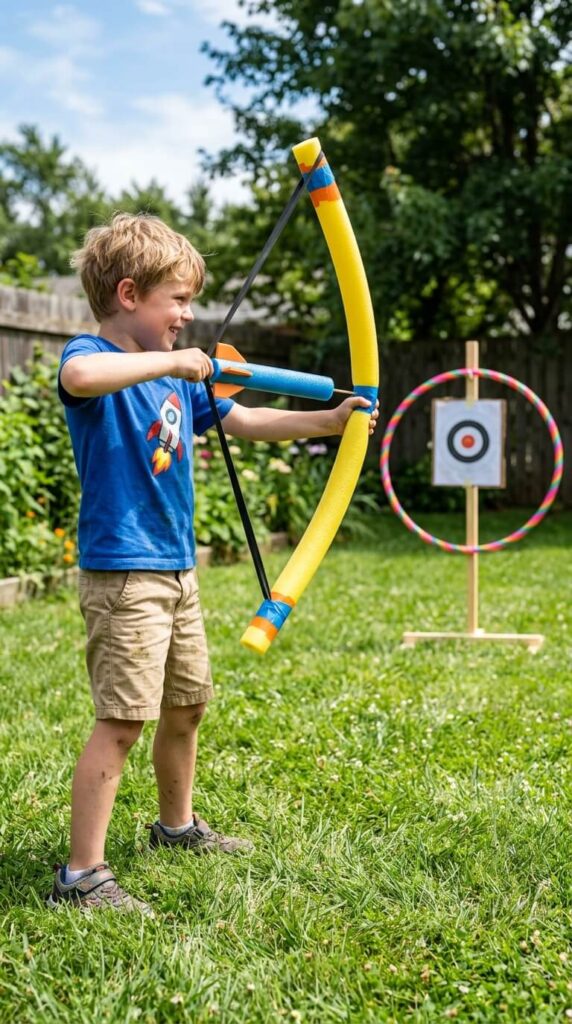
Ages: 6 to 12 | Prep: 5 min | Play: 15 min | Cleanup: 2 min | Mess: none | Supervision: hands on, adult in the yard | Cost: about $3
A foam bow that fires a foam rocket. This one gets the biggest reaction from the 7 to 10 crowd and it is the game on this list I supervise most closely.
Why It Works
Stored energy released all at once is fascinating at that age, and both the launcher and the projectile are soft foam. Kids get to fire something hard and far without any of it being made of plastic or wood.
Materials & Costs
- 2 pool noodles, $2
- 1 thick heavy duty rubber band or a length of bungee cord, $1
- Hula hoops for targets. Swap: laundry baskets, chalk circles, a cardboard box on its side
Step-by-Step Instructions
- Set the safety rule first: it points up and away from people, always.
- Bend one full noodle into a U shape.
- Loop a thick rubber band over both ends, stretched across the gap.
- Cut a 6 inch section off the second noodle. That is the rocket.
- Place the flat end of the rocket against the band, pull back, aim up and away, release.
Pro Tip
Give it structure or it becomes a game of shooting at each other within four minutes. Lay hula hoops flat at different distances, assign points, and keep score on the driveway in chalk.
Common Mistakes to Avoid
- Thin or old rubber bands. They snap under tension and a snapped band is an eye injury waiting to happen. Heavy duty only, and check it for cracks before each session.
- Letting kids aim at each other. Foam rocket or not, it goes fast and faces are at exactly the wrong height.
- Handing this to a 4 or 5 year old. The pull-and-release is a two-hand coordination job and they will let go early, straight into their own face.
Adapt it down: For kids under 6, let them load and you fire, or skip this one entirely.
Adapt it up: For 10 and older, have them test whether a longer rocket or a shorter one flies farther and keep a tally.
The trade-off: Big excitement for very little money, but this is the least walk-away-able game here. If you are not standing in the yard, put it back in the garage.
14. Pool Noodle Hockey

Ages: 4 to 12 | Prep: 10 min | Play: 20 to 40 min | Cleanup: 5 min | Mess: none | Supervision: check in, and set stick-height rules | Cost: about $6
Floor hockey without the shin guards. This is the game that has burned off the most energy in my yard, and it scales from preschoolers to competitive 12 year olds with one change.
Why It Works
Hard sticks and heavy pucks are why kids need pads for real hockey. Take both away and you can run a full game on grass in flip flops. Cardio, teamwork, and hand-eye coordination all show up on their own once you drop the ball in.
Materials & Costs
- Pool noodles, one for every two players, and firmer is better here, $2 to $6
- Wooden skewers for goals, tips snipped
- A beach ball or a lightweight rubber playground ball, already owned. Swap: a rolled sock ball for indoor or garage play
Step-by-Step Instructions
- Cut the noodles in half crosswise. Each half is one stick.
- Build two arch goals at opposite ends of the yard using the croquet method from game 3.
- Split into teams, one to four players per side.
- Drop the ball in the middle and play. Stick to the ball, ball through the arch, point scored.
- Set one rule before you start: sticks stay below the waist.
Pro Tip
The ball size is the difficulty dial. A big slow beach ball makes this hilarious and easy for 4 year olds. Swap in a small fast rubber ball and the same setup becomes a serious match for 12 year olds. Change nothing else.
Common Mistakes to Avoid
- Leaving the noodles full length. Five feet of foam is too floppy to control a ball. Half length is rigid enough to actually hit with.
- Using the cheapest thinnest noodles. They fold in the middle on contact. This is one of the two games worth buying a firmer noodle for.
- Not setting the stick-height rule. Foam is soft, but a stick swung at head height still catches somebody’s face.
Adapt it down: For a 4 year old, use a beach ball, no teams, and one goal that everybody scores in.
Adapt it up: For 10 and older, small ball, real goalies, and three minute periods.
The trade-off: The best energy-burner on the list, but it needs at least four kids and a reasonably flat lawn, and thin dollar store noodles will disappoint you.
15. Horse and Unicorn Sticks

Ages: 2 to 7 | Prep: 20 min | Play: open ended, often days | Cleanup: 5 min | Mess: medium, yarn scraps and glue | Supervision: adult does all the gluing | Cost: about $4
A craft that becomes a toy they keep. Ours lived in the yard for most of a summer and got dragged inside at bedtime more than once.
Why It Works
Little kids do not need a realistic prop, they need a hook for the story they are already telling themselves. A noodle with yarn hair is enough. It is light enough for a 2 year old to carry, and safe to swing wildly while galloping into furniture.
Materials & Costs
- 1 pool noodle, $1
- Yarn, $1. Swap: cut strips from an old t-shirt
- Googly eyes, $1. Swap: Sharpie dots, which honestly survive rain better
- Craft foam or cardboard for ears. Swap: a cereal box
- Low temp hot glue gun
Step-by-Step Instructions
- Pick which end is the head.
- Cut long strands of yarn and tie them in a tight knot around the noodle about six inches from the top for the mane.
- Adult hot glues two googly eyes near the top.
- Cut two triangles from craft foam or cardboard and glue them on as ears.
- For a unicorn, roll cardstock into a cone, tape it, and glue it to the top center.
- Kid holds it between their legs and gallops.
Pro Tip
Let them pick the noodle color, the yarn color, and where the eyes go, even if the eyes end up in a strange spot. The lopsided one they chose themselves is the one that survives the summer. The perfect one you made gets left in the grass.
Common Mistakes to Avoid
- Using Elmer’s or any liquid craft glue. It never bonds to the slick foam surface and the eyes fall off within an hour. Hot glue is the only thing that holds.
- Running the glue gun on high. High heat melts a visible dent in the foam and can make the eye sink in crooked.
- Letting a 3 year old near the glue gun because it is “just a craft.” Adults glue, kids place. No exceptions on this one.
Adapt it down: For a 2 year old, pre-tie the mane yourself and let them hand you the eyes.
Adapt it up: For a 6 or 7 year old, let them design a whole stable with names, a bridle made of ribbon, and a jump course out of the leftover noodles.
The trade-off: The longest lasting toy on this list, but it is 20 minutes of adult craft work with a hot glue gun, and it will not interest a kid over about 7.
16. Toy Car Race Track
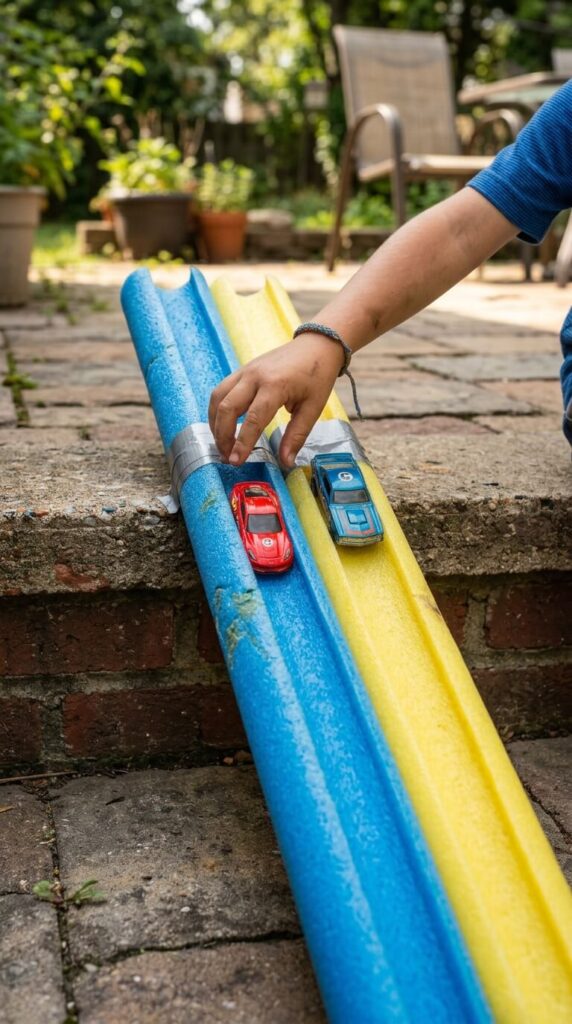
Ages: 2 to 8 | Prep: 5 min | Play: 20 to 45 min | Cleanup: 2 min | Mess: low, foam crumbs from the cut | Supervision: check in | Cost: $1
The fastest win on this entire list. One cut, one propped end, and you are done. If you only try one thing from this article with a toddler, make it this one.
Why It Works
No assembly, no batteries, no instructions. Gravity does everything, and the smooth foam channel keeps the cars from flying off the sides, which is the flaw in every DIY track made of cardboard.
Materials & Costs
- 1 pool noodle, $1
- Hot Wheels or Matchbox cars, already owned in quantity
- A bread knife, adult only
Step-by-Step Instructions
- Lay the noodle flat on a table.
- Slice it lengthwise down the middle, slowly, with a sawing motion. Two channels.
- Take one or both outside.
- Prop the top end on a porch step, a chair, or a stack of books. Rest the bottom on the driveway.
- Kids drop cars at the top and watch them go.
Pro Tip
Check the width before you buy. A standard noodle channel fits a Hot Wheels car with a little room to spare, but wider Matchbox trucks and monster trucks catch on the sides. If your kid is into the big ones, get the jumbo noodles.
Common Mistakes to Avoid
- Cutting with scissors. Scissors chew the foam into a bumpy ridge and the cars catch and flip on every run. A serrated bread knife gives you the smooth cut this needs.
- Too steep a slope. Cars launch off the end and land in the flowerbed. Start shallow and raise it.
- A cluttered landing zone. They want to see how far it rolls, so sweep the driveway first.
Adapt it down: For a 2 year old, lower the slope and put a shoebox at the bottom as a garage to roll into.
Adapt it up: For 6 to 8 year olds, set up four channels side by side for heats, add a jump between two sections, or time the runs and rank the cars.
The trade-off: The least effort for the most reliable payoff here, and the only downside is a driveway full of foam crumbs and cars.
17. Ring Toss

Ages: 3 to adult | Prep: 10 min | Play: 15 to 30 min | Cleanup: 2 min | Mess: none | Supervision: light | Cost: about $5
Carnival ring toss, scaled up so a 3 year old can play and still hard enough that the adults get competitive. This is the one that grandparents end up joining.
Why It Works
Big foam rings float and drift on the way to the target, so muscle memory from throwing a ball does not help. That levels the field between a 5 year old and an adult, and adults losing at a kids’ game is reliably funny.
Materials & Costs
- 2 to 4 pool noodles, $2 to $4
- Duct tape or hot glue, $4. Swap: zip ties, which hold bent foam better than any tape
- Targets: plastic bottles, traffic cones, or stakes. Swap: upside down buckets, chair legs, a garden stake
Step-by-Step Instructions
- Bend one noodle into a circle and bring the ends together.
- Secure the joint: hot glue and hold, or wrap it tightly with several layers of duct tape, or run two zip ties through both ends.
- Make 3 or 4 rings.
- Set targets at different distances. Bottles with an inch of water in them stay put.
- Mark a throwing line and take turns.
Pro Tip
Point values by distance keep this alive twice as long as just tossing rings. Close target 1 point, middle 3, far one 5, first to 20 wins. Write the scores in chalk so nobody can dispute them.
Common Mistakes to Avoid
- Cheap thin tape on the joint. Bent foam is under constant tension and weak tape pops open on the first landing. Wrap it tight, wrap it several times, or use zip ties.
- Trimming zip ties and leaving the sharp cut end sticking out. Snip flush and turn the nub inward, those edges scratch hands.
- Making the rings too small. A tight little ring is nearly impossible to land. A full noodle circle is the right size.
Adapt it down: for a 3 year old, let them stand two feet away and drop the ring over the target. Do not enforce a throwing line. Adapt it up: for older kids and adults, throw with your non-dominant hand, or add a target that only counts if the ring lands flat.
The trade-off: works across the widest age range on this list and stores flat, but the joints will eventually pop open and need re-taping every few sessions.
18. Noodle Catapult
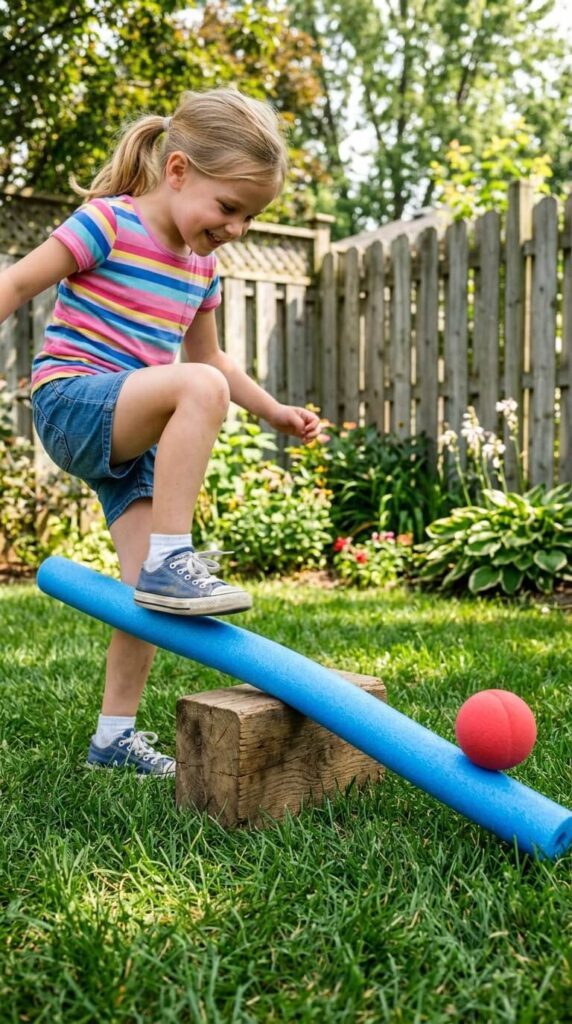
Ages: 4 to 10 | Prep: 3 min | Play: 15 min | Cleanup: 2 min | Mess: none | Supervision: hands on, soft projectiles only | Cost: $1
A noodle, a block, and something soft to launch. The physics lesson is real but what sells it is that they get to stomp on something and watch a ball fly.
Why It Works
Move the fulcrum, change the launch. Kids can see the relationship immediately, and they will spend fifteen minutes adjusting the block position without anyone telling them to experiment.
Materials & Costs
- 1 pool noodle, $1
- A fulcrum: a thick book, a wood block, or a tightly rolled towel. Swap: a shoe works fine
- Soft projectiles: foam balls, rolled socks, bean bags. Swap: a crumpled paper ball
- Buckets or laundry baskets as targets
Step-by-Step Instructions
- Put the fulcrum on flat ground.
- Balance the noodle across it.
- Put a soft projectile on the low end.
- Stomp or smack the raised end.
- Watch, adjust, repeat.
Pro Tip
A block about 4 inches tall is the sweet spot. Lower than that and the ball barely hops. Much higher and the noodle skids out from under the stomp instead of launching anything.
Common Mistakes to Avoid
- Using a magazine or anything thin as the fulcrum. There is not enough travel to generate lift and the game looks broken.
- Launching anything hard. No golf balls, no rocks, no toy cars. Soft only, and nobody stands in front of the launch end.
- Setting it up on grass that is too long. The noodle sinks into the grass and the stomp does nothing. Patio or short lawn.
Adapt it down: For a 4 year old, hold the noodle steady while they stomp, and use a big soft ball they can actually see land.
Adapt it up: For 8 to 10 year olds, mark bucket distances and challenge them to hit each one by moving only the fulcrum.
The trade-off: Three minutes of setup for a genuinely educational fifteen, but it needs a hard flat surface and a bit of stomping strength, so it falls flat for toddlers.
19. The Engineering Wall
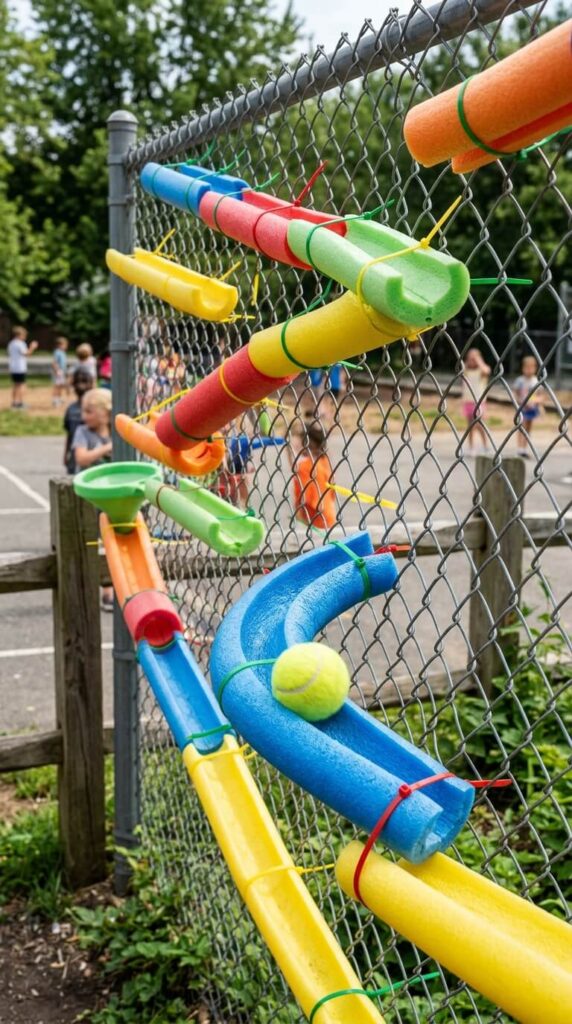
Ages: 3 and up to explore, 6 and up to build their own | Prep: 20 min the first time, 5 min to rearrange | Play: 30 to 60 min, longer if they keep redesigning | Cleanup: 5 min | Mess: low | Supervision: check in | Cost: about $5 | Group size: 1 to 4
Parents skip this one because it sounds like a classroom STEM project. It takes 20 minutes and about $5, and it is the only game here that occupies a kid who does not want to run around.
Why It Works
Everything else on this list is physical. This one is entirely a thinking game. They have to redesign the layout after every run, working out why the ball stalled on the flat section or shot off the corner. It is real problem solving, and because it comes apart in 30 seconds, they can build a brand new puzzle whenever they get bored of the old one.
Materials & Costs
- 2 pool noodles, firm ones, $2
- Large binder clips, chip bag clips, or long zip ties, $1 to $3
- A bread knife, adult only
- Tennis balls or golf balls
- A chain-link fence or a wooden deck railing
Step-by-Step Instructions
- Slice both noodles in half lengthwise, giving you four channels.
- Cut those into different lengths: a few 8 inch pieces, a few 12 inch, a couple of 24 inch. The variety is what makes the puzzle interesting.
- Take the pieces and your clips out to the fence.
- Attach them to the fence. Zip ties thread through the chain link and wrap around the foam. Binder clips just clamp onto the wire.
- Arrange them top to bottom as a path with drops, curves, and gaps.
- Drop a tennis ball at the top and watch what happens.
Pro Tip
Build one simple zigzag with them first and let the ball make it all the way down before you let them get creative. Once they have seen it work, they will spend an hour making it complicated. If the first attempt fails, most kids decide the whole idea does not work and walk off.
Common Mistakes to Avoid
- Squishy dollar store noodles. They buckle under a tennis ball and the channel collapses. This is the one project where the firmer noodle matters most.
- Light plastic balls or marbles. Plastic balls stall on the curves, marbles are too fast to follow and get lost in the grass.
- Leaving zip tie ends long and sharp at kid height. Snip them flush.
- Building it all yourself. The building is the game. If you hand them a finished track, you have made a toy instead of a puzzle.
Adapt it down: For a 3 year old, build the track yourself and let them be the one who drops the ball and collects it at the bottom. Adapt it up: For 8 and older, challenge them to make the ball travel as slowly as possible without stopping, which is much harder than making it fast.
The trade-off: The best quiet, independent, screen-free activity here, but it needs a chain-link fence or railing and firmer noodles, so it is not a spontaneous pick.
Mistakes Parents Make the First Time
These are the ones I made, not generic advice.
Cutting noodles before deciding what you are playing. You cannot un-cut a noodle. Read the list, pick two games, then cut only what those need. I sliced five noodles lengthwise for car tracks one June and then had nothing left to bend into croquet arches.
Buying all dollar store noodles. Perfect for fifteen of these games, wrong for hockey sticks and the engineering wall. Buy four cheap ones and two firm ones and you are covered.
Setting up five games at once. The yard looks incredible and they cycle through all of it in twenty minutes, then it is over and you have a foam-covered lawn to clean. Two games out, the rest in the garage.
Running the craft games in the late afternoon. Magnetic fishing and unicorn sticks need patience, and nobody has patience at 4pm on a hot day. Those are morning projects.
Handing out the noodles before explaining the game. Rules first, foam second. Every single time.
Building everything yourself. The kid who helped build the obstacle course runs it fifteen times. The kid who was handed a finished course runs it twice.
Ignoring the wind. Balloon Battle, the Standing Noodle Game, and any hurdle setup all fall apart in a breeze. Check before you commit twenty minutes to it.
Leaving them outside all season. UV makes foam brittle and chalky, and it starts shedding colored dust on everyone’s hands. A deck box or a corner of the garage doubles their life.
Frequently Asked Questions
Are pool noodles safe for toddlers to play with?Uncut pool noodles are about as safe as toys get for toddlers: soft polyethylene foam, non-toxic, and light enough that getting hit with one is a non-event. The hazards are the add-ons, not the noodle: cut pieces smaller than 2 inches, balloons, and magnetic clasps all need an adult in the yard. Also keep in mind that toddlers bite foam, and the bite marks come off in crumbs.
Can my kid use a pool noodle as a float in the pool?No. A pool noodle is a toy, not a flotation device, and it rolls out from under a child in a second. For a kid who cannot swim, use a Coast Guard approved life jacket and stay within arm’s reach, no matter how confident they seem with the noodle.
How do you cut pool noodles cleanly without making a mess?A serrated bread knife with a slow sawing motion is the only tool that cuts foam smoothly. Cut outside, standing over an open trash bag, because the crumbs hold static and stick to clothes, dog fur, and car seats. A box cutter is better for small slits, like the ones in the fishing game, and both tools are adults only.
How do I get foam crumbs and duct tape residue off the carpet and the lawn?For carpet, skip the vacuum first and go over it with a lint roller or a wide strip of packing tape, because the static makes the crumbs skate away from a vacuum nozzle. On the lawn, wait for the grass to dry and rake gently, or just leave it, foam bits break down and disappear after a couple of mows. Sticky tape residue on foam never comes off cleanly, so plan on that piece staying taped.
How long do these DIY pool noodle games typically last?Whole uncut noodles used for limbo, hockey, or the obstacle course last for years if you store them out of the sun. Cut, taped, or glued projects like the car track and the sword handles usually give you a few weeks of hard play, and replacing them costs a dollar.
Can I leave the pool noodle games set up outside in the sun?Better not to. UV breaks the foam down, so it goes brittle, fades, and flakes into colored dust that gets on everyone’s hands. Store the pieces in a garage, a deck box, or any shaded spot between sessions and they will last several summers instead of one.
Read Next
If the sprinkler and the water balloon race went over well, our full list of water balloon games for kids is the natural next step for the next hot afternoon, and most of them use supplies you already bought for this list.
And for the days when you have nothing at all, not even a noodle, outdoor games with zero equipment needed covers the ones you can start empty-handed in a park or a parking lot.
Conclusion
Start with the toy car track and the balloon battle. Between them you will spend about six minutes and one dollar, and you will know within ten whether your kids are in the mood to build things or in the mood to run around. Everything else on this list branches off from that.
Next time you are near a Dollar Tree, throw six noodles in the cart and put them in the garage. The whole point is that they are already there on the morning you need them, and you are not driving anywhere at 9:40 with two bored kids in the back seat.