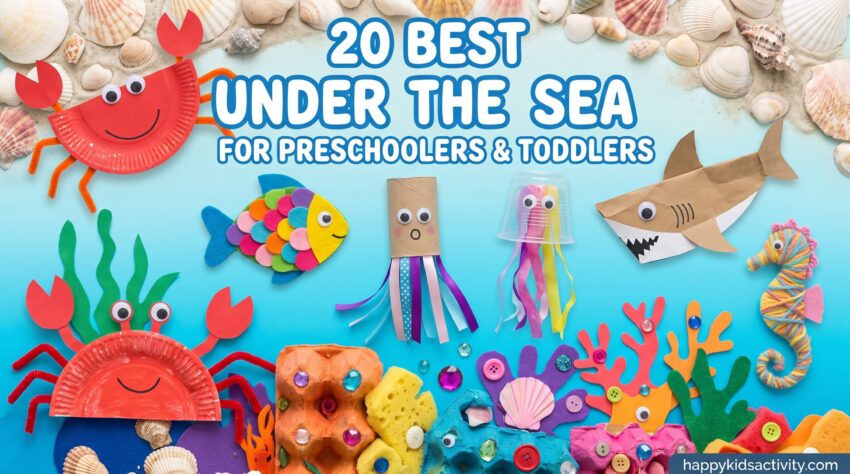
The rain started Thursday night, and by Saturday morning we were done. Nemo had been watched twice. The couch cushions were on the floor. Someone asked for a tablet before 8am.
Under the sea crafts for preschoolers saved that morning. I tipped the recycling bin onto the table, grabbed a paper plate and blue paint, and said we were making a jellyfish. That bought me forty minutes.
That is the real appeal here. Your kid is already obsessed with sharks, crabs, or whatever fish they pressed their face against at the aquarium, and most of the supplies are things you were about to throw out.
Below are 20 of them. For each one you get the ages it actually works for, how long it really takes (including the drying time nobody mentions), how messy it gets, and what goes wrong the first time. Skip whatever doesn’t suit your kid today. That is the point.
I’m updating this in early September, which is when the 4pm to 6pm stretch starts getting long again and the weather stops helping.
The Under the Sea Crafts for Preschoolers That Actually Work
The best under the sea crafts for preschoolers use what you already have at home: paper plates, cardboard tubes, old CDs, coffee filters, and washable paint. For toddlers under 3, stay with painting and printing crafts like the paper plate jellyfish, bubble wrap pufferfish, or celery stamped coral reef, because they involve no small parts and take 10 to 20 minutes of active time. Kids aged 3 to 5 can handle multi-step builds like the egg carton crab or the contact paper suncatcher fish bowl, which run 20 to 30 minutes plus drying time.
Before You Start: Supplies, Budget Swaps, and Safety Basics
You do not need a craft cupboard. This base kit covers about 15 of the 20 projects, and nearly every item has a free swap.
| Item | Where I get it | Free or cheap swap |
| Washable paint | Crayola Washable Kids Paint, or Crafter’s Square at Dollar Tree | Washable markers or crayons for a zero-mess version |
| Paper plates | Dollar Tree, 20+ for around a dollar | Cereal box cardboard, coffee filters, pizza box lids |
| Liquid glue | Elmer’s School Glue | Flour and water paste, equal parts, stirred smooth (paper only) |
| Googly eyes | Dollar Tree craft aisle | Marker dots, hole-punched paper circles, sticker dots with a pen dot |
| Tissue paper | Dollar Tree gift bag aisle | Last birthday’s gift tissue, magazine pages, foil candy wrappers |
| Pipe cleaners | Dollar Tree | Rolled paper strips, or paper straws cut in half |
| Child-safe scissors | Fiskars blunt-tip kids scissors | Let them tear instead, which builds hand strength anyway |
| Contact paper | Con-Tact brand, hardware store or Amazon | An opened laminating pouch, or wide packing tape laid sticky side up |
| Plastic tablecloth | Dollar Tree | An opened trash bag, newspaper, or an old bedsheet |
| CDs, cardboard tubes, bubble wrap, egg cartons, coffee filters, dry pasta | Already in your house | Already free |
Tip: buy one thing only if you buy nothing else, and make it washable paint. Craft-aisle acrylic is cheaper per bottle and it will permanently mark your table, your kid’s shirt, and the grout.
Safety, in plain terms
This is the part I will not soften, because these are little kids and most of these hazards are the boring, easy-to-forget kind.
- Small parts. Googly eyes, sequins, foil confetti, craft gems, aquarium gravel, dry pasta, and small plastic sea animals are choking hazards for any child under 3 and for older kids who still mouth things. Swap in marker dots and tissue paper instead.
- Food-based materials. Play dough and dry pasta both contain wheat. Play dough is also very salty, so a serious mouthful is a genuine problem for a toddler and dangerous for dogs. Celery is a recognized allergen. Shaving cream is not food safe and it stings eyes.
- Adult-only steps. Cutting slits in cardboard tubes, cutting the base off an oatmeal container, poking holes in egg cartons, hot glue guns, craft knives, spray sealer, and anything involving a wire coat hanger. Do these before you call your child to the table.
- Paint on skin. Only washable tempera goes on hands and feet. Acrylic and craft paint are not skin paints.
- Anything you hang. Never hang a mobile, jellyfish, or windsock with string above a crib, bed, or changing table, and keep the cord out of reach of a standing toddler. Strings and small necks are a bad combination.
Practical note: the thing that ruins a craft afternoon in my house is not mess, it is drying time. Check the wait column in the table below before you start. If bedtime is 30 minutes away, pick the suncatcher fish bowl or the play dough tray, not anything involving glue.
Pick a Craft in 30 Seconds
Scan this, pick one, close the tab. Active time is the part you supervise. Wait time is drying, and it is the reason a “quick” craft eats an afternoon.
| Craft | Best ages | Mess | Active time | Wait time |
| 1. CD Rainbow Fish | 3 to 5 | Medium | 15 min | 1 hour |
| 2. Wiggly Paper Plate Jellyfish | 18 months to 5 | Medium-high | 20 min | 30 to 60 min |
| 3. Bubble Wrap Printing Pufferfish | 2 to 5 | High | 15 min | 20 min |
| 4. Suncatcher Fish Bowl | 18 months to 5 | Very low | 20 min | None |
| 5. Clothespin Dolphin | 3 to 5 | Low | 10 min | 30 min |
| 6. Toilet Roll Octopus | 2 to 5, adult cuts | Medium | 15 min | 30 min |
| 7. Pasta Shell Sea Turtle | 3 to 5 | Medium | 20 min | 1 hour |
| 8. Celery Stamped Coral Reef | 18 months to 5 | High | 20 min | 30 min |
| 9. Handprint & Footprint Mermaid | 6 months to 5 | High | 10 min | 1 hour |
| 10. Paper Bag Shark Puppet | 3 to 5 | Low-medium | 20 min | 20 min |
| 11. Coffee Filter Watercolor Medusa | 2 to 5 | Low-medium | 15 min | 30 to 60 min |
| 12. Egg Carton Crab | 3 to 5, adult pokes holes | Medium | 15 min | 30 min |
| 13. Rock Pool Creatures | 2 to 5 | Medium, stains | 25 min | 1 hour, overnight if sealed |
| 14. Ocean in a Bottle Sensory Jar | Adult builds, any age plays | Low | 10 min | 2 min |
| 15. Paper Chain Octopus | 4 to 5 | Low | 30 to 40 min | 20 min |
| 16. Puffy Paint Starfish | 3 to 5 | High | 20 min | Overnight |
| 17. Fish Scale Collage | 18 months to 5 | Low-medium | 25 min | 20 min |
| 18. Swimming Fish Mobile | 3 to 5, adult assembles | Low | 25 min | None |
| 19. Underwater Play Dough World | 18 months to 5 | Low-medium | 5 min setup, 20 to 45 min play | None |
| 20. Fish Windsocks | 2 to 5, adult cuts | Medium | 25 min | 30 min |
Best Under the Sea Crafts for Preschoolers
1. CD Rainbow Fish
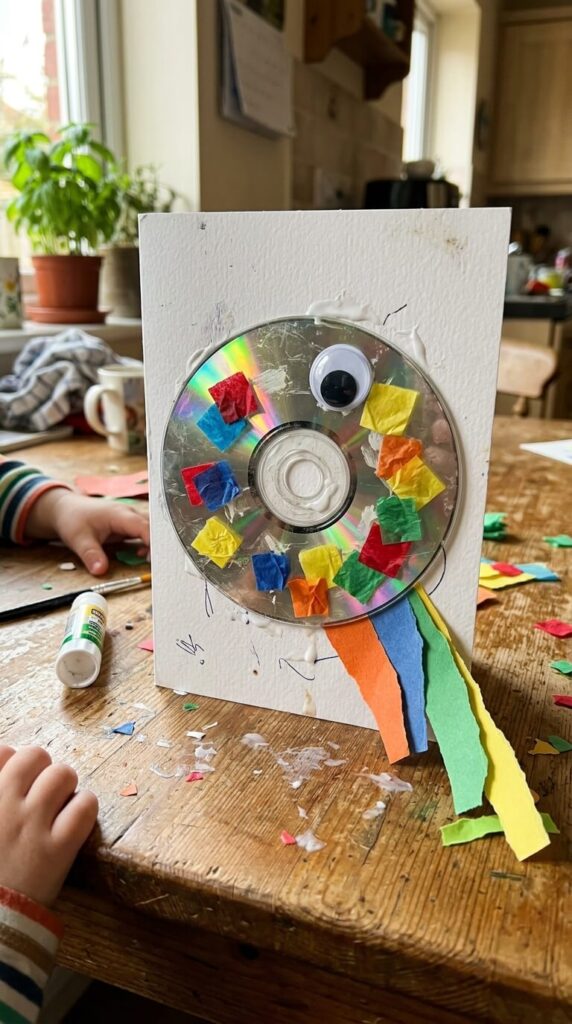
Do not throw out those scratched CDs. The mirrored side looks more like fish scales catching the light than anything you could paint on, and in a sunny window it throws rainbows on the wall, which is the part kids care about.
Ages: 3 to 5 · Time: 15 min active, 1 hour drying · Mess: Medium (glue) · Supervision: Hands on for the first two steps, then check every few minutes
Materials Needed
- Old CD or DVD (free, or a cardboard circle wrapped in aluminum foil)
- Heavy cardstock in various colors (a cereal box works)
- Liquid school glue (Aleene’s Original Tacky Glue grips far better here)
- Large googly eyes (or a black marker dot on a white sticker)
- Colorful tissue paper cut into small squares (old gift tissue, foil wrappers)
- Child-safe scissors
How to Create
- Cut one large triangle for the tail and two smaller ones for the fins.
- Glue the tail and fins to the dull label side of the CD so they poke out past the edge. Press for a slow count of ten.
- Flip it over, shiny side up, and glue on the googly eye. Cover the center hole with it if you can.
- Have your child dot glue across the shiny surface and press the tissue squares down like scales.
- Leave it flat for an hour before you hang it.
Tip: School glue slides right off that lacquered shiny side, and the tissue paper slowly migrates into one wet clump at the bottom. Tacky glue or a glue stick fixes it. So does waiting one minute for the glue to get sticky before the tissue goes on.
Safety: CDs snap into sharp shards, so this one is not for a child who bites or bends things. Adults handle any cutting or trimming of the disc.
2. Wiggly Paper Plate Jellyfish

The one I always fall back on. Big sweeping brush strokes suit toddler arms, there is nothing to get wrong, and the tentacles move every time the heating kicks on.
Ages: 18 months to 5 · Time: 20 min active, 30 to 60 min drying · Mess: Medium-high · Supervision: Hands on while painting
Materials Needed
- Standard paper plates (Dollar Tree)
- Washable tempera paint or markers (Do A Dot Art markers if you want near-zero mess)
- Paintbrushes
- Googly eyes
- Crepe paper streamers or colorful ribbons (cut strips from a plastic tablecloth, or braid yarn)
- Clear tape and liquid glue
How to Create
- Turn the plate upside down so the domed side faces up.
- Let your toddler paint or color the whole surface, any colors they like.
- Once dry, glue two googly eyes to the middle.
- Cut long strips of crepe paper or ribbon. Flip the plate and tape them around the inside rim.
- Punch a hole at the top, thread yarn through, and hang it.
Tip: thin dollar-store plates warp and curl the second wet tempera hits them. Go light on the paint, use the sturdier plates, or hand over markers instead. Curling ribbon also survives damp hands better than crepe paper, which bleeds dye onto fingers.
Safety: Hang it away from cribs and beds, and keep the yarn short.
3. Bubble Wrap Printing Pufferfish

Save the packing material from your deliveries. This is printmaking for people who cannot yet hold a pencil, and the texture it leaves comes out looking like a spiny pufferfish.
Ages: 2 to 5 · Time: 15 min active, 20 min drying · Mess: High · Supervision: Hands on
Materials Needed
- Bubble wrap (the small 3/16 inch bubbles print much better than the big ones)
- Yellow and brown washable paint
- Thick construction paper
- Paintbrushes (a foam brush is better)
- Black marker
- Child-safe scissors
How to Create
- Cut the bubble wrap into a medium circle.
- Have your child roll an even layer of yellow paint over the bubbly side.
- Flip it onto the paper and press down all over with flat palms.
- Peel it straight up, not sideways.
- Once dry, add fins, a tail, and a grumpy face with the marker.
Tip: Two things wreck this print. Too much paint fills the gaps between bubbles so you lose the dots, and lifting sideways smears the whole thing into mush. Say “press, then lift up like a sticker” before they touch it. Work inside a baking sheet to catch the overspill.
Safety: Loose sheets of plastic film need to stay away from babies and out of reach afterwards. Big bubbles also pop and spit paint, which is exactly at eye height for a toddler.
4. Suncatcher Fish Bowl

This is the mess-free one. If you want a craft that does not require you to change anyone’s clothes, it is this one, and it holds attention longer than it has any right to.
Ages: 18 months to 5 · Time: 20 min active, no drying · Mess: Very low · Supervision: Check in every few minutes
Materials Needed
- Clear contact paper (Con-Tact brand, or an opened laminating pouch)
- Blue construction paper
- Pre-cut tissue paper squares
- Sequins and foil confetti (skip both for under 3s)
- Scissors
- Tape
How to Create
- Cut a thick fishbowl outline from the blue paper.
- Peel the backing off a slightly larger piece of contact paper and stick the outline onto it.
- Tape it to the window or table, sticky side facing your child, with painter’s tape on all four edges.
- Let them press tissue squares, sequins, and confetti into the sticky middle.
- Seal it with a second piece of contact paper, smooth out the bubbles, and trim.
Tip: The sticky side collects everything. Lint, hair, one cracker, a strand of the dog. Also expect them to peel the whole sheet off the window at least once, so tape it properly the first time and keep spare tape within reach.
Safety: Sequins and foil confetti are choking hazards. For a child under 3 or a determined mouther, use tissue paper only and stay at the table.
5. Clothespin Dolphin

Heavy on fine motor skills, specifically the pincer grasp that later turns into pencil grip. The finished dolphin clips shut, so it earns its keep on the fridge or a snack bag.
Ages: 3 to 5 · Time: 10 min active, 30 min drying · Mess: Low · Supervision: Hands on for gluing
Materials Needed
- Wooden clothespins, spring-loaded (Dollar Tree, bag of 50)
- Gray acrylic paint (Apple Barrel is about a dollar a bottle)
- Paintbrushes
- Gray cardstock
- Small googly eyes
- Liquid glue
How to Create
- Paint the flat wooden faces of the clothespin gray, keeping paint off the metal spring. Dry fully.
- Cut a dolphin shape from the cardstock, roughly a curved banana with a dorsal fin and a tail.
- Glue on a small googly eye.
- Run a thin line of glue along the top edge of the pin and press the dolphin on.
- Let it set, then squeeze the pin to make the mouth snap.
Tip: If paint gets into the hinge and dries, the clip stops clipping. That is the whole appeal gone. Paint the sides, not the spring.
Safety: The spring pinches small fingers, cheap pins splinter, and this uses acrylic paint, which does not come out of clothing. Old shirt, non-negotiable.
6. Toilet Roll Octopus

Proof to a preschooler that the recycling bin is a toy box. Cheap, fast, and the curled legs make it stand up on a shelf like a real thing.
Ages: 2 to 5, with an adult cutting · Time: 15 min active, 30 min drying · Mess: Medium · Supervision: Hands on
Materials Needed
- Empty toilet paper rolls (or a paper towel tube cut into thirds)
- Brightly colored washable paint
- Paintbrushes
- Child-safe scissors
- Googly eyes
- Liquid glue
How to Create
- Paint the outside of the tube and let it dry completely.
- Once dry, an adult cuts eight slits from the bottom edge up to about three quarters of the way.
- Fold the strips outward.
- Wrap each strip around a pencil and slide it off to curl it. This is the bit kids like.
- Glue two googly eyes onto the uncut top.
Tip: Paint first, cut second. Wet cardboard tears, and if you cut the legs first they flop around while you are trying to paint. Also, kids’ scissors do not really cut cardboard tubes, so do not set your child up to fail on step two.
Safety: The slits are an adult job with proper scissors. Googly eyes are a choking hazard, so keep the packet off the table if you have a younger sibling crawling around.
7. Pasta Shell Sea Turtle

Mixed textures hold a preschooler’s attention longer than flat paper does, and a jumbo pasta shell makes a convincing turtle back with zero sculpting skill required.
Ages: 3 to 5 · Time: 20 min active, 1 hour drying · Mess: Medium · Supervision: Hands on
Materials Needed
- Large jumbo pasta shells, the kind sold for stuffing (Barilla or store brand)
- Green and brown washable paint
- Paintbrushes
- Green construction paper
- Liquid school glue (tacky glue holds better)
- Black marker
How to Create
- Let your child paint the ridged outside of a dry shell green and brown. Set it aside.
- Draw a turtle body on the green paper: head, four flippers, small tail.
- Cut it out, or let them cut if they are ready.
- Draw a face on the head with the marker.
- Put a thick puddle of glue in the middle of the body and press the painted shell into it. Hold for 30 seconds.
Tip: Painted pasta is heavier than it looks and it pops straight off a glue stick or thin school glue once everything dries. Tacky glue, or one adult-applied dot of hot glue, is the difference between a turtle and a turtle plus a loose shell. Buy an extra handful of shells too, because at least one gets crushed.
Safety: Dry pasta is a choking hazard and contains wheat, so keep it away from mouthers and from any child with a wheat allergy. Painted pasta is not food, and it looks a lot like food.
8. Celery Stamped Coral Reef
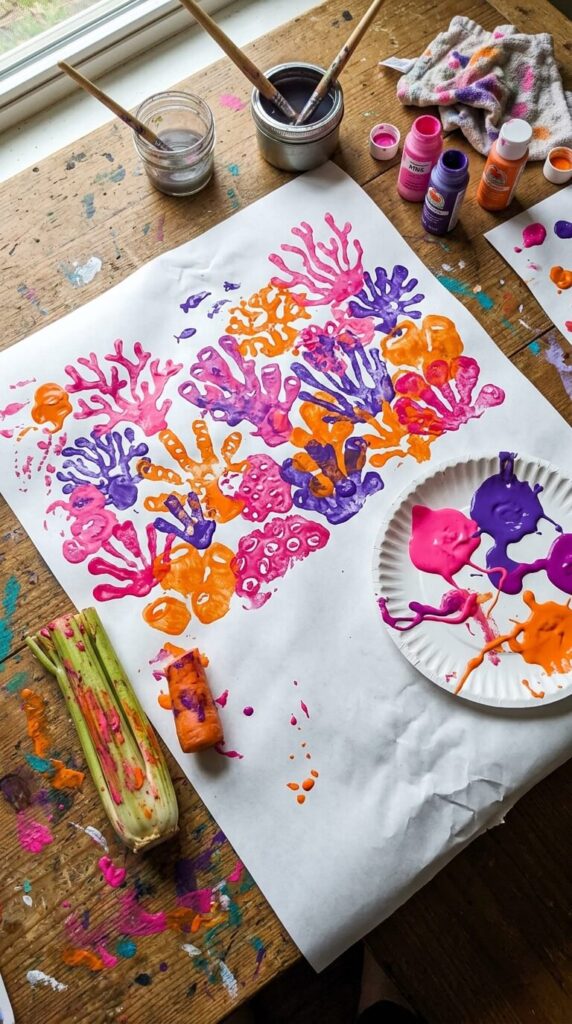
Process art, meaning the fun is in the doing and the result is a happy accident. Cut the base off a bunch of celery and the end looks like a rose, which prints as coral almost too well.
Ages: 18 months to 5 · Time: 20 min active, 30 min drying · Mess: High · Supervision: Hands on the whole time
Materials Needed
- One bunch of fresh celery (use the white heart end, not single stalks)
- One whole carrot
- Washable tempera in pink, orange, and purple
- Large sheets of heavy white paper
- Paper plates as palettes
How to Create
- Cut about two inches off the base of the celery bunch, keeping it intact.
- Pour shallow puddles of paint onto the plates.
- Dip the cut end, blot it once on a paper towel, then press it firmly onto the paper.
- Repeat in different colors to build up a reef.
- Cut the tip off a carrot and stamp small circles for anemones and little fish.
Tip: you get about eight to ten clean prints before the celery goes floppy and mushy, and after that the pattern blurs into a blob. Slice a fresh half inch off the base and it prints sharply again. Single stalks give crescent shapes, which make good small coral, so don’t toss them.
Safety: celery is a recognized allergen, and this paint-covered celery goes nowhere near a mouth. Cover the table and roll sleeves up, because this one gets on wrists.
9. Handprint & Footprint Mermaid
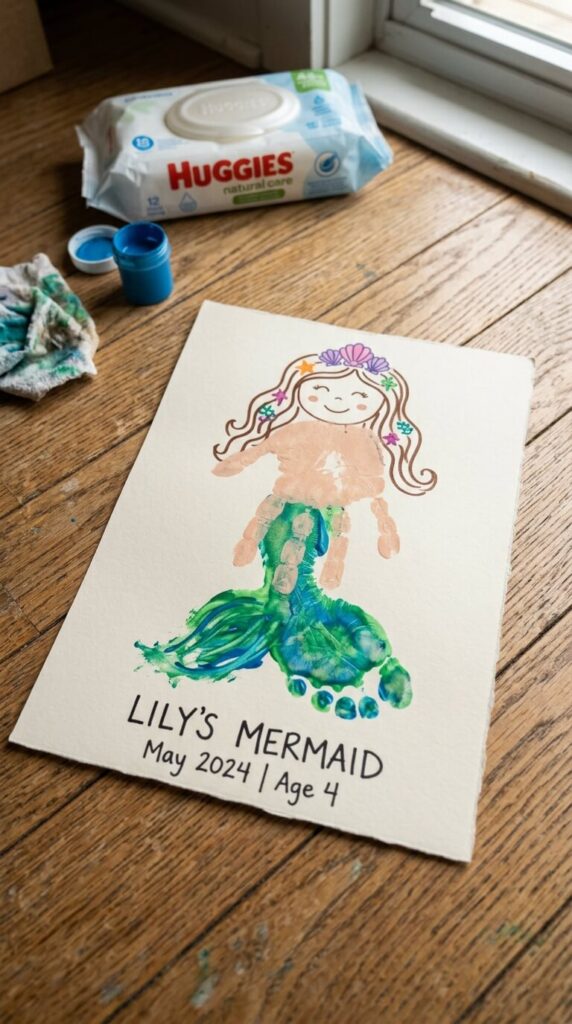
The keepsake one. In two years you will not remember how small that foot was, and this is the only craft on the list where the parent cares more than the kid.
Ages: 6 months to 5 (babies are an adult-led keepsake) · Time: 10 min active, 1 hour drying · Mess: High · Supervision: Hands on, both hands, no phone
Materials Needed
- Thick watercolor paper or cardstock
- Skin-tone washable paint
- Green and blue washable paint for the tail
- Wet wipes, open and within arm’s reach before you start
- Foam brush
- Markers
How to Create
- Sit your child down, open the wipes, and put the paper where you can reach it.
- Brush green or blue paint onto the sole of one foot.
- Press the paper onto the foot rather than the foot onto the paper, pushing each toe down as you go.
- Wipe the foot immediately, before it touches the floor.
- Paint the palm skin-tone, keep fingers together, and press it above the heel to make the torso and hair. Add a face and scales with markers once dry.
Tip: Cold paint makes toddlers curl their toes, so you get half a print and a wriggling child. Warm the paint between your hands for a few seconds, use a foam brush instead of bristles (bristles tickle and the foot yanks away), and do the whole thing on the bathroom floor next to the tub.
Safety: Washable tempera only on skin, never acrylic or craft paint. Skip this one if your child has eczema or hates wet textures on their hands, because forcing it teaches them that craft time is something to dread.
10. Paper Bag Shark Puppet
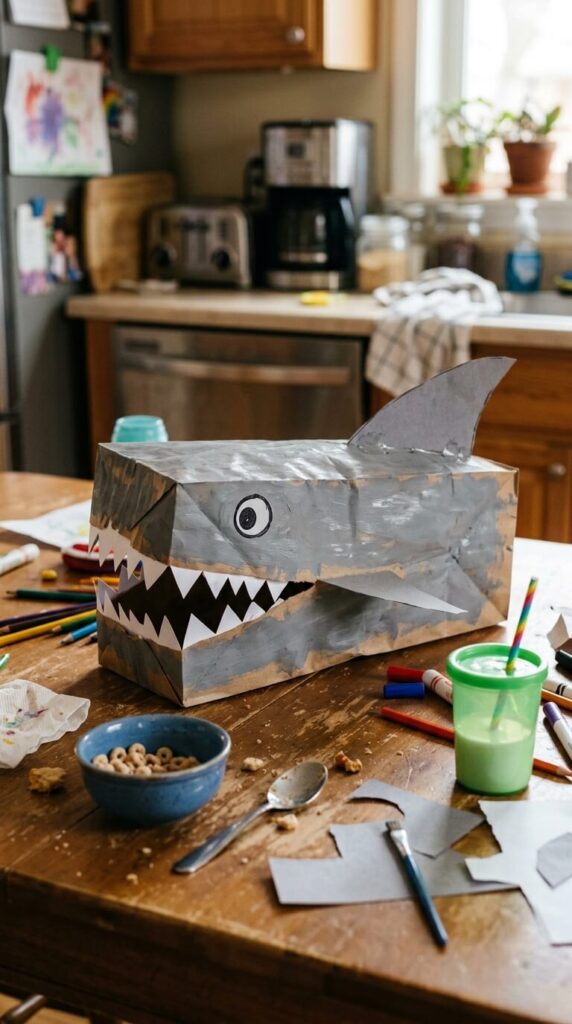
Two crafts in one: you make it, then it talks for the rest of the day. Good for the kid who narrates everything.
Ages: 3 to 5 · Time: 20 min active, 20 min drying · Mess: Low to medium · Supervision: Check in every few minutes
Materials Needed
- Brown paper lunch bag (never a plastic bag)
- Gray paint or gray markers
- Paintbrushes
- White and gray construction paper
- Liquid glue
- Black marker
How to Create
- Lay the bag flat with the bottom flap facing up.
- Color the front and the flap gray. Markers or a thin coat of paint.
- Cut a dorsal fin from gray paper and small triangle teeth from white paper.
- Lift the flap and glue the teeth along the inside top edge so they show when the mouth closes.
- Glue the fin to the back, draw eyes on the flap, then put your hand in and make it snap.
Tip: Wet paint turns a paper bag soggy and it tears along the mouth fold the first time you open it. Markers avoid that entirely. If you paint, use a thin coat, dry it flat, and open the mouth slowly the first time.
Safety: Paper bags only. A plastic bag over a child’s hand and face is a suffocation risk, and it will end up on their head.
11. Coffee Filter Watercolor Medusa

Medusa is the proper name for the free-swimming jellyfish stage, which is a nice fact to drop while you work. It also doubles as a first science lesson: the color creeps along the filter fibers on its own and kids will watch it happen.
Ages: 2 to 5 · Time: 15 min active, 30 to 60 min drying · Mess: Low to medium · Supervision: Hands on with the spray bottle
Materials Needed
- White basket-style coffee filters
- Liquid watercolors or washable markers (Crayola washable bleed best)
- Spray bottle of water
- Pipe cleaners
- Small googly eyes
- Liquid glue
How to Create
- Flatten a filter on a baking sheet.
- Let your child scribble heavily with washable markers, or drip liquid watercolor on.
- Hand over the spray bottle for two or three spritzes and watch the colors bleed.
- Dry flat, or 15 minutes on a sunny windowsill.
- Pinch the center from underneath to make a dome, wrap a pipe cleaner around the base leaving the ends dangling, then glue on the eyes.
Tip: Permanent markers will not spread, so check the pens first. And keep the spraying to a few pumps. Soak it and every color runs together into a muddy gray-brown, which is the most common way this one disappoints.
Safety: Fold over the cut ends of pipe cleaners, because the wire tips are sharp enough to scratch an eye. Expect the spray bottle to be aimed at a sibling at least once.
12. Egg Carton Crab
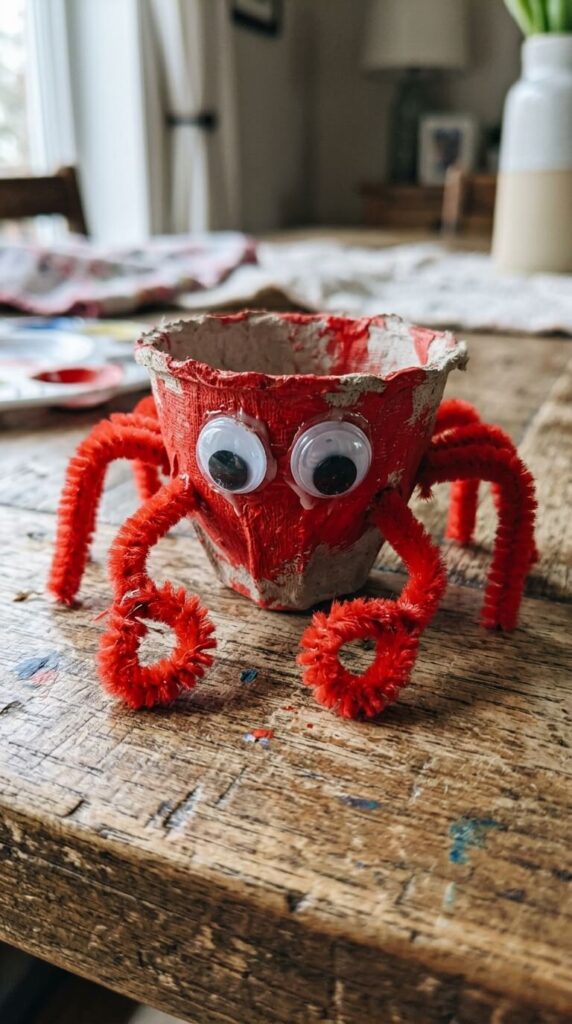
Egg cartons hold their shape, so this one stands up and gets played with instead of going straight in the bin. Counting the eight leg holes is free math.
Ages: 3 to 5, with an adult making the holes · Time: 15 min active, 30 min drying · Mess: Medium · Supervision: Hands on
Materials Needed
- Cardboard egg carton, the pulp kind rather than styrofoam
- Red acrylic or washable paint
- Paintbrushes
- Red pipe cleaners
- Googly eyes
- Liquid glue
- Scissors
How to Create
- Cut one cup from the carton and trim the edges so it sits flat.
- Let your child paint the outside red. Pulp cartons drink paint, so expect two coats.
- An adult pokes four small holes down each side with scissor tips or a skewer.
- Thread short pipe cleaner pieces through to make eight legs.
- Bend the front two upward into a C shape for claws, then glue on two googly eyes.
Tip: Styrofoam cartons crumble and split when you poke them and the paint sits on top in a patchy film. The gray pulp ones are the right ones. Tuck the cut wire ends of the pipe cleaners inside the claw curl so nothing sharp sticks out.
Safety: Hole-poking is an adult job, done before your child sits down. Pipe cleaner wire ends are sharp.
13. Rock Pool Creatures
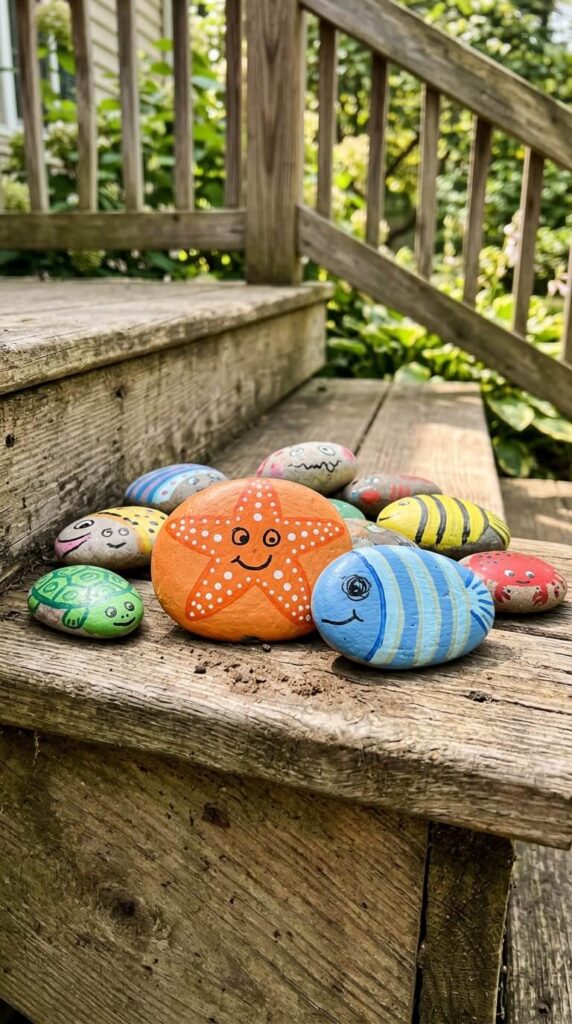
This one starts with a walk, which means the craft has already done half its job before you get the paint out. Painted rocks also survive being dropped, unlike everything else on this list.
Ages: 2 to 5 for painting, 4 and up for detail work · Time: 25 min active, 1 hour drying · Mess: Medium, and it stains · Supervision: Hands on
Materials Needed
- Smooth flat rocks (or a bag of river stones from Dollar Tree or a garden center)
- Acrylic paint in bright colors
- Paintbrushes
- Black permanent marker or paint pens (Posca or Sharpie oil-based, adult use)
- Clear acrylic sealer, optional (Krylon)
How to Create
- Go and hunt for smooth flat rocks together. Check the rules first if you are in a park or on private land.
- Wash them with soap and water and let them dry completely, ideally overnight.
- Paint them as starfish, striped fish, sea snails, whatever they see.
- Once the base coat is dry, add eyes and details with the marker.
- If you want them to live outdoors, an adult sprays sealer outside, well away from the kids.
Tip: Damp rocks make the paint peel off in sheets a day later, so wash them the night before. Rough porous stones also soak up two or three coats and still look chalky, which is why smooth river stones are worth the two dollars.
Safety: Acrylic paint does not wash out of clothes or off a wooden table. Sealer is adult-only and outdoors. And painted rocks get thrown, so this is not a craft to do next to a toddler sibling on a tiled floor.
Practical note: If your kid is under 3, or still puts everything in their mouth, the four safest picks here are the paper plate jellyfish, the bubble wrap pufferfish, the celery stamped coral reef, and the handprint mermaid. No small parts, no glue, nothing to swallow. Everything else needs you sitting at the table.
14. Ocean in a Bottle Sensory Jar
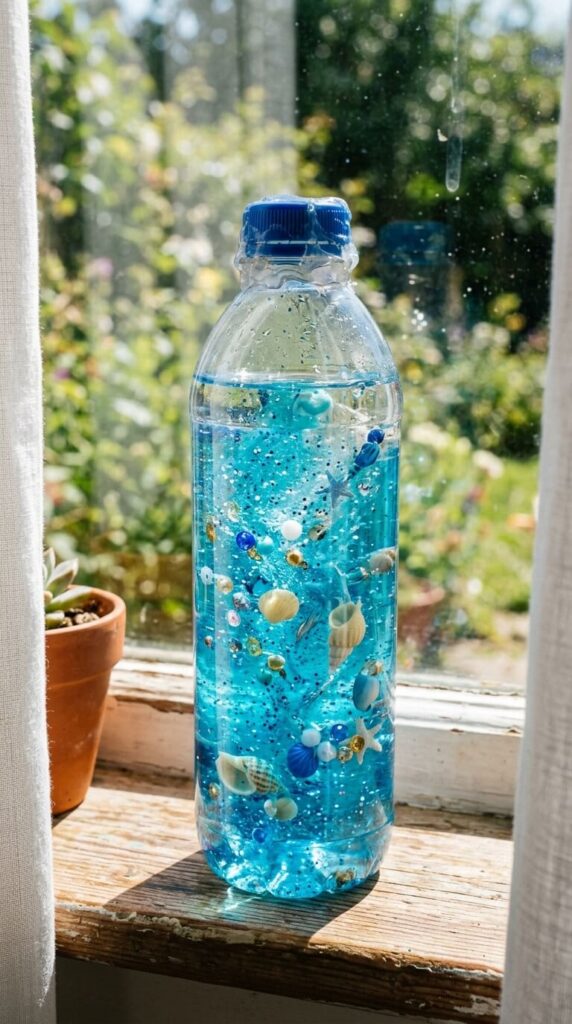
The calm-down jar. Genuinely useful at 5pm when everyone is overtired, and it takes ten minutes to make.
Ages: adult builds it, any age can shake it · Time: 10 min, ready in 2 min · Mess: Low, unless the lid fails · Supervision: Adult builds, child shakes
Materials Needed
- Clean clear plastic bottle with a tight lid (never glass)
- Water
- Blue food coloring
- Baby oil (for waves) or clear corn syrup (for slow swirl), see the tip
- Fine glitter
- Small plastic shells and sea creature beads
- Hot glue gun, adult only
How to Create
- Fill the bottle one third with water and add two or three drops of blue coloring.
- Let your child drop in glitter, shells, and beads.
- Top up slowly with baby oil, leaving a small air gap.
- An adult runs hot glue around the cap threads and screws it on tight. Add a wrap of packing tape as a second line of defense.
- Shake and watch the two layers roll like waves.
Tip: Pick your effect, because the two liquids do different things. Baby oil floats and gives you a distinct wave line. Corn syrup is heavier than water, so it mixes instead of layering and gives you a slow-motion glitter swirl with no waves at all. Fine glitter also clumps in oil and hangs beautifully in syrup.
Safety: Baby oil is mineral oil, and swallowing or inhaling it can cause serious lung inflammation, so the lid has to be sealed and the bottle stays supervised. Plastic bottle only. Food coloring stains hands, clothes, and grout.
15. Paper Chain Octopus
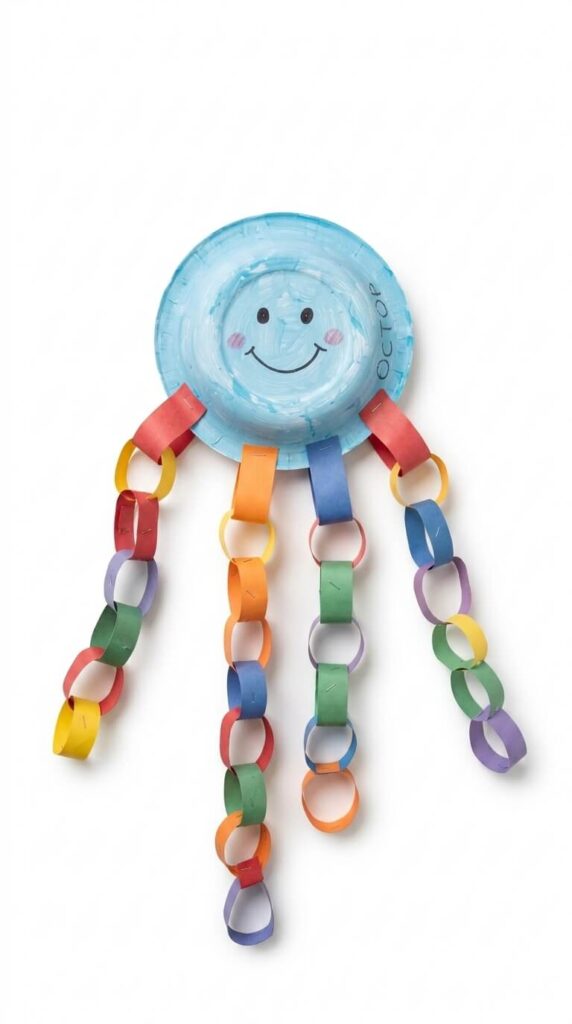
Good sequencing and counting practice, and the only craft here that a four year old can mostly do alone. It is also the longest, so know that going in.
Ages: 4 to 5 · Time: 30 to 40 min active, 20 min for the head to dry · Mess: Low · Supervision: Check in every few minutes
Materials Needed
- Heavy paper plate or paper cup
- Washable paint
- Construction paper in various colors
- Stapler (adult) or tape
- Glue
- Markers
How to Create
- Paint the plate or cup for the head and set it aside.
- Cut the colored paper into long even strips.
- Show your child how to loop a strip, tape it, then thread the next strip through before sealing it.
- Build eight chains, counting the links out loud as you go.
- Draw a face on the dry head and attach the eight chains around the bottom edge.
Tip: Eight chains of five links is forty links, which is around half an hour of fiddly work. Most preschoolers tap out around chain three. Either make the chains three links long, pre-make a few yourself, or accept a five-legged octopus and let it go. Tape holds better than glue here, because wet glue lets the loops slide open.
Safety: Stapling is an adult job. Loose staples end up on the floor and then in a foot.
16. Puffy Paint Starfish
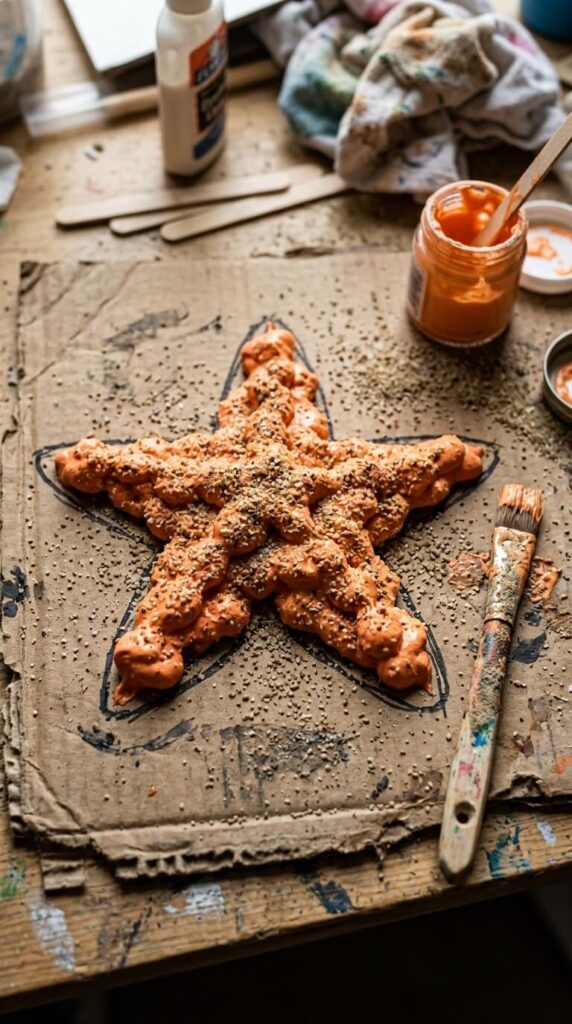
Homemade puffy paint is the best texture on this list. It goes on like whipped cream and dries raised, so the finished starfish is something they keep touching for days.
Ages: 3 to 5 · Time: 20 min active, dries overnight · Mess: High · Supervision: Hands on
Materials Needed
- White liquid school glue
- Foaming shaving cream, not gel (Barbasol is the cheap standard)
- Food coloring, orange or yellow
- Sturdy cardboard, not paper
- Paintbrushes or craft sticks
- Craft sand or glitter
How to Create
- Mix equal parts glue and shaving cream in a bowl and fold gently.
- Add a few drops of food coloring and fold until the color is even.
- Draw a large starfish outline on the cardboard.
- Let your child glob the mixture inside the lines with a brush or craft stick.
- Sprinkle craft sand or glitter over the wet paint, then leave it overnight.
Tip: Nothing is reacting chemically here, you are just folding air into glue, which is why the finish deflates as it dries. Expect it to lose about a third of its height, so pile it on thicker than looks sensible. It also stays slightly tacky for a day and the room smells like a barbershop for about a week. Use cardboard, because paper buckles under wet puffy paint.
Safety: Shaving cream is not food safe, it stings eyes badly, and it is a hard no for any child who mouths things. The strong scent bothers a lot of sensory-sensitive kids too, so open the can near them first and see how they react. For a taste-safe version, use whipped topping with food coloring instead, but that is a play activity, not a keeper.
17. Fish Scale Collage

The lowest-pressure craft on the list. There is no wrong way to do it, which makes it the right choice for a kid who fights instructions or hates being corrected.
Ages: 18 months to 5 · Time: 25 min active, 20 min drying · Mess: Low to medium · Supervision: Check in every few minutes
Materials Needed
- Large sheet of heavy paper
- Scissors
- Glue sticks (buy the multipack, Elmer’s six-pack is fine)
- Collage bits: foil wrappers, tissue paper, magazine pages, stickers, colored tape
- Black marker
How to Create
- Draw one very large simple fish outline and leave the inside blank.
- Cut the collage materials into squares, circles, and odd shapes.
- Sort them into small bowls so it looks like a buffet.
- Hand over a glue stick and let them fill the fish however they want, overlapping and mixing freely.
- Add a marker eye at the end if they have not already covered that part.
Tip: A toddler will flatten an entire glue stick into the paper in the first three minutes. That is normal, buy the cheap multipack. Glue sticks also will not hold shiny foil wrappers, so keep liquid glue or double-sided tape on hand for those.
Safety: If your child hates sticky fingers, and plenty do, swap the glue for stickers and washi tape. Same craft, no meltdown.
18. Swimming Fish Mobile

A nice way to display work that would otherwise curl up on the fridge. It also moves, which buys it a second week of attention.
Ages: 3 to 5 for decorating, adult assembles and hangs · Time: 25 min active, no drying · Mess: Low · Supervision: Check in every few minutes
Materials Needed
- Colored cardstock or craft foam (foam does not curl in humidity)
- Markers, crayons, stickers
- Hole punch
- Yarn (skip fishing line with young kids)
- A stick from the yard, or a wire coat hanger
- Scissors
How to Create
- Cut out several simple fish shapes.
- Let your child decorate both sides. Both sides matters, because a mobile spins.
- Punch one hole near the top of each fish.
- Cut yarn to different lengths, tie one end to each fish and the other to the stick.
- Slide the strings along the stick until it hangs level, then hang it high.
Tip: It will hang crooked on the first go. Do not re-tie anything, just slide the knots along the bar until it balances. A stick from the yard beats a wire hanger, since there is no sharp hook to deal with.
Safety: See the note below on hanging anything with string, and let an adult do the tying and hanging.
Practical note: Never hang this, or the jellyfish, or the windsock, above a crib, bed, or changing table, and keep the strings out of reach of a standing toddler. Yarn and small necks do not mix. Hang it in a doorway or over a corner of the room instead.
19. Underwater Play Dough World

Best return on effort of anything here. Five minutes of setup, and on a good day it holds a three year old for forty-five. No steps, no result, no chance of doing it wrong.
Ages: 18 months to 5 · Time: 5 min setup, 20 to 45 min play · Mess: Low to medium · Supervision: Check in every few minutes
Materials Needed
- Blue and green play dough (Play-Doh, or homemade)
- Assorted seashells
- Smooth pebbles or aquarium gravel (skip for under 3s)
- Plastic sea animal figures
- Craft gems or sequins (skip for under 3s)
- Large plastic tray or shallow bin
How to Create
- Put a tray or shallow bin on the table to catch everything.
- Press the blue and green dough flat across the bottom for water and sea floor.
- Scatter shells, pebbles, animals, and gems around the edges.
- Say nothing and step back.
- Come back to caves, castles, and shell fossils pressed into the dough.
Tip: the blue and green will be one gray-green blob within fifteen minutes. Every time. Either accept it, or keep the colors on opposite ends of the tray and mention once that they mix. If dough gets ground into the carpet, leave it alone until it dries hard, then crumble it and vacuum. Scrubbing it wet is how it becomes permanent.
Safety: play dough is non-toxic but very salty, and a real mouthful is a problem for a small child and genuinely dangerous for a dog, so keep both in view. Standard dough contains wheat, so use a gluten-free recipe if that applies. Gravel, gems, and sequins are choking hazards, so for under 3s use large shells and large plastic animals only.
20. Fish Windsocks
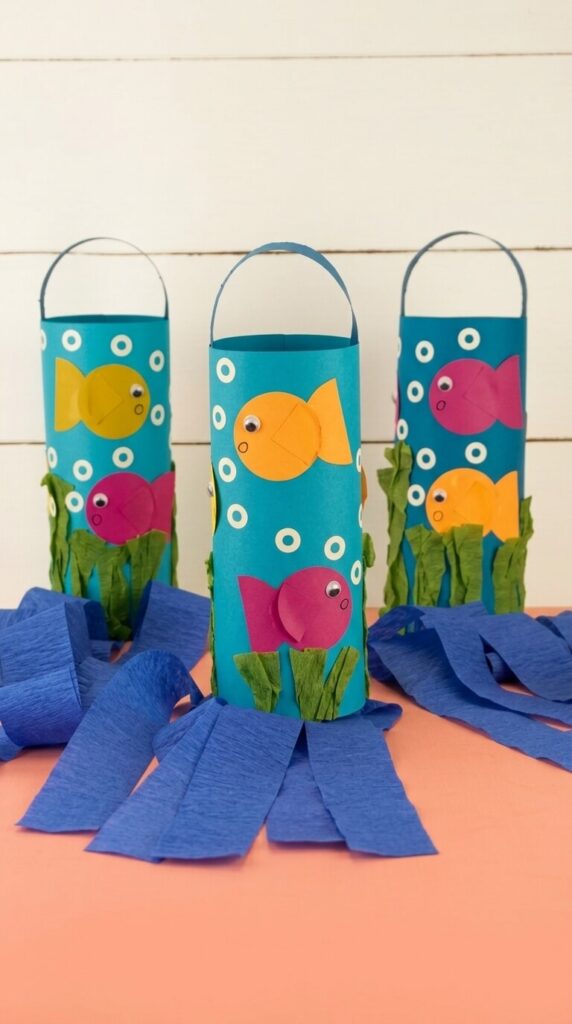
The outdoor one. Kids get an instant lesson in wind direction, and it is the craft they will drag visitors outside to look at.
Ages: 2 to 5, with adult cutting · Time: 25 min active, 30 min drying · Mess: Medium · Supervision: Hands on
Materials Needed
- Empty cardboard oatmeal container, or a piece of flexible cardstock
- Washable paint or markers
- Tissue paper in bright colors
- Liquid glue or strong tape
- Hole punch
- String or yarn
How to Create
- An adult cuts the bottom out of the oatmeal container to make a tube. Or roll cardstock into a cylinder and staple it.
- Let your child paint or color the outside as the fish body. Dry it.
- Cut tissue paper into long one-inch strips.
- Glue or tape the strips around the inside bottom edge so they hang free.
- Punch two holes opposite each other at the top, thread string through, and hang it.
Tip: Honest warning, tissue paper tails disintegrate in the first proper rain and a cardboard tube goes soft and collapses outdoors. Hang it on a covered porch, or indoors near an open window or a fan. If you want it to survive real weather, cut the tails from a plastic tablecloth or use ribbon instead.
Safety: Cutting the container base needs a craft knife, so that is done by an adult, away from the table. Keep the hanging string short and out of reach.
Common Mistakes to Avoid With Under the Sea Crafts for Preschoolers
I have made all of these, most of them more than once.
- Starting a glue craft 20 minutes before you have to leave. Drying time is the thing that turns a fun idea into a fight. Check the wait column first.
- Buying acrylic paint because it was cheaper. It marks the table, the shirt, and the chair, permanently. Washable tempera for anyone under 5.
- Setting out all the supplies at once. Too much choice and a three year old picks nothing, or wants to do all of it in the next four minutes. Offer two options and put the rest away.
- Doing the craft for them. If you keep straightening the fins and repositioning the eye, they stop trying, and quite reasonably so. A wonky seven-eyed shark is the correct outcome.
- Putting the rinse water next to the paper. It gets knocked over. Every time. Put it on the far side of the table and use a wide, low container.
- Cutting and prepping while your child waits. You lose them before the craft starts. Do all the cutting first, then call them over.
- Showing them a finished example. A picture of an adult-made version sets a bar they cannot hit, and some kids will refuse to start. Show the materials instead.
- Handing over the glitter shaker. No. You hold the glitter.
FAQs
Are these crafts safe for a 3 year old?
Most are, with an adult at the table. The real hazards are the small parts, so googly eyes, sequins, foil confetti, craft gems, aquarium gravel, and dry pasta are the ones to watch, and any child who still mouths objects should skip them entirely. Painting and printing crafts like the jellyfish, pufferfish, celery reef, and handprint mermaid have no small parts at all.
What can I do with a toddler who still puts everything in their mouth?
Stay with the paint-only projects: the paper plate jellyfish, bubble wrap pufferfish, celery stamped coral reef, and handprint mermaid. Use washable tempera, keep googly eyes off the table, and give them the sealed ocean in a bottle jar so all the small pieces stay inside the bottle.
How do I get washable paint out of the carpet?
Blot it, do not rub, working from the outside of the stain inward so you are not spreading it. Cold water with a drop of dish soap lifts most fresh washable tempera. Dried acrylic on carpet is usually there for good, which is the main reason I keep it away from little kids.
How do I get glitter out of the carpet?
A lint roller or a strip of packing tape pressed down and pulled up gets more than a vacuum does, then vacuum after. Accept that you will still find glitter in a month, and use craft sand instead next time if that bothers you.
How long do these crafts actually take?
Most are 10 to 25 minutes of active time. Drying is the variable, from nothing at all for the suncatcher and play dough tray up to overnight for the puffy paint starfish. Prep is under 5 minutes if you do the cutting before you call your child over.
Can I do these with a toddler and a 5 year old at the same time?
Yes, and three of them scale in both directions. Everyone stamps celery coral onto the same big sheet of paper. The older child cuts and assembles the paper chain octopus while the toddler paints its head. For the fish collage, the toddler sticks whatever they grab and the five year old cuts their own shapes and adds detail with a marker.
Read Next
If the clothespin dolphin showed you that your child’s pinch grip is not quite there yet, that is worth following up on before they start writing. These fine motor activities that build hand strength use the same five-minute, kitchen-table setup.
And if the ocean theme has landed and you want a week of it rather than one afternoon, these creative crafts to keep them entertained follow the same low-supply approach.
Conclusion
If you only do one this week, make the paper plate jellyfish. It is the cheapest, the hardest to get wrong, and the one my kids still ask for by name. Put out two options rather than twenty. Open the wipes before you open the paint. Then leave them alone and let the shark have seven eyes. Tape the finished one somewhere they can see it, at their height. That is the bit that gets them back to the table next week, more than any craft on this list.