
The best pool party finger foods for kids are one bite, no utensil, make ahead items that survive heat and wet hands: fruit skewers, jello cups, frozen banana bites, pepperoni crescent rolls, mini corn dogs, and pre bagged trail mix. For 10 to 15 kids, plan two or three savory options, two or three fruit based snacks, and one showstopper dessert, then keep everything either on ice or fully in the shade. Skip anything that needs a fork, melts fast, or has to be assembled at the table while you’re also watching the water.
Twelve Kids, One Warm Plate of Watermelon
Last July I stood in my kitchen at 1:40 in the afternoon with twelve kids in the pool, a tray of cookies I was still frosting, and a paper plate of watermelon that had gone warm and slimy in about nine minutes flat.
Nobody was eating the watermelon. They were eating the pretzels straight out of the bag on the counter, with wet hands, dripping across my floor.
That was the day I figured out the actual rule: at a pool party, kids don’t eat meals. They graze in fast, wet, three second visits to the table between cannonballs. If a food can’t survive being grabbed by a chlorine soaked eight year old who is already running back to the diving board, it doesn’t matter how good it tastes.
So this list is sorted for real conditions. Every recipe below has the ages it actually works for, how messy it really gets, how much of it you can do the day before, and what tends to go wrong the first time you make it. I’ve kept the honest notes in, including the three recipes I’d talk you out of making during the party.
It’s early September as I’m updating this, so if you’re planning a late season party or a warm weather birthday, the frozen items at the end of the fruit section are the ones worth your time right now.
Pick Your Pool Party Finger Foods Fast
Don’t read all 25 first. Scan this table, pick three or four, and go. Mess level assumes kids are helping, because they always end up helping. Times include prep, hands on time, and the wiping down afterward.
| Recipe | Ages it works for | Mess | Total time | Make ahead |
| 1. Pool Party Jello Cups | 4 and up (needs a spoon) | Low | 15 min plus 2 hr chill | Yes, 2 days |
| 2. Sand Pudding Cups | 3 and up | Medium | 30 min | Yes, 1 day |
| 3. Marshmallow Beach Balls | 4 and up | High | 50 min | Yes, 2 days |
| 4. Mini Fruit Tarts | 5 and up | Medium | 1 hr 30 min | Parts, 1 day |
| 5. Summer Sour Cream Sugar Cookies | 2 and up | High | 1 hr 15 min | Yes, freeze |
| 6. Mixed Berry Crumble Bars | 2 and up | Low | 3 hr 15 min, mostly waiting | Yes, 2 days |
| 7. Mini Cookies and Cream Cheesecake Bites | 3 and up | Medium | 1 hr plus chill | Yes, 3 days |
| 8. Blueberry Hand Pies | 3 and up | Low | 1 hr 20 min | Yes, 1 day |
| 9. Rainbow Fruit Salad with Honey Lime Dressing | 1 and up, see honey note | Low | 35 min | Morning of |
| 10. Fresh Fruit Cream Cheese Sandwiches | 2 and up | Medium | 15 min | No, serve fresh |
| 11. Rainbow Fruit Skewers with Cheesecake Dip | 4 and up, skewers | Low | 40 min | Yes, 1 day |
| 12. Watermelon Caprese Skewers | 6 and up, really an adult favorite | Low | 15 min | Parts only |
| 13. No-Bake Energy Bites | 3 and up | Medium | 25 min | Yes, 1 week |
| 14. Red Pepper Hummus with Veggies | 2 and up | Low | 1 hr 30 min, mostly hands off | Yes, 5 days |
| 15. Aquarium Trail Mix | 4 and up | Low | 10 min | Yes, 3 days |
| 16. Roasted Trail Mix | 4 and up, contains nuts | Low | 45 min | Yes, 2 weeks |
| 17. Yogurt Fruit Dip | 1 and up | Low | 5 min | Yes, 1 week |
| 18. PB&J Banana Sushi Wraps | 2 and up | Medium | 15 min | No, 2 hr max |
| 19. Banana Split Bites | 3 and up | Medium | 30 min | Yes, freeze |
| 20. Banana Yogurt Popsicles | 2 and up | High, drips | 15 min plus 1 hr freeze | Yes, freeze |
| 21. Walking Banana Pudding Bags | 3 and up | Low | 10 min | No, build at the table |
| 22. Mini Pepperoni Calzones | 3 and up | Low | 1 hr | Yes, reheat |
| 23. Pepperoni Crescent Rolls | 2 and up | Low | 30 min | Yes, reheat |
| 24. Sheet Pan Nachos | 5 and up | Medium | 20 min | No |
| 25. Mini Corn Dogs | 3 and up, cut small for under 4 | Medium, plus hot oil | 35 min | Yes, hold warm |
Save this one for later. If you’re reading this two weeks before the party, pin this table now. It’s the part you’ll want at the grocery store, and it’s easier than trying to remember which four recipes you liked.
Where to Buy This Stuff Without Blowing the Budget
Party food costs balloon in the decoration aisle, not the produce aisle. Here’s where I actually shop for this list.
Dollar Tree (roughly $1.25 an item): 5 ounce clear plastic cups with lids, mesh food tents, paper parasol picks, wooden skewers, popsicle sticks, small plastic sand buckets in the summer aisle, foil half sheet pans, snack size zip bags, and squeeze bottles. The lidded cups are the single best buy here, because lids mean you can stack the jello and pudding cups in a cooler instead of balancing an open tray.
Aldi or the store brand shelf: Berries, cream cheese, sour cream, yogurt, tortillas, pudding mix, cookies, and pepperoni. Store brand instant vanilla pudding behaves identically to name brand in every recipe below. Frozen berries cost less than fresh and work fine in anything baked.
Amazon or a craft store, only if you need them: Wilton Candy Melts, oil based candy coloring, a mini cheesecake pan, and a 100 count of food grade sticks. These are the items worth buying once and reusing for years.
Probably already in your kitchen: Popsicle sticks can be skipped in favor of forks, a zip bag with a corner snipped off replaces a piping bag, a fork replaces a pastry cutter, a sturdy glass replaces a rolling pin, and a plastic bag plus a can of beans crushes cookies as well as a food processor.
Free and low cost swaps for the fancy parts
- Paper parasols: cut small triangles of paper and tape them to toothpicks, or skip them entirely, since the kids pull them off in two seconds anyway.
- Mini sand buckets: clean yogurt cups or 9 ounce clear cups.
- Candy melts: white chocolate chips melted with half a teaspoon of coconut oil.
- Cool Whip: heavy cream whipped with a spoonful of powdered sugar, or plain yogurt for the fruit dips.
- Wooden skewers: pretzel sticks. They cost less, they’re safer for little kids, and they’re edible.
- Balsamic glaze: simmer regular balsamic vinegar down by half in a small pot, about 8 minutes.
- Fresh berries out of season: frozen berries thawed and drained, or canned mandarin oranges rinsed well.
- A cake stand or tiered tray: stack two upside down bowls and drape a clean towel over them.
Pool Party Food Safety You Can’t Skip
This is the part I’d read even if you skip everything else, because pool parties combine every risk factor at once: heat, dairy, small hard foods, sharp sticks, distracted adults, and water.
Choking risks with the under 4 crowd
Standard pediatric guidance is to keep whole grapes, popcorn, whole nuts, hard or chewy candy, marshmallows, and coin shaped slices of hot dog away from kids under 4. That hits five recipes on this list, so here’s the fix rather than the ban:
- Grapes: quarter them lengthwise, not into rounds.
- Hot dogs: slice lengthwise into strips, then into short pieces, and pull the stick out before handing it over.
- Giant marshmallows: cut into thirds and serve off the skewer.
- Popcorn and whole nut trail mix: serve to 4 and up, and keep a separate bowl of Kix, Goldfish, and diced fruit for the little ones. Do not just tell a 3 year old not to eat from the big bowl. They will.
- Peach ring and gummy candy toppers: fine as decoration, but pull them off for toddlers.
Allergies, and the one line to put in the invite
Six recipes here contain peanut butter, tree nuts, or sesame. Ask on the invitation, not at the gate: “Any allergies I should know about?” It takes one text and saves a scary afternoon.
If any guest has a nut allergy, don’t just skip serving them the nut items, leave the nuts home entirely. Kids share food off each other’s plates at parties, and a shared table with wet hands is exactly how cross contact happens. Tahini counts here too, since sesame is one of the major allergens the US requires to be labeled.
Write the allergens on an index card in front of each dish. Contains peanuts. Contains dairy. Contains gluten. Parents scan it in three seconds and stop hovering.
Practical note: Set out one plate of plain safe food, fruit, pretzels, plain crackers, that any kid can eat without asking. It ends the “can I have that” negotiation and it means the kid with allergies isn’t standing there empty handed while everyone else eats.
Heat is the real enemy
The USDA guideline for perishable food is a maximum of 2 hours at room temperature, and only 1 hour once it’s above 90°F. On a pool party afternoon, assume the 1 hour version. That covers anything with cream cheese, pudding, whipped cream, yogurt, mayo, or cut melon.
What that means in practice: put out half, keep half in the fridge, and swap the trays at the halfway point.
Sticks, toothpicks, and sharp tools
Snip the points off wooden skewers with kitchen shears before you thread anything. Then count them out and count them back in. A bamboo skewer on a pool deck ends up under a bare foot every single time, and I’ve picked up a toothpick from the bottom step of the pool more than once.
The steps an adult has to do, not the kid
Frying the corn dogs, boiling the custard, roasting peppers, and pulling anything from the oven are adult jobs. Melting chocolate in the microwave sounds harmless and isn’t: melted candy melts run hotter than you expect and stick to skin.
And the one that matters most: if you’re cooking, you are not watching the water. Assign one adult as water watcher who isn’t holding a spatula, a drink, or a phone, and hand the job off out loud when you swap. Deep fry nothing while kids are in the pool.
Beach-Themed Showstopper Desserts
These are the ones kids point at. Most can be prepped the day before, and three of them double as a party activity if you let the kids assemble their own.
1. Pool Party Jello Cups
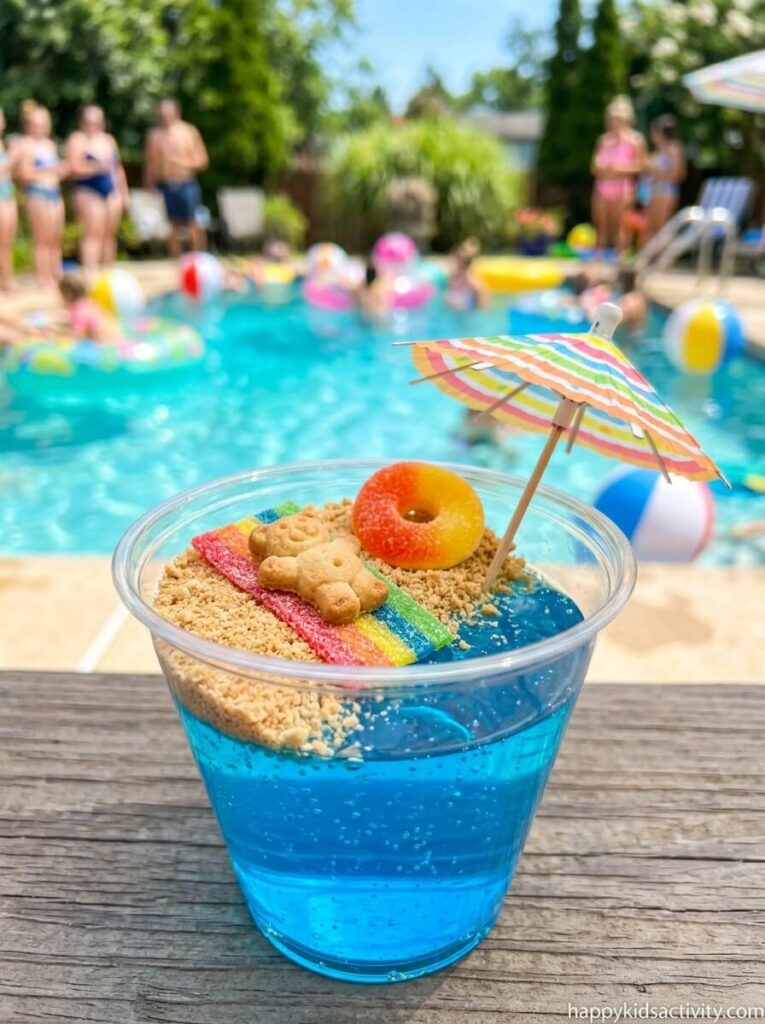
Blue gelatin is the water, crushed graham crackers are the sand, and a Teddy Graham sunbathes on a sour candy beach towel. These are the cheapest wow on the whole list.
Ages: 4 and up, because they need a spoon · Time: 10 min prep, 2 hr chill, 5 min cleanup · Mess: Low to make, sticky to eat · Supervision: Check in every few minutes · Make ahead: Yes, 2 days undecorated · Yield: 10 cups
Ingredients
- 6 ounces blue gelatin (Berry Blue Jell-O is the right shade of pool water)
- 2 cups water, prepared per the package directions
- 3 graham cracker sheets, crushed
- 10 Teddy Grahams
- 10 peach ring candies
- 10 rainbow sour candy strips, cut into 1.5 inch pieces
- 10 clear 5 ounce cups, with lids if you can find them
- Paper parasols, optional
Swap to save: Store brand blue gelatin, crushed vanilla wafers or animal crackers in place of graham sheets, and rinsed out yogurt cups if the clear look isn’t the point.
Instructions
- Make the gelatin following the package directions.
- Line the cups up on a baking sheet, then pour the liquid gelatin in evenly. The tray is what lets you carry ten wobbly cups to the fridge in one trip.
- Refrigerate at least 2 hours, or overnight, until fully set.
- For the sunbathing cups, sprinkle crushed graham over half the surface, lay a candy strip down as a towel, and set a Teddy Graham on it.
- For the floating cups, tuck a Teddy Graham inside a peach ring and press it gently onto the surface.
- Add a parasol if you want one, and serve right away.
Kid job: A 3 year old can smash the graham crackers in a zip bag. A 6 year old can build the whole beach scene. A 10 year old can handle the measuring, but the water for gelatin is boiling, so that pour stays with you.
Tip: Skip tall skinny cups. Kids can’t reach the bottom with a short plastic spoon, and you’ll find half eaten cups abandoned all over the deck.
Heads up: The graham cracker sand turns to paste in about 15 minutes in humid air, so decorate at the table instead of in the kitchen. Blue gelatin also stains, and it will absolutely leave its mark on a white pool towel and light colored grout. Keep these in the cooler until serving, because gelatin goes soft and slumps in the heat faster than you’d think.
2. Sand Pudding Cups
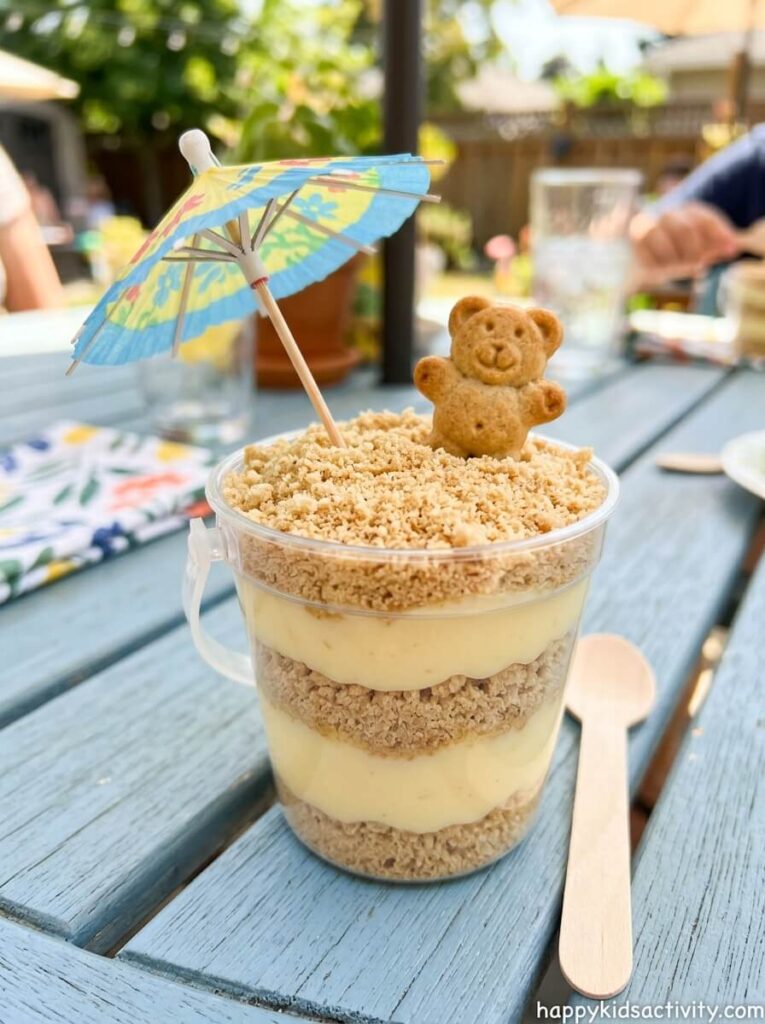
Crushed Golden Oreos look uncannily like wet beach sand, and layered with a thick vanilla pudding mix they turn into a whole beach scene in a cup. This is the one my nephew asked for again the next weekend.
Ages: 3 and up · Time: 20 min prep, 10 min cleanup · Mess: Medium, cookie dust travels · Supervision: Hands on for the mixer, then hands off · Make ahead: Yes, 1 day · Yield: 14 to 15 five ounce cups
Ingredients
- 1 package Golden Oreo cookies
- 2 regular Oreo cookies, for darker specks in the sand
- 8 ounces cream cheese, properly softened
- 2/3 cup powdered sugar
- 2 boxes (3.5 ounces each) instant vanilla pudding mix
- 2 3/4 cups milk
- 12 ounces Cool Whip
- Small clear cups or mini sand buckets
Swap to save: Nilla Wafers or animal crackers instead of Golden Oreos (cheaper and no filling to scrape), store brand pudding mix, and heavy cream whipped with a spoonful of powdered sugar instead of Cool Whip.
Instructions
- Twist the Golden Oreos apart and scrape the filling off, which gives you a dry, sandy texture instead of a paste.
- Crush all the cookies, golden and regular, in a food processor until fine.
- Beat the softened cream cheese and powdered sugar until completely smooth with no lumps.
- In a second bowl, whisk the pudding mixes with the milk.
- Stir the pudding into the cream cheese mixture, then fold in the Cool Whip.
- Layer into cups: sand, pudding, sand, pudding, and a thick layer of sand on top.
Kid job: Crushing cookies in a zip bag is a great job for a 2 or 3 year old, and it’s loud enough that they’ll stay busy. Kids 6 and up can do the layering, which looks better when it’s imperfect anyway. A 10 year old can run the whole recipe with you reading the steps out.
Tip: Cream cheese has to be genuinely at room temperature, an hour on the counter, not 20 seconds in the microwave. Cold lumps never smooth out later, and you’ll see every one of them in a clear cup.
Heads up: Scraping the filling out of a full package of Oreos takes a solid 15 to 20 minutes and it’s the most tedious job on this list, which is why I usually reach for Nilla Wafers instead. This recipe also makes far more than the 10 cups you’d expect, closer to 15, so halve it for a small party. It’s dairy heavy, so it sits on ice or it goes back in the fridge.
3. Marshmallow Beach Balls
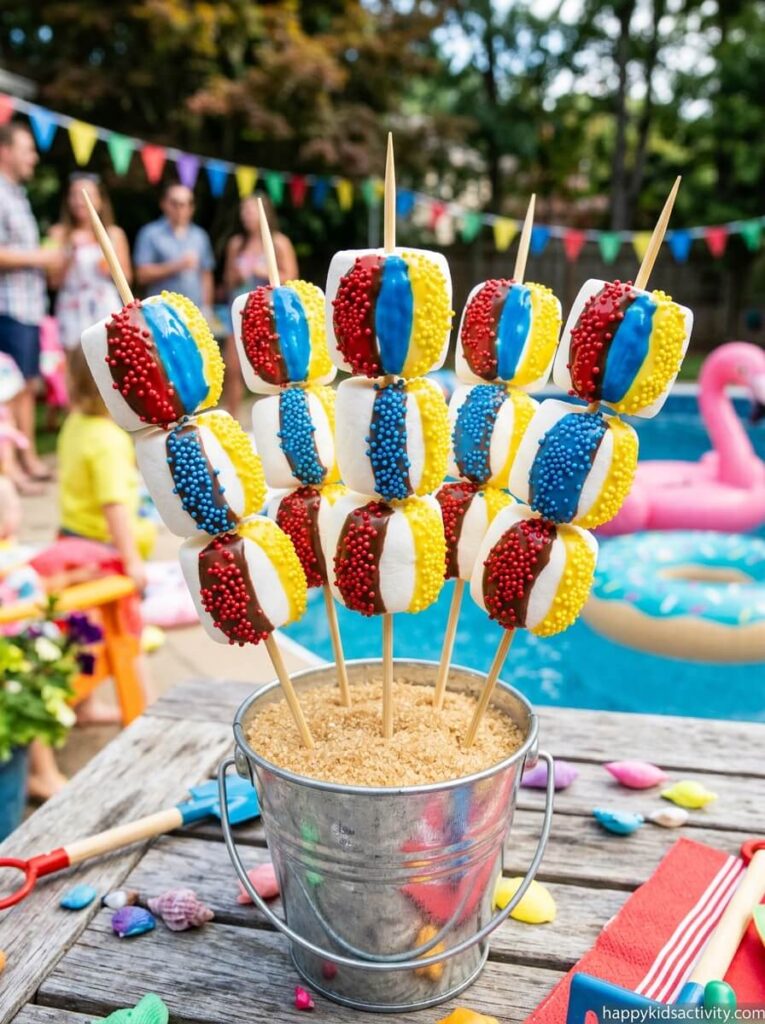
Giant marshmallows striped in bright candy coating look exactly like tiny beach balls, and they photograph better than anything else on the table. They’re also the recipe most likely to go sideways on your first attempt, so read the note below before you start.
Ages: 4 and up to eat, 6 and up to decorate · Time: 30 min hands on, 20 min drying, 15 min cleanup · Mess: High, chocolate gets on everything · Supervision: Hands on the entire time, melted coating is hot · Make ahead: Yes, 2 days in an airtight box at room temperature
Ingredients
- Large marshmallows, such as Campfire Giant Roasters
- Wilton Bright White Candy Melts
- Bamboo skewers, points snipped off
- Oil based candy coloring, in three or four colors
- Sprinkles or nonpareils in matching colors
- A small offset spatula or butter knife
Swap to save: white chocolate chips plus half a teaspoon of coconut oil instead of candy melts, regular marshmallows instead of giant ones (they’re a third of the price and easier for small mouths), and pretzel sticks instead of skewers.
Instructions
- Skewer each marshmallow, or press a pretzel stick in gently.
- Melt a small batch of white candy melts in the microwave in 20 second bursts, stirring between each one, until just barely melted.
- Stir in a drop or two of oil based candy coloring until the color is even.
- Spread a stripe of colored coating down one panel of the marshmallow with the spatula, cleaning up the edges as you go.
- Shake sprinkles over the wet coating immediately and press lightly so they stick. Stand the skewer upright in a tall glass to set.
- Finish one color across all the marshmallows before mixing the next color.
Kid job: A 4 year old can shake the sprinkles, which is honestly the best part. Kids 7 and up can paint their own stripes. For older kids, hand them the color mixing and let them try to match a real beach ball.
Practical note: Do not add water to candy melts. Not a few drops, not a splash. Water makes candy coating seize into a stiff, grainy paste you can’t rescue, and this is the single most common first try failure with this recipe. If you want the Kool-Aid flavor version, stir the powder into a teaspoon of melted coconut oil first, then stir that into the coating, and accept that it may stay slightly gritty.
Heads up: Whole giant marshmallows are a choking risk for kids under 4, so cut them into thirds and serve them off the stick for the little ones. On a humid 90 degree day the coating never fully hardens and the sprinkle colors bleed, so keep these inside in the air conditioning and bring them out right before you want the photo. This one is a poor fit for sensory sensitive kids who don’t like sticky hands, and for impatient kids, since each color has to dry before the next one goes on.
4. Mini Fruit Tarts
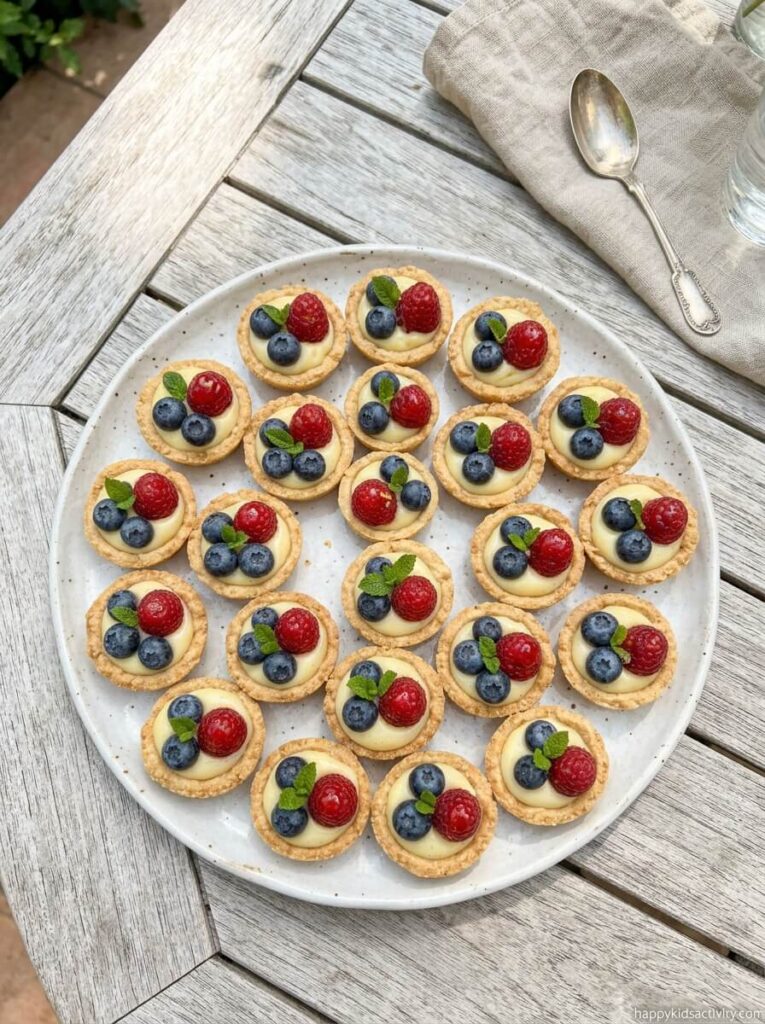
Buttery shortbread shells filled with real vanilla custard and topped with fresh berries. They look like a bakery order and they taste like it too, but I’ll be straight with you: this is the biggest time commitment on the list.
Ages: 5 and up to eat, 8 and up to help · Time: 1 hour hands on, 20 min setting, 15 min cleanup · Mess: Medium, plus a saucepan and a food processor to wash · Supervision: Adult only for the custard and the oven · Make ahead: Components yes, 1 day, assembled no · Yield: 24 mini tarts
Ingredients
- 1 1/4 cups all purpose flour
- 1/3 cup powdered sugar
- 1/4 teaspoon kosher salt
- 1/2 cup cold unsalted butter, cubed
- 1 tablespoon cold water
- 1 cup whole milk
- 3/4 tablespoon vanilla bean paste or vanilla extract
- 3 egg yolks
- 1/3 cup granulated sugar
- 2 tablespoons cornstarch
- 1/2 tablespoon unsalted butter
- 1 pint fresh blueberries
- 1 pint fresh raspberries
- Nonstick spray and a mini muffin pan
Swap to save: A box of Athens Mini Fillo Shells plus instant vanilla pudding gets you 90 percent of the effect in 10 minutes with no oven. Vanilla extract instead of bean paste saves several dollars, and frozen berries thawed and drained work if fresh ones are pricey.
Instructions
- Heat the oven to 375°F and spray the mini muffin pan generously, every cup, up the sides.
- Pulse the flour, powdered sugar, and salt. Add the cold butter and pulse to coarse crumbs, then add the cold water and pulse just until it holds together.
- Press about a tablespoon of dough into each cup, across the bottom and up the sides.
- Bake 15 minutes until the edges are golden. Cool in the pan 5 minutes, then lift each one out with a butter knife and cool completely.
- Bring the milk and vanilla to a boil. Whisk the yolks and granulated sugar until pale, then whisk in the cornstarch.
- Stream about 1/4 cup of the hot milk into the yolks while whisking hard, then whisk in the rest and pour it all back into the pan.
- Cook over medium high heat, whisking constantly, until it thickens and just starts to bubble. Pull it off the heat immediately and stir in the butter.
- Fill the cooled shells, let them sit 20 minutes to firm up, then top with berries and refrigerate until serving.
Kid job: pressing dough into the muffin cups is a genuinely good job for a 5 year old, and the imperfect ones taste identical. Berry arranging suits any age. The custard is not a kid step at any age, since it goes above 200°F and thickens fast.
Tip: Bake the shells and cook the custard a day ahead and store them separately, then fill them about an hour before guests arrive.
Heads up: Custard scorches the second you stop whisking, and it will scramble if you dump the hot milk in too fast. These are also fragile in wet hands, so I’d put them on the adult end of the table and pick a sturdier dessert for the kids. If a shell sticks, run a butter knife around the edge and lift, don’t tip the pan.
5. Summer Sour Cream Sugar Cookies
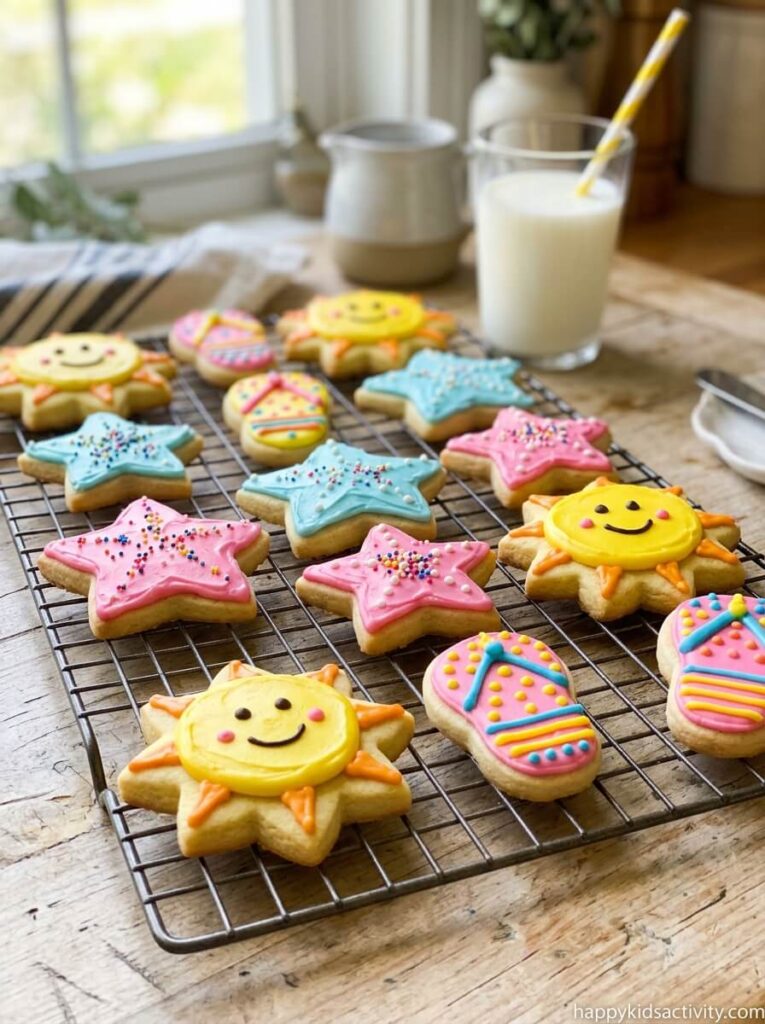
Sour cream keeps these soft for days, with a slight tang that stops them from tasting like pure sugar. This is the recipe people text me about afterward.
Ages: 2 and up to eat, 3 and up to help · Time: 30 min mixing, 20 min baking, 25 min frosting, 15 min cleanup · Mess: High, flour goes everywhere · Supervision: Hands on for rolling and the oven · Make ahead: Yes, freeze plain or frosted · Yield: About 2 dozen large cookies
Ingredients
- 2 cups sugar
- 1 cup butter, softened
- 2 eggs
- 1 cup sour cream
- 2 teaspoons vanilla extract
- 5 cups all purpose flour
- 3/4 teaspoon salt
- 2 teaspoons baking soda
For the frosting
- 1/2 cup butter, softened
- 8 ounces cream cheese, softened
- 1 teaspoon vanilla extract
- 5 cups powdered sugar
- 1/4 cup milk, added a little at a time
- Food coloring, optional
Swap to save: Plain yogurt in place of sour cream works, cookie cutters can be replaced by the rim of a drinking glass, and a simple glaze of powdered sugar plus a splash of milk costs a fraction of cream cheese frosting.
Instructions
- Cream the sugar, butter, and eggs until light and fluffy.
- Mix in the sour cream and vanilla.
- Whisk the flour, salt, and baking soda in a separate bowl, then stir it in gradually and stop as soon as it comes together.
- Chill the dough 30 minutes, then roll to about 1/4 inch thick on a floured counter and cut into suns, stars, or flip flops.
- Bake at 425°F for 5 minutes. The centers will look underdone, which is correct. They firm up as they cool.
- Cool completely before frosting, and I mean completely.
- For the frosting, beat the butter and cream cheese, add vanilla, then alternate powdered sugar and milk until smooth. Tint if you want.
- Frost and decorate.
Kid job: A 2 year old can press cutters into rolled dough with your hand over theirs. A 5 year old can cut and sprinkle. Kids 9 and up can run the mixer and pipe frosting, and they’ll be better at the flip flop details than you are.
Tip: Chilling the dough is the difference between rolling cookies and fighting a sticky blob. Thirty minutes is enough.
Heads up: Cream cheese frosting slides off cookies in direct sun. If the cookies are living outside for more than half an hour, use the powdered sugar glaze instead and skip the drama. This recipe also makes a real mess with kids involved, so this is a night before activity, not a party day one. Five cups of flour is a big batch, so freeze half the dough if your crowd is small.
6. Mixed Berry Crumble Bars
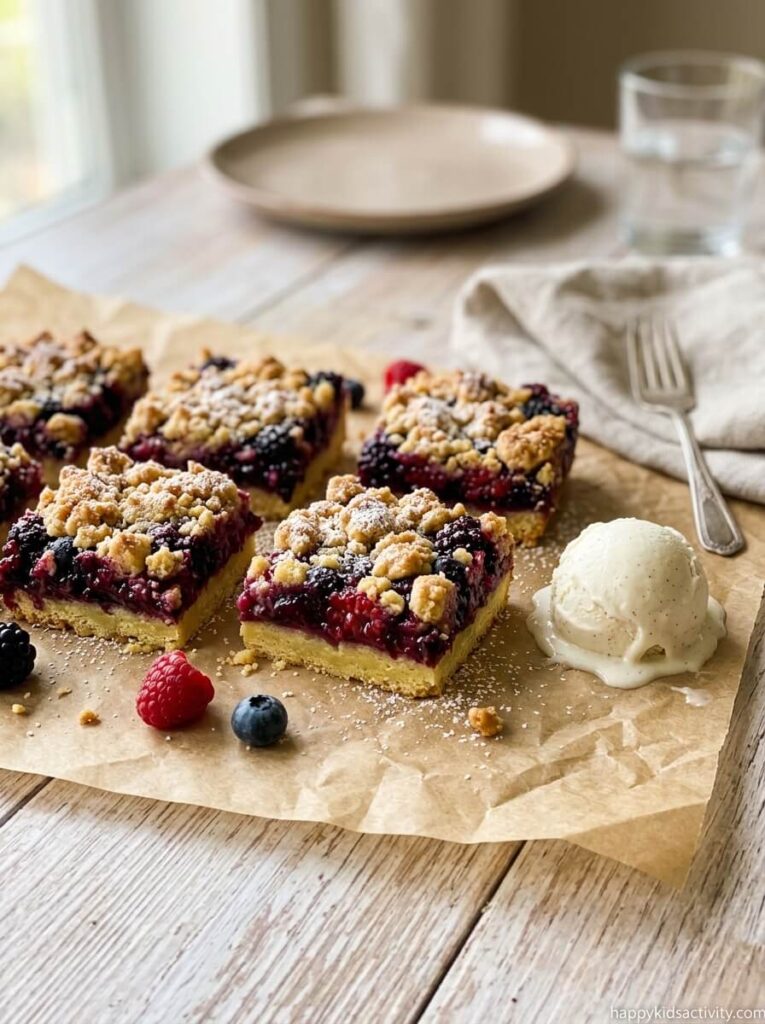
Summer berries baked between two layers of buttery shortbread, cut into squares you can hand to a kid without a plate. If I could only make one dessert on this list for an outdoor party, it would be this one, because nothing about it melts.
Ages: 2 and up · Time: 15 min prep, 45 min bake, 2 hours cooling, 5 min cleanup · Mess: Low, one bowl and one pan · Supervision: Hands off once it’s in the oven · Make ahead: Yes, 2 days covered · Yield: 9 large bars or 16 kid sized ones
Ingredients
- 1.5 to 2 cups mixed fresh berries
- 1/3 cup sugar, for the filling
- 1 tablespoon cornstarch
- 1.5 cups all purpose flour
- 1/2 cup granulated sugar, for the dough
- 1/2 teaspoon baking powder
- 1/4 teaspoon salt
- 1/2 cup cold salted butter, cubed
- 1 egg
- 1 teaspoon vanilla extract
- An 8×8 inch pan and parchment paper
Swap to save: Frozen mixed berries cost less than fresh and bake up identically, just add an extra half tablespoon of cornstarch. Foil pans from the dollar store save you the dish washing.
Instructions
- Heat the oven to 375°F and line the pan with parchment, leaving the edges hanging over the sides.
- Toss the berries with the 1/3 cup sugar and the cornstarch, then set aside.
- Mix the flour, 1/2 cup sugar, baking powder, and salt, then cut in the cold butter with a fork until crumbly.
- Beat the egg and vanilla together, add to the flour mixture, and mix lightly until it clumps.
- Press half the dough into the bottom of the pan.
- Spread the berries evenly over the base.
- Crumble the rest of the dough over the top.
- Bake 45 minutes until golden, then cool completely in the pan, about 2 hours, before you cut.
Kid job: A 2 year old can dump and stir the berries. A 5 year old can crumble the topping with their fingers, which is the fun part and also the part where imperfect looks better. Kids 10 and up can make these on their own start to finish.
Tip: Those parchment handles let you lift the whole slab out and cut clean squares on a board instead of sawing at the pan.
Heads up: Cut these warm and they’ll fall apart into a berry pile, so the two hours of cooling is not optional. That means starting them the night before, not the morning of. Very ripe berries release more liquid, so if yours are soft, add the extra cornstarch.
7. Mini Cookies and Cream Cheesecake Bites
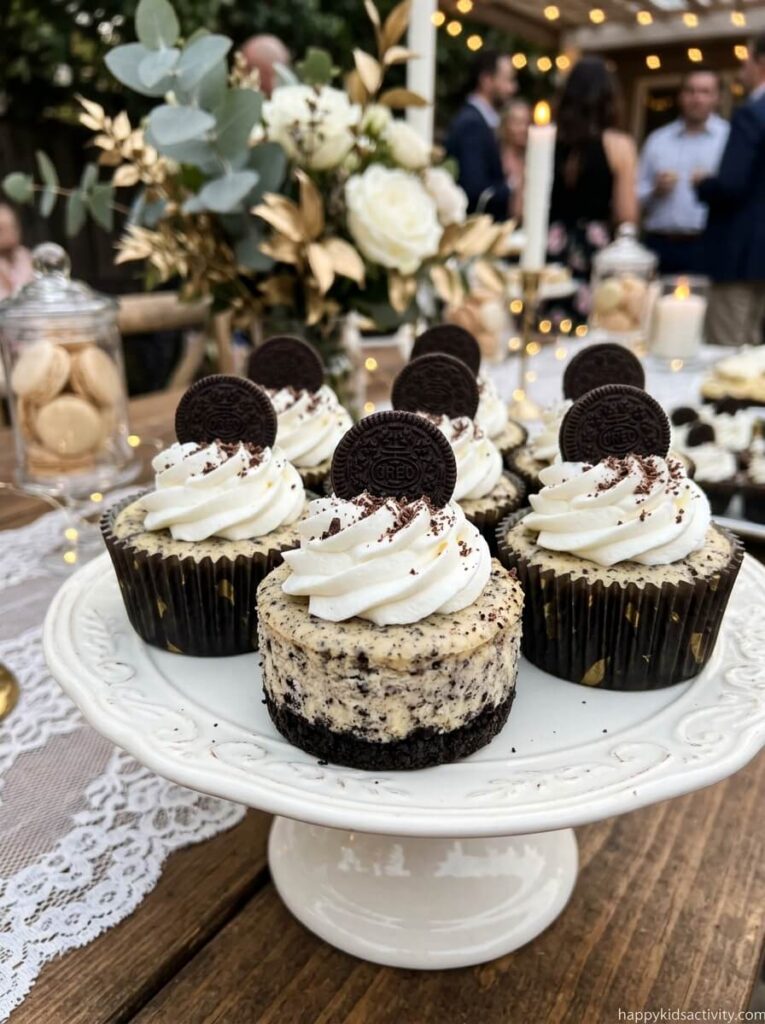
An Oreo crust, cheesecake filling loaded with crushed cookies, a swirl of whipped cream, and a mini Oreo on top. Individual portions mean no cutting and no serving spoon at the table.
Ages: 3 and up · Time: 40 min hands on, 3 hours chilling, 10 min cleanup · Mess: Medium · Supervision: Adult at the oven, kids fine for crust and topping · Make ahead: Yes, 3 days, and they’re better on day two · Yield: 12
Ingredients
- 10 Oreo cookies, for the crust
- 1 tablespoon melted butter
- 12 ounces cream cheese, softened
- 1/2 cup granulated sugar
- 2 teaspoons vanilla extract
- 1 egg
- A pinch of salt
- 1/2 cup chopped Oreos, filling removed
- 1 cup heavy cream
- 1/4 cup powdered sugar
- 12 mini Oreos for the top
- A mini cheesecake pan, or a muffin tin with paper liners
Swap to save: Store brand chocolate sandwich cookies are indistinguishable here, and a regular muffin tin with foil liners does the job without buying a cheesecake pan. Skip the piped whipped cream and just set a mini Oreo on top.
Instructions
- Heat the oven to 350°F and grease the pan or liners lightly.
- Crush the 10 Oreos fine and mix with the melted butter. Press about 1.5 teaspoons into each well and bake 5 minutes, then cool slightly.
- Beat the cream cheese, sugar, vanilla, egg, and salt smooth, then fold in the chopped Oreos. Fill nearly to the top and tap the pan on the counter to knock out air bubbles.
- Bake 15 to 18 minutes, until slightly puffed and just barely jiggly in the middle. Cool on the counter, then chill.
- Whip the cream, beat in the powdered sugar, and pipe onto each one.
- Top with a mini Oreo.
Kid job: Crushing cookies and pressing crusts is perfect for a 3 to 5 year old. A 7 year old can place the mini Oreos. Kids 10 and up can pipe the whipped cream from a zip bag with the corner snipped off.
Tip: Pull them when the centers still jiggle a little. Baked until firm means cracked tops and a dry, grainy texture.
Heads up: Paper liners peel off in shreds unless the cheesecakes are fully cold, so give them the full chill in the fridge, not 20 minutes. Piped whipped cream also collapses within 20 minutes outdoors in the heat, so pipe it right before you carry the tray out. Twelve goes fast at a party, so double the batch if you’ve got more than eight kids.
8. Blueberry Hand Pies
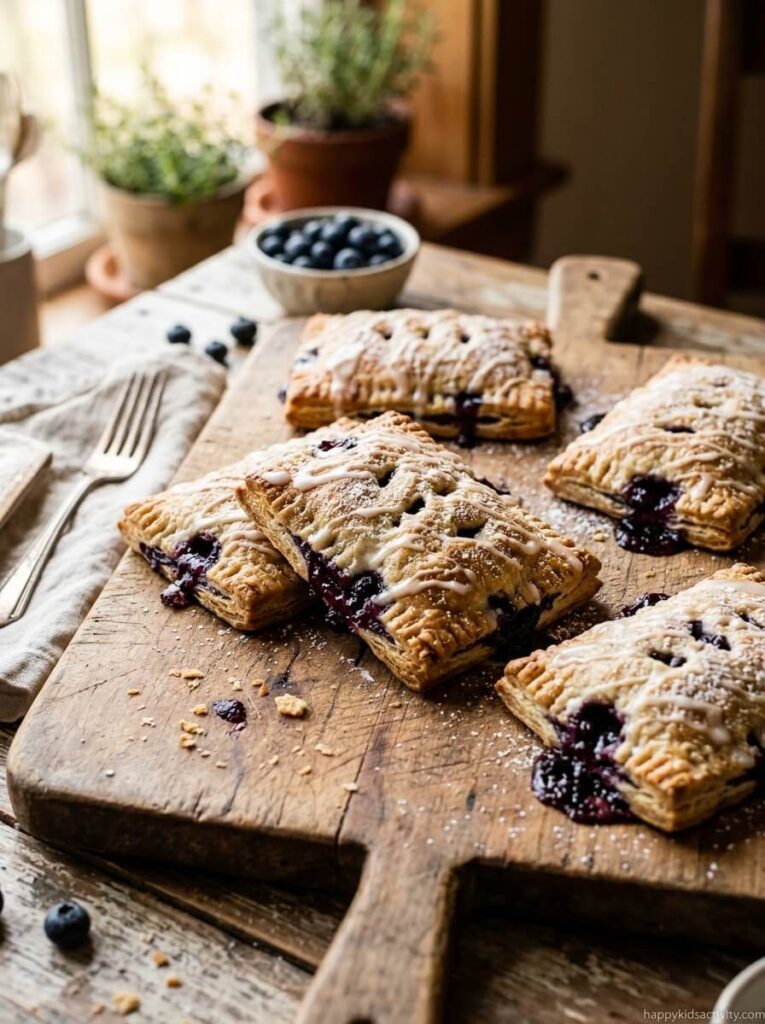
An upgraded toaster pastry. Flaky pie crust wrapped around thick blueberry jam, sized for one hand, which makes them one of the few desserts here that genuinely survives a wet kid.
Ages: 3 and up · Time: 20 min filling, 20 min assembly, 20 min bake, 20 min cooling · Mess: Low · Supervision: Adult at the stove and oven · Make ahead: Yes, 1 day, or freeze unbaked · Yield: 6
Ingredients
- 2 sheets refrigerated pie crust
- 2 cups wild blueberries, fresh or frozen
- 2 tablespoons cornstarch, or 2.5 if using frozen
- 1/3 cup sugar
- 1/8 teaspoon salt
- 1 teaspoon lemon juice
- 1 large egg plus 1 teaspoon water, for the egg wash
- 1 cup powdered sugar and 1 to 2 tablespoons heavy cream, for an optional glaze
Swap to save: Frozen wild blueberries are cheaper than fresh most of the year, and a jar of blueberry jam thickened with a teaspoon of cornstarch skips step one entirely. Store brand refrigerated crust performs the same as name brand.
Instructions
- Combine the blueberries, cornstarch, sugar, salt, and lemon juice in a saucepan. Simmer over medium high heat, then lower and stir until thick, about 5 minutes. Cool completely.
- Heat the oven to 425°F and line a baking sheet with parchment.
- Roll each crust into a rectangle roughly 10 by 15 inches and cut into 6 pieces about 3.25 by 5 inches.
- Whisk the egg with the water and brush the inner edges of 6 rectangles.
- Spoon filling into the center of those 6, no more than 1.5 tablespoons each, and move them to the sheet.
- Cut vent holes in the remaining rectangles, lay them on top, and crimp the edges with a fork.
- Chill 20 minutes if the dough has gone soft, then brush the tops with egg wash.
- Bake 18 to 20 minutes until golden. Cool 20 minutes before glazing.
Kid job: A 4 year old can crimp edges with a fork and brush on egg wash. A 7 year old can cut the vent holes into shapes. Older kids can roll and cut the dough, and cutting them into circles with a wide glass looks great.
Tip: Keep the dough cold right up until it hits the oven. Cold fat meeting hot air is what makes the layers flake.
Heads up: Overfill these and the filling blows out the sides and welds to the pan, which is the classic first try mistake. Level tablespoons, not heaping. Fruit filling also holds heat far longer than the crust suggests, so a pie that feels cool outside can still burn a mouth inside. Let them sit the full 20 minutes before handing one to a kid, and don’t glaze them if they’ll be sitting in the sun.
Fresh Fruit and Better-For-You Snacks
Fruit disappears faster than dessert at a pool party, which surprised me the first time I counted. Hot kids want cold and wet, not rich and sweet. These are the recipes I lean on hardest.
9. Rainbow Fruit Salad with Honey Lime Dressing
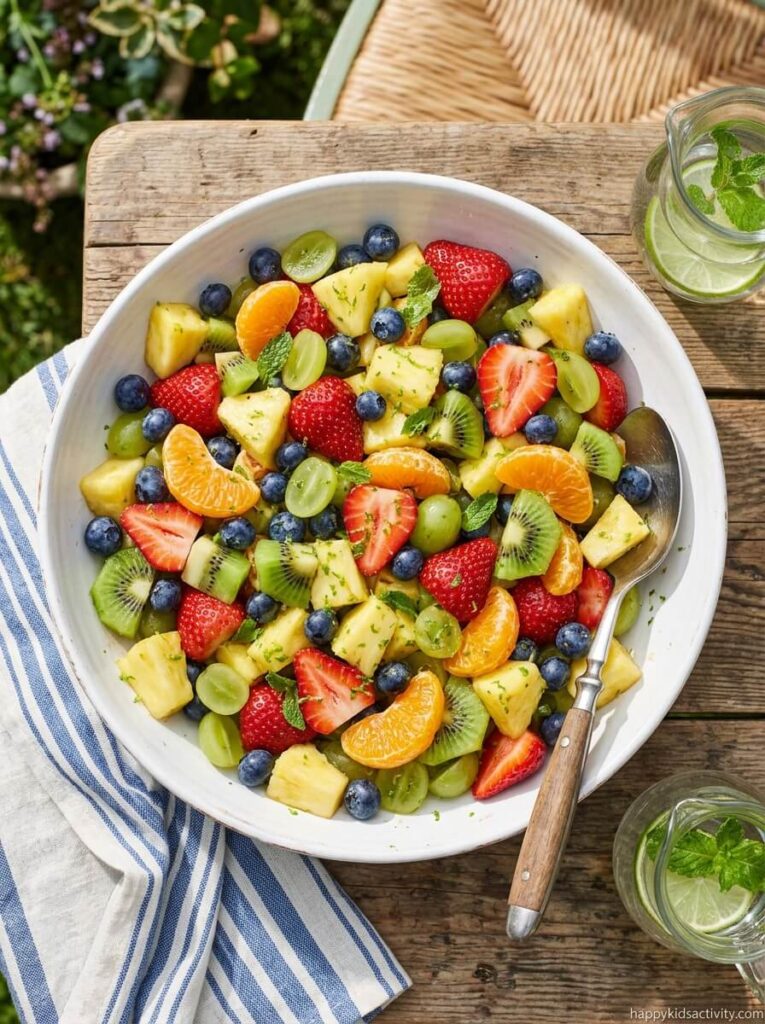
A big bowl of cold fruit in a honey lime dressing that keeps it from tasting like plain fruit. This is the dish that makes the table look finished.
Ages: 1 and up, with cutting adjustments below · Time: 25 min chopping, 5 min dressing, 5 min cleanup · Mess: Low, but juicy · Supervision: Adult does the knife work · Make ahead: Morning of, not the day before · Serves: 12
Ingredients
- 1 pound fresh pineapple, chopped
- 12 ounces strawberries, chopped
- 12 ounces blueberries
- 12 ounces red grapes, halved
- 5 clementines, peeled and segmented
- 4 kiwis, peeled and chopped
- 1/4 cup honey
- 2 teaspoons lime zest
- 1.5 tablespoons fresh lime juice
Swap to save: Buy whatever fruit is on sale and hit the same colors, use canned pineapple in juice (drained well) instead of fresh, and swap maple syrup or a spoonful of sugar for honey. A bottle of lime juice works if you skip the zest.
Instructions
- Wash, dry thoroughly, and chop all the fruit into a large bowl.
- Whisk the honey, lime zest, and lime juice in a small bowl.
- Pour the dressing over the fruit and toss gently to coat.
- Move to a serving bowl and top with extra zest if you like.
Kid job: A 3 year old can tear apart clementine segments and dump berries in. A 6 year old can cut soft fruit with a plastic serrated knife. Kids 10 and up can zest, juice, and whisk the dressing themselves.
Tip: Dry the fruit properly after washing. Wet fruit waters down the dressing and it pools in the bottom of the bowl instead of clinging.
Heads up: Skip the honey entirely if any guest is under 1 year old, since honey isn’t safe for infants. Grapes need to be quartered lengthwise for kids under 4, not halved into rounds. By hour two, the pineapple juice starts softening the strawberries into mush, so serve it in the first hour or hold the berries back and add them at the table. Serve it in individual cups rather than one shared bowl, because kids will reach into a communal bowl with pool water dripping off their arms. A mesh food tent over the bowl also keeps the wasps off, and wasps around a fruit bowl are a real problem in late summer.
10. Fresh Fruit Cream Cheese Sandwiches
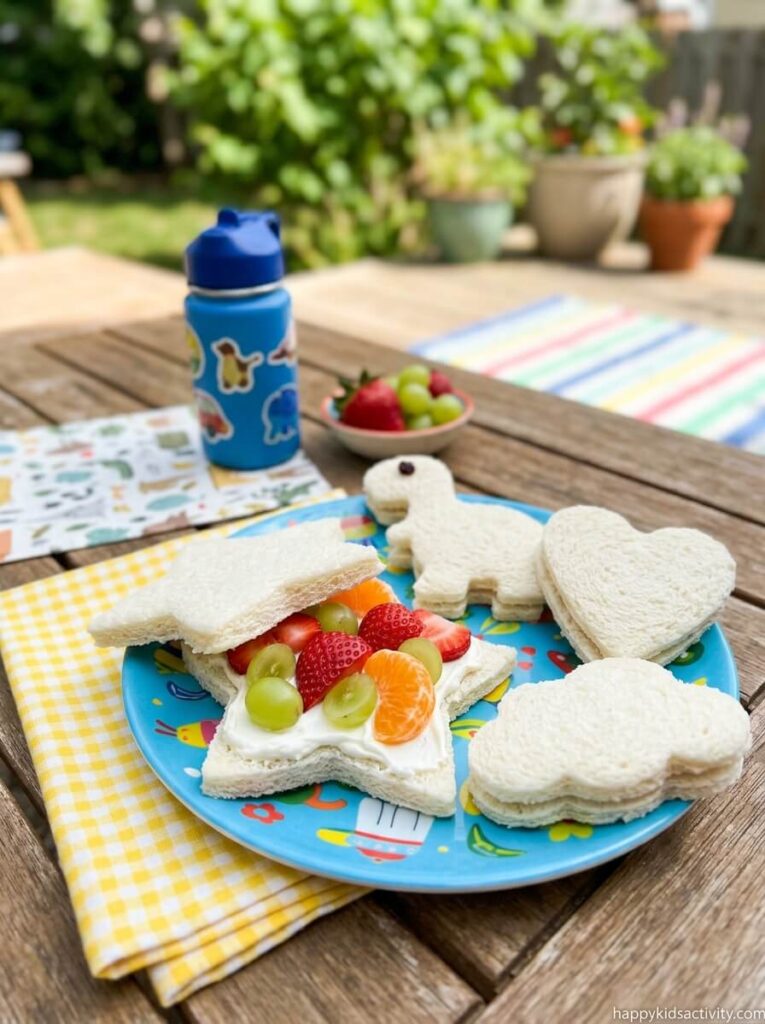
Soft bread, a thick layer of cream cheese, and fruit arranged on top. Half snack, half activity, because kids build their own and that keeps them at the table for ten minutes.
Ages: 2 and up · Time: 10 min prep, 5 min assembly, 5 min cleanup · Mess: Medium, cream cheese ends up on elbows · Supervision: Hands on if kids are building · Make ahead: No, these are a serve now item · Yield: 2 sandwiches, so multiply by your kid count
Ingredients
- 4 slices soft white bread
- 2 tablespoons cream cheese
- 6 strawberries, halved lengthwise
- 8 green grapes, halved
- 8 red or black grapes, halved
- 1 clementine, peeled and segmented
Swap to save: Whatever bread is in the box already, store brand cream cheese, and any fruit you have. Canned mandarin oranges, drained and patted dry, cost less than clementines out of season.
Instructions
- Wash and dry the fruit, slice the strawberries and grapes, and separate the clementine segments.
- Trim the crusts off the bread.
- Spread cream cheese on one side of each slice.
- Arrange fruit over the cream cheese however you like.
- Top with a second slice and press gently.
- Cut into halves, quarters, or shapes with a cookie cutter and serve.
Kid job: This is the recipe where a 2 year old can genuinely do most of it. Set out bowls of fruit and let them place pieces. Kids 8 and up will start making patterns and faces, which is worth the extra five minutes.
Tip: Pat the fruit dry before it touches the bread. Wet strawberries turn a sandwich to mush in about 20 minutes.
Heads up: Cookie cutter shapes waste half the bread, so cut them over a bowl and eat the scraps yourself. These need to be eaten within an hour or two and they don’t survive the cooler, so make them in a batch while kids are drying off between swims rather than setting them out early. Cream cheese is dairy sitting in the heat, so the 1 hour rule applies. Sticky fingered assembly is a hard no for some sensory sensitive kids, so offer them the fruit plain on the side.
11. Rainbow Fruit Skewers with Cheesecake Dip
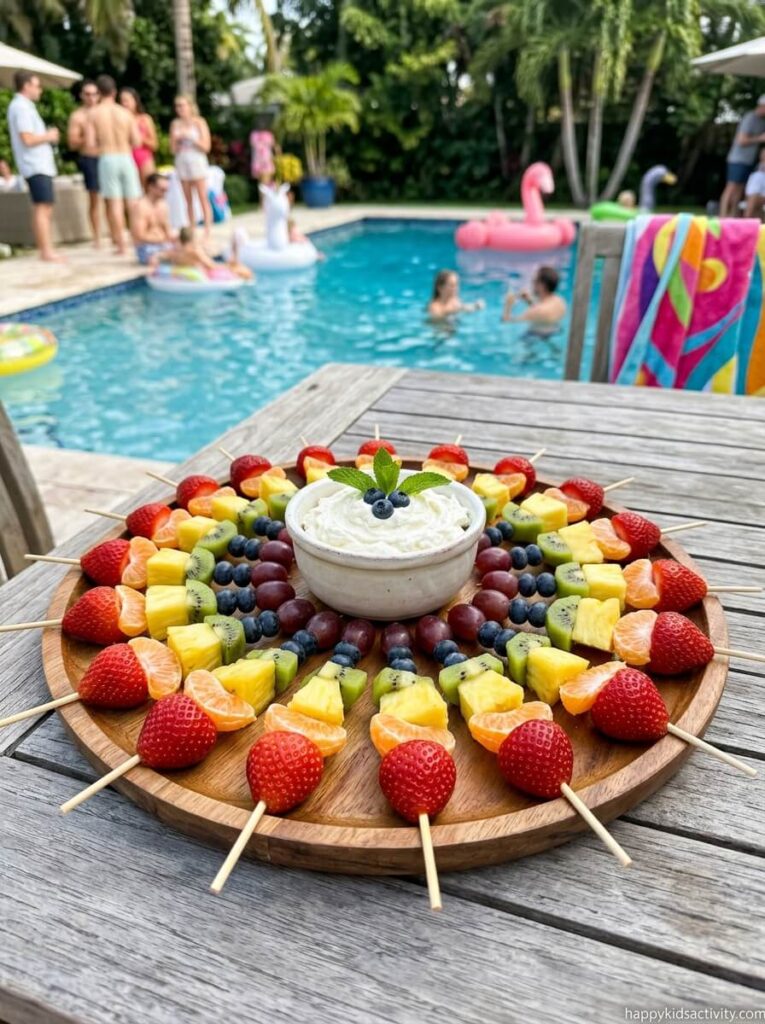
Fruit threaded in rainbow order, which somehow makes kids eat three skewers of the same fruit they ignored in a bowl. The cheesecake dip is what makes the adults come back.
Ages: 4 and up with snipped skewers, 2 and up if you use pretzel sticks or serve the fruit loose · Time: 20 min cutting, 20 min threading, 10 min for the dip · Mess: Low · Supervision: Adult cuts, adult snips the skewer points · Make ahead: Yes, 1 day, kept covered in the fridge · Yield: 21 skewers
Ingredients
- 2 cups strawberries, halved or quartered
- 21 goldenberries or clementine segments
- 1 small pineapple, cubed
- 21 kiwi chunks, about 2 kiwis
- 42 blueberries
- 21 purple grapes
- 21 wooden skewers
For the dip
- 4 ounces cream cheese, softened
- 6 tablespoons powdered sugar, or 3 tablespoons maple syrup
- 1/2 teaspoon vanilla extract
- 1/16 teaspoon salt
- 1/2 cup cold heavy cream
Swap to save: Canned mandarin oranges or cubed cantaloupe instead of goldenberries, which are expensive and hard to find. Pretzel sticks instead of wooden skewers. For the dip, plain yogurt with a spoonful of honey is a cheaper, lighter version that kids like just as much.
Instructions
- Wash, dry, and cut all the fruit into similar sized pieces.
- Thread in rainbow order: strawberry, goldenberry or clementine, pineapple, kiwi, two blueberries, grape.
- Lay them out in a fan on a platter and refrigerate until serving.
- For the dip, beat the cream cheese, sweetener, vanilla, and salt until smooth. Add the cold cream slowly on low, then beat on high to stiff peaks.
Kid job: Threading is the whole appeal for kids 5 and up, and it keeps them busy for a solid 15 minutes. Little ones can sort fruit into color bowls first. Give a 10 year old the mixer for the dip and they’ll own it.
Tip: Portion the dip into small individual cups instead of one bowl. Twelve kids double dipping in one bowl of cream cheese dip is exactly as bad as it sounds.
Heads up: Threading 21 skewers takes longer than you expect, closer to 20 minutes, so do it the night before with the radio on. Snip the sharp points off with kitchen shears, then count the skewers back in at the end, because one left on the deck ends with somebody stepping on it barefoot. The dip is dairy and heavy cream, so it stays on ice. Skip the skewers entirely for kids under 4 and give them fruit in a cup.
12. Watermelon Caprese Skewers
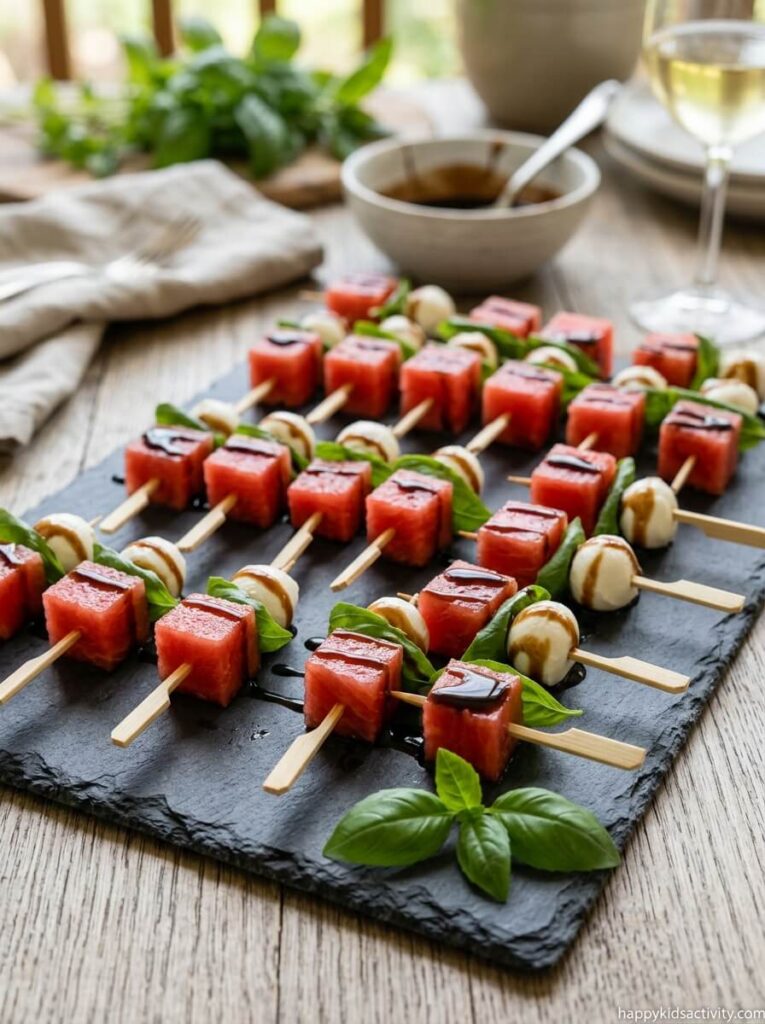
Watermelon, mozzarella, basil, and a drizzle of balsamic glaze. Ten minutes of work for something that looks like you tried much harder.
Ages: 6 and up, and honestly this one is for the parents · Time: 10 min prep, 5 min cleanup · Mess: Low · Supervision: Adult cuts the melon, kids can assemble · Make ahead: Cut the components ahead, assemble within an hour · Serves: 10
Ingredients
- 1/2 medium watermelon
- 12 mozzarella snacking cheese balls
- 12 fresh basil leaves
- 3 tablespoons balsamic glaze
- Toothpicks or small skewers
Swap to save: A block of low moisture mozzarella cut into cubes costs less than snacking balls, basil from a $3 grocery pot lasts all summer on a windowsill, and you can make balsamic glaze by simmering regular balsamic down by half for about 8 minutes.
Instructions
- Cut the watermelon into 1/2 to 1 inch chunks and drain them on a paper towel.
- Stack watermelon, a folded basil leaf, and mozzarella on each toothpick.
- Drizzle with balsamic glaze and serve cold.
Kid job: Stacking is easy for a 5 year old, even if they won’t eat the result. Older kids can do the whole platter.
Tip: Serve the balsamic on the side in a small dish instead of drizzling ahead. It soaks into the watermelon and turns the skewers a dull brown within half an hour.
Heads up: I’ll be honest, my kids pulled the watermelon off and left the mozzarella and basil sitting on the toothpick. Most kids under 6 are not going to eat this, so make it for the adults and don’t count it toward your kid food. Watermelon also weeps, so the platter fills with pink liquid, which is why the paper towel step matters. Count the toothpicks in and out, since they’re small, sharp, and easy to lose on a wet deck.
13. No-Bake Energy Bites
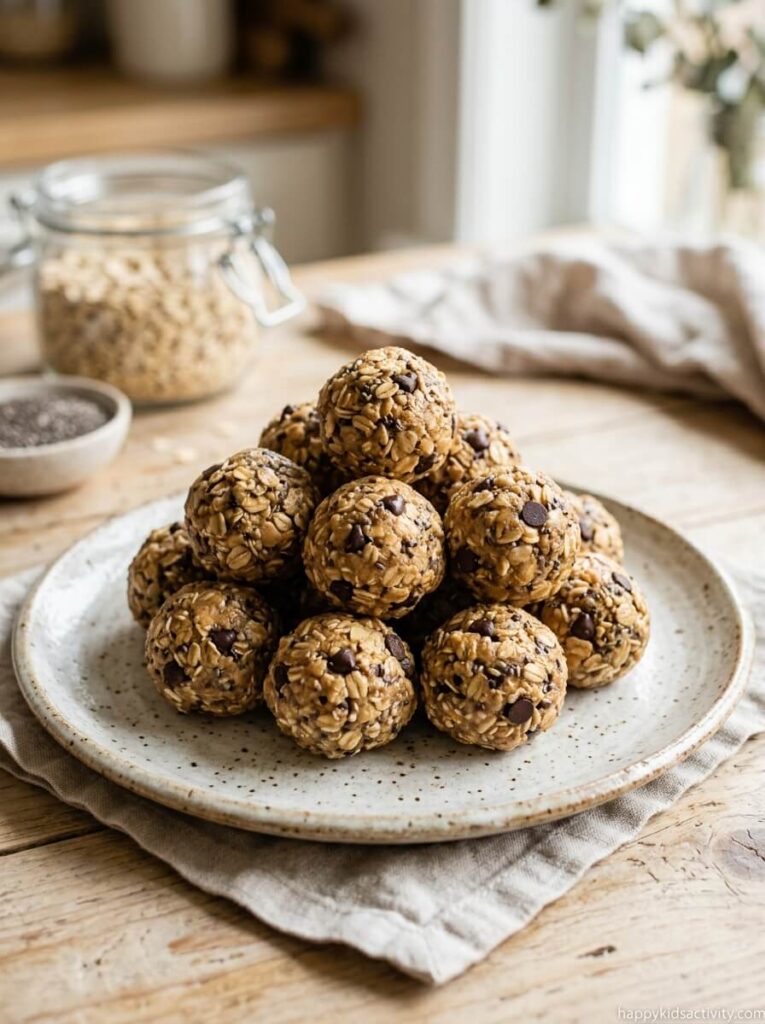
Pantry staples rolled into balls, no oven, ten different flavor directions. These are the snack I make the night before every party because they fill kids up between swims.
Ages: 3 and up · Time: 15 min mixing, 5 min rolling, 5 min cleanup · Mess: Medium, sticky hands guaranteed · Supervision: Check in every few minutes · Make ahead: Yes, 1 week in the fridge or a month in the freezer · Yield: 18 to 22 bites
Base ingredients
- 1 cup rolled oats
- 1/4 cup ground flax or chia seeds
- 1/2 cup peanut butter, or any nut or seed butter
- 1/3 cup maple syrup or honey
- 1 teaspoon vanilla extract, optional
- A pinch of salt
Flavor add ins
- Chocolate chip cookie: 1/2 cup mini chocolate chips
- Monster cookie: 1/2 cup M&Ms
- No bake cookie: 3 tablespoons cocoa powder plus 1/4 cup mini chocolate chips
- Strawberry: 3/4 cup crushed freeze dried strawberries plus 1 teaspoon cinnamon
- Blueberry muffin: 1/2 cup dried blueberries, 1 teaspoon cinnamon, 1 teaspoon lemon zest
Swap to save: Store brand oats and peanut butter, ground flax from the bulk bin, and raisins or any chopped dried fruit instead of freeze dried strawberries, which are the priciest thing on this list. Sunflower seed butter is the swap if nuts are off the table.
Instructions
- Stir the oats, ground flax or chia, and any spices together.
- Add the nut butter, syrup, vanilla, and salt, and mix until fully combined. Add water a teaspoon at a time if it’s too dry to hold.
- Fold in your mix ins.
- Scoop and roll into balls.
- Store in the fridge up to a week, or freeze up to a month.
Kid job: Rolling balls is the single best kitchen job for a 3 to 5 year old, and slightly lumpy ones taste the same. A 7 year old can measure and mix everything. Older kids can invent their own flavor, which is a better activity than it sounds.
Tip: If the mix feels loose, wait 5 minutes. The flax or chia absorbs moisture and firms it right up. If it’s still loose, add another 1/4 cup of oats.
Heads up: Peanut butter is a top allergen, so ask before you make the peanut version for a party, and use sunflower seed butter if there’s any doubt. Skip honey if a child under 1 will be eating. The M&M version is the wrong choice for an outdoor party, because the candy shells crack and the chocolate smears the second warm little hands hold them. Serve these straight from the cooler and they hold their shape.
14. Red Pepper Hummus with Veggies
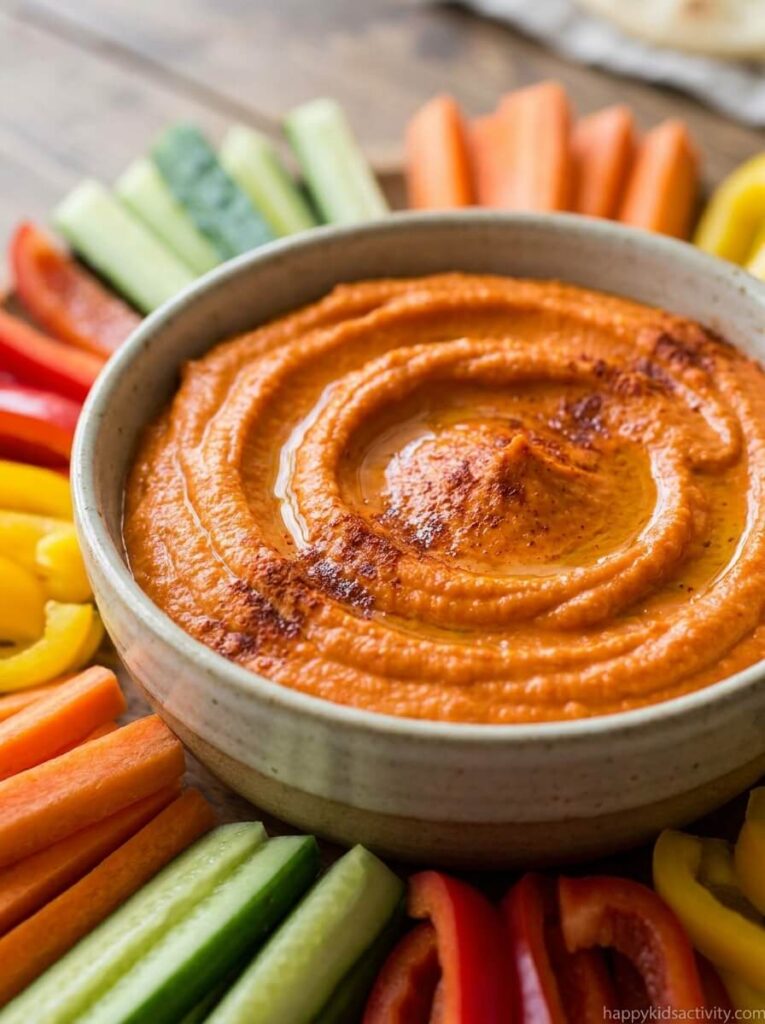
Roasting the peppers first gives this a smoky sweetness that no tub from the store gets close to. It’s also the cheapest thing on this list per serving.
Ages: 2 and up, with veggie prep notes below · Time: 40 min roasting, 20 min steaming, 10 min blending, 10 min cleanup · Mess: Low · Supervision: Adult at the oven and the blender · Make ahead: Yes, up to 5 days, and it improves overnight · Serves: 6
Ingredients
- 2 medium red bell peppers
- 1 can chickpeas, drained and rinsed, liquid reserved
- 2 tablespoons aquafaba, the reserved chickpea liquid
- 3 tablespoons lemon juice
- 1/4 cup tahini
- 4 garlic cloves
- 1/2 teaspoon cumin
- 1/2 teaspoon smoked paprika
- 1/4 teaspoon salt
Swap to save: a jar of roasted red peppers, drained and patted dry, replaces the whole roasting step and cuts this to 10 minutes. Dried chickpeas soaked overnight cost a fraction of canned. Plain Greek yogurt can stand in for tahini if sesame is off limits, though the flavor shifts.
Instructions
- Heat the oven to 400°F. Roast the whole peppers on a lined sheet for 20 minutes, flip, and roast 20 more until blistered.
- Move them to a bowl, cover with a towel, and let them steam 20 minutes.
- Peel off the skins, pull out the stems and seeds, and slice.
- Blend the peppers with everything else until smooth, then adjust the salt.
- Scrape into a bowl, dust with extra paprika, and serve with vegetables and crackers.
Kid job: peeling the steamed peppers is a strangely satisfying job for a 4 year old, and the skins slip right off. Kids 8 and up can measure and run the blender with you there. Little ones can arrange the veggie platter.
Tip: Smooth, fresh tahini makes or breaks the texture. If yours has been in the pantry for a year and separated into concrete at the bottom, it will taste bitter.
Heads up: Tahini is sesame, one of the major labeled allergens in the US, so put a card in front of this bowl. Raw carrot and celery sticks are a choking risk for kids under 4, so give the little ones cucumber sticks, soft pepper strips, or lightly steamed carrots instead. An hour and twenty minutes of roasting on party day is a bad plan, so make this two days ahead, which is when it tastes best anyway.
15. Aquarium Trail Mix
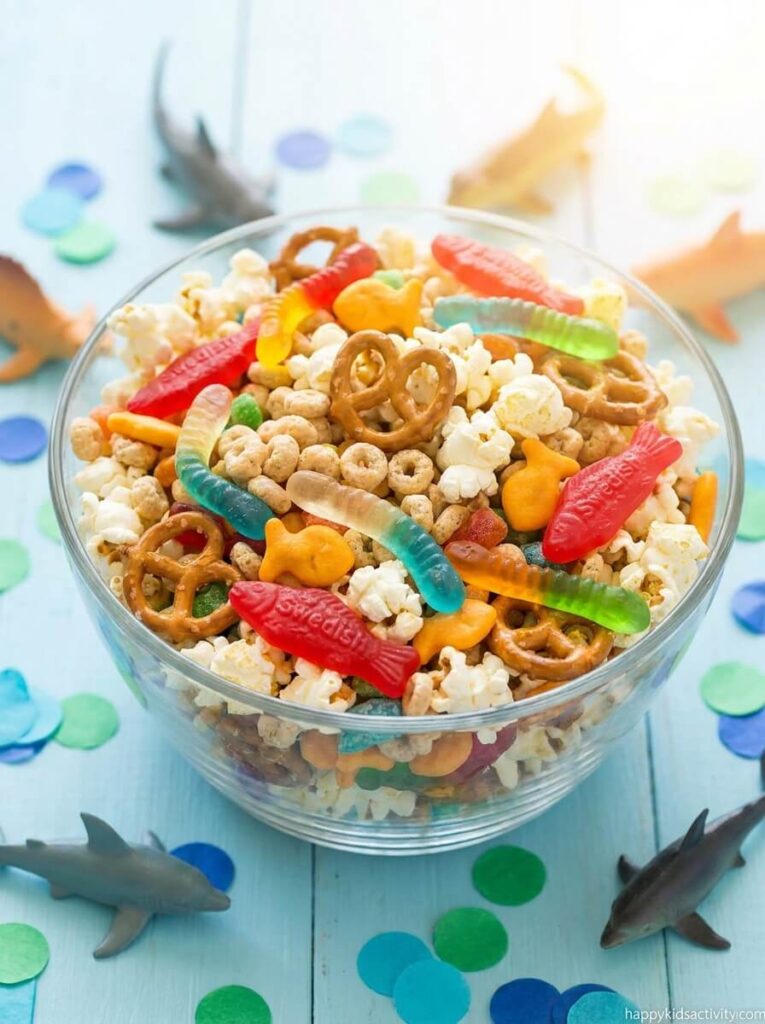
Gummy worms as eels, Swedish Fish swimming through, yogurt raisins as turtle eggs. Five minutes, no cooking, and a kid can make the entire thing while you do something else.
Ages: 4 and up · Time: 5 min mixing, 5 min bagging, no cleanup beyond one bowl · Mess: Low · Supervision: Check in every few minutes · Make ahead: Yes, 3 days in a sealed container · Yield: 7 cups, about 14 half cup servings
Ingredients
- 2 heaping cups popped popcorn
- 1 cup mini pretzel twists
- 1 cup Kix cereal
- 1 cup Goldfish crackers
- 1 cup gummy worms
- 1/2 cup vanilla yogurt raisins
- 1/2 cup Swedish Fish
Swap to save: Microwave popcorn or a bag popped on the stove costs pennies, store brand cheese crackers work fine, and any gummy candy from the dollar store bin does the job. Skip the yogurt raisins if you’re trimming the list, since they’re the priciest item and the first thing kids pick around.
Instructions
- Combine everything in a large bowl.
- Mix, then store leftovers in an airtight container.
Kid job: This is the recipe to hand over completely. A 4 year old can dump and stir. A 7 year old can portion it into bags and even label them. Older kids can invent their own version, which is a decent pre party activity for the birthday kid.
Tip: Portion it into 5 ounce cups or snack bags ahead of time. It’s the difference between one refill trip and fifteen kids reaching into a shared bowl with wet hands.
Heads up: Popcorn, whole hard candies, and gummy candy are choking risks for kids under 4, so make a toddler version with just Kix, Goldfish, and diced soft fruit. Also, gummy worms in direct sun fuse into a single sticky brick within about half an hour, and I’ve had to peel a whole bag apart because of it. Keep the bags in the shade or in a cooler, and add the gummy candy last if you’re mixing in advance.
16. Roasted Trail Mix
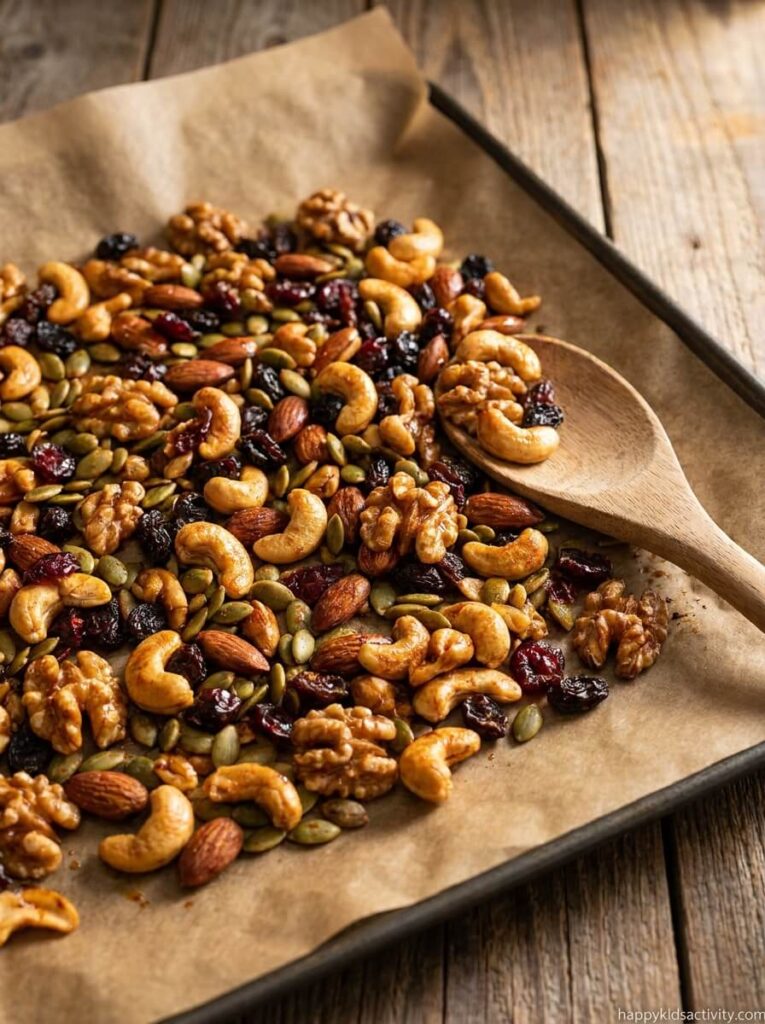
Nuts and seeds toasted with maple syrup and smoked paprika. This is the bowl the adults park next to, and it keeps for two weeks, so it’s worth making ahead of the party.
Ages: 4 and up, and only if nobody has a nut allergy · Time: 5 min prep, 18 min roasting, 20 min cooling · Mess: Low · Supervision: Adult at the oven, the tray comes out very hot · Make ahead: Yes, 2 weeks sealed · Yield: About 3 cups
Ingredients
- 1/3 cup peanuts
- 1/3 cup chopped walnuts
- 1 cup cashews
- 3/4 cup almonds
- 1/4 cup pumpkin seeds
- 1 tablespoon pure maple syrup
- 1/4 teaspoon smoked paprika
- 1/2 teaspoon garlic powder
- A pinch of salt
- 1/4 cup raisins
- 1/4 cup dried cranberries
- A handful of chocolate chips, optional
Swap to save: Buy one bag of mixed nuts instead of four separate bags, use honey instead of maple syrup, and stretch the mix with roasted chickpeas or pretzel pieces, which cost almost nothing.
Instructions
- Heat the oven to 350°F.
- Toss the nuts and pumpkin seeds with the maple syrup, then add the paprika, garlic powder, and salt.
- Spread on a lined tray and bake 8 minutes, stir, then bake 8 to 10 minutes more until golden and no longer wet looking.
- Cool completely, then stir in the raisins, cranberries, and chocolate chips.
- Store airtight for up to two weeks.
Kid job: A 4 year old can measure and dump. Stirring the hot tray is an adult job, and so is the pan coming out of the oven. Older kids can handle the whole recipe with supervision at the oven door.
Tip: Let the nuts cool fully before the chocolate chips go in, or you’ll have one warm clump instead of trail mix.
Heads up: This bowl is peanuts and tree nuts, full stop. If any guest has a nut allergy, don’t make it at all for that party, because a shared table plus wet hands is exactly how cross contact happens. Whole nuts are also a choking risk under 4. Maple coated nuts taste sticky and underdone until they’re completely cool, so don’t judge the batch at minute 16.
17. Yogurt Fruit Dip
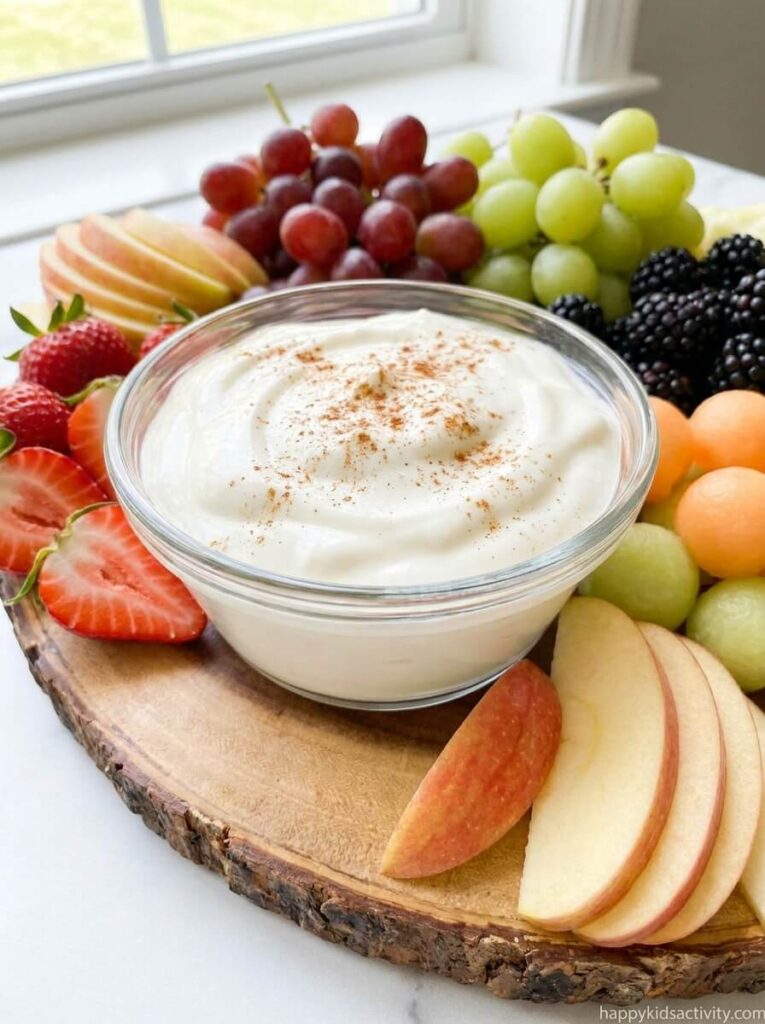
Four ingredients, two minutes, and it tastes like a light honey cheesecake. This is my emergency recipe when I’ve run out of time and still want one more thing on the table.
Ages: 1 and up, minus the honey for infants · Time: 2 min mixing, 1 min cleanup · Mess: Low · Supervision: A 5 year old can do this alone · Make ahead: Yes, 1 week · Yield: 1 cup
Ingredients
- 1 cup plain full fat yogurt
- 1 tablespoon honey
- 1/4 teaspoon ground cinnamon
- 1/2 teaspoon vanilla extract
Swap to save: whatever plain yogurt is already in the fridge, maple syrup or sugar instead of honey, and a shake of cinnamon sugar if you don’t have separate cinnamon.
Instructions
- Stir everything together until smooth.
- Cover and refrigerate until you’re ready to serve it with fruit.
Kid job: genuinely a solo job for a 5 year old, and a good one for a kid who wants to help but can’t be near the oven. Older kids can taste and adjust the sweetness themselves.
Heads up: Thin yogurt makes a runny dip that slides off fruit, so use Greek yogurt if you want it thick enough to cling. It separates as it sits, so stir before serving. Leave the honey out if a baby under 1 will be eating, and portion it into small cups rather than one shared bowl.
18. PB&J Banana Sushi Wraps
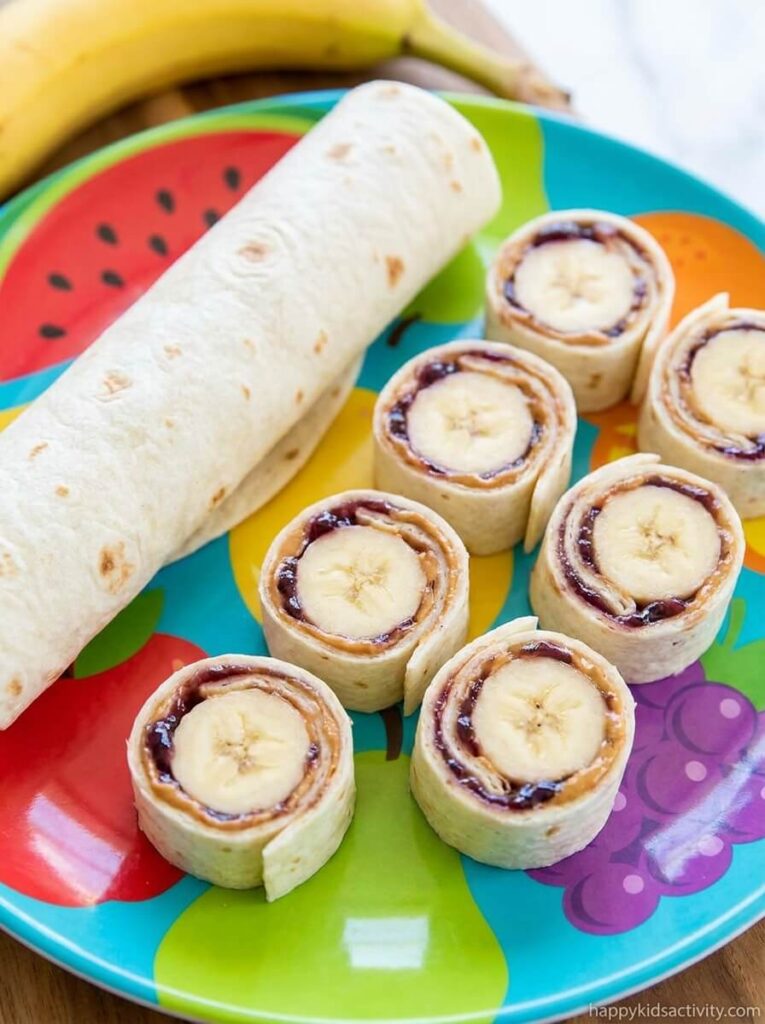
A peanut butter and jelly sandwich rolled around a whole banana and sliced into rounds. Ten minutes, no cooking, and it’s filling in a way that fruit alone isn’t.
Ages: 2 and up · Time: 5 min assembly, 5 min slicing and cleanup · Mess: Medium, peanut butter on the knife and the counter · Supervision: Adult slices, kid spreads · Make ahead: No, 2 hours maximum · Yield: 1 wrap, 4 to 6 pieces
Ingredients
- 1 medium flour tortilla
- 2 to 3 tablespoons peanut butter
- 1 to 2 tablespoons jelly, any flavor
- 1 medium banana
Swap to save: Sunflower seed butter for nut free crowds, sandwich bread flattened with a rolling pin instead of tortillas, and honey or a smear of cream cheese instead of jelly.
Instructions
- Spread peanut butter across the whole tortilla, right out to the edges.
- Spread jelly over the peanut butter.
- Lay the banana near one edge and roll the tortilla tightly around it.
- Slice into 1 inch rounds and serve cut side up.
Kid job: Spreading is a great 3 year old job, and it does not matter if it’s uneven. A 6 year old can roll. Kids 9 and up can slice with a butter knife, which cuts these cleanly since nothing here is firm.
Tip: Warm the tortilla for 10 seconds in the microwave before you roll. A cold tortilla straight from the fridge cracks down the middle every time.
Heads up: Peanut butter is a top allergen, so label it clearly or use sunflower seed butter. If the peanut butter doesn’t reach the edges, the rounds unravel the moment a kid picks one up. Toddlers will often eat the banana out of the center and hand you back the tortilla ring, which is fine, just expect it. Brush the cut ends with lemon juice if you’re prepping ahead, and keep them in the fridge no more than two hours.
19. Banana Split Bites
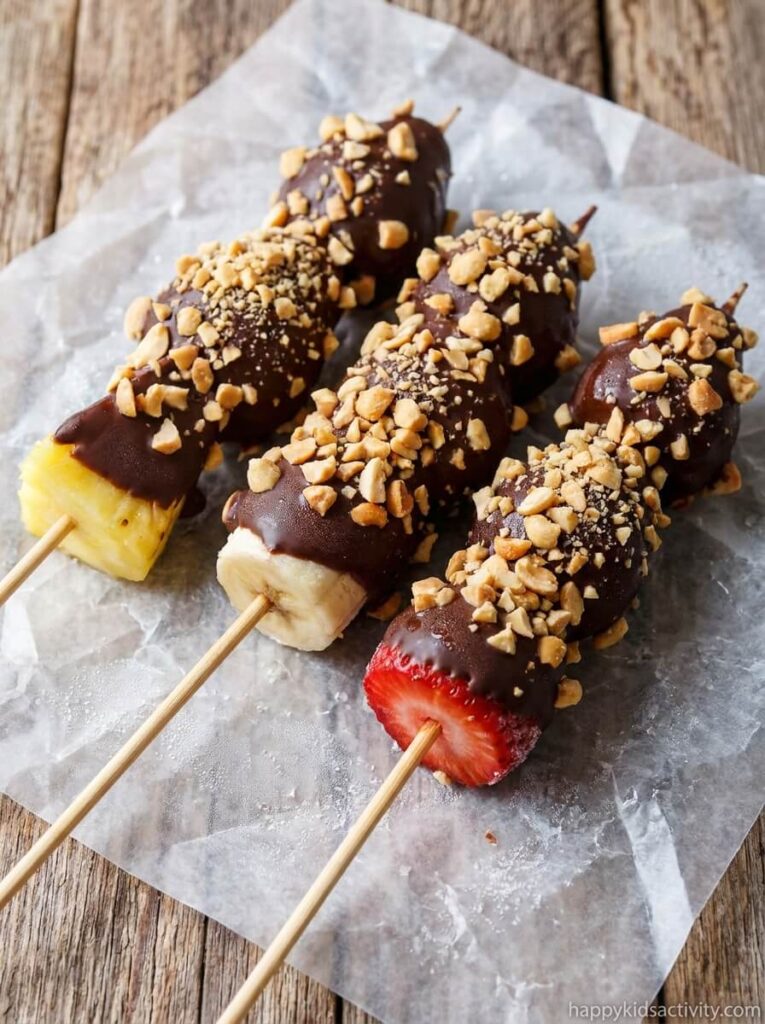
All the flavors of a banana split on a stick, no ice cream and no bowls. On a hot day these are better frozen solid, and they vanish within minutes of hitting the table.
Ages: 3 and up · Time: 15 min prep, 10 min freezing, 10 min dipping, 10 min cleanup · Mess: Medium, melted chocolate · Supervision: Adult melts the chocolate, kids can dip · Make ahead: Yes, that morning, kept in the freezer · Yield: 12 bites
Ingredients
- 3 bananas
- 1/4 pound cored pineapple
- 6 strawberries
- 1 cup dipping chocolate
- 1/4 cup chopped peanuts
- 12 popsicle sticks or skewers
- Wax paper or parchment
Swap to save: Chocolate chips with half a teaspoon of coconut oil instead of dipping chocolate, canned pineapple chunks drained and dried instead of fresh, and sprinkles or crushed graham crackers instead of peanuts, which is also the allergy friendly version.
Instructions
- Halve the strawberries.
- Cut a piece of banana and a piece of pineapple to match each strawberry half.
- Thread each stick in this order: pineapple, banana, strawberry.
- Freeze the loaded sticks for 10 minutes.
- Line a tray with wax paper and put the chopped peanuts on a small plate.
- Melt the chocolate in the microwave in 30 second bursts, stirring each time, until smooth.
- Dip each cold skewer in chocolate, then roll it in the peanuts.
- Set on the tray and keep chilled until serving.
Kid job: Threading fruit is good for a 5 year old. Dipping works for 7 and up, though expect chocolate fingerprints. Little ones can shake sprinkles over the wet chocolate.
Tip: Ten minutes in the freezer, not forty. You want the fruit cold enough to set the chocolate quickly, but a fully frozen skewer sweats and the chocolate slides right off.
Heads up: Wet fruit is the reason chocolate won’t stick, so pat everything dry before it goes on the stick. Chopped peanuts make this a nut item, so switch to sprinkles if you’re unsure about allergies, and remember whole or chopped nuts are a choking risk for kids under 4. Pull the stick out for toddlers and cut the fruit smaller. These are best made the morning of and kept frozen until the moment you serve them.
20. Banana Yogurt Popsicles
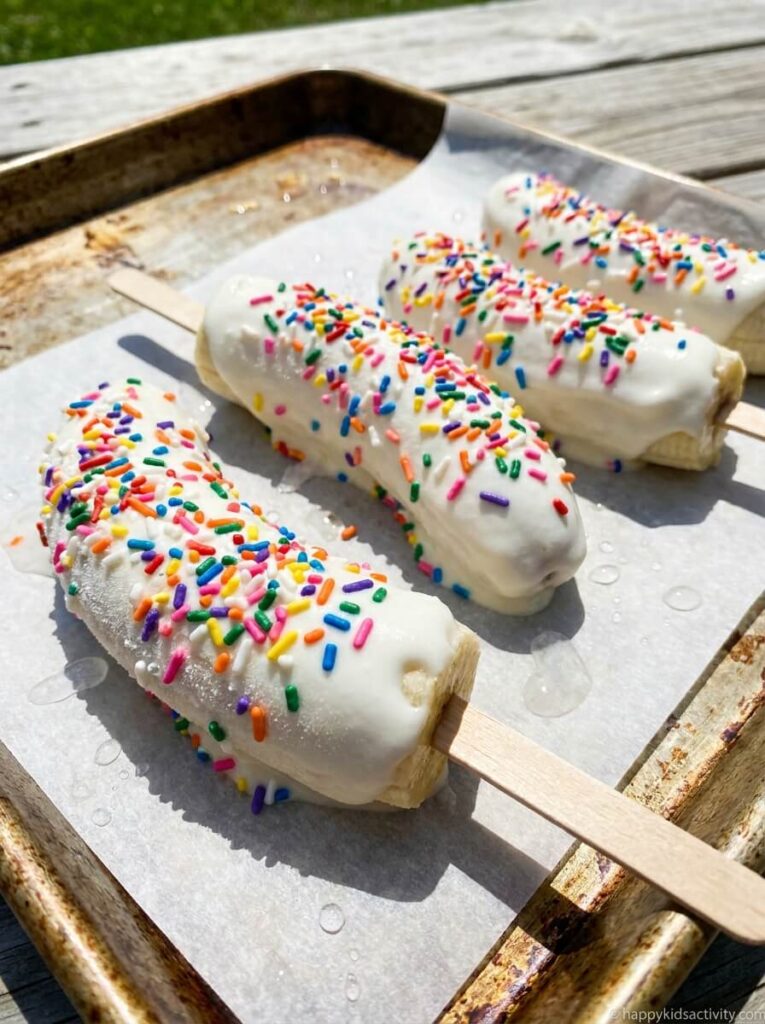
Three ingredients and an hour in the freezer. Frozen banana coated in yogurt tastes like soft serve, and it’s the cheapest cold treat you can hand a hot kid.
Ages: 2 and up · Time: 10 min prep, 1 hour freezing, 5 min cleanup · Mess: High once they start melting, so serve these outside · Supervision: Check in every few minutes, but eat them poolside not on the carpet · Make ahead: Yes, freeze up to a week · Yield: 6
Ingredients
- 3 bananas
- 1.5 cups vanilla yogurt
- Rainbow sprinkles
- Popsicle sticks
- Parchment paper and a baking sheet
Swap to save: Plain yogurt with a spoonful of honey or sugar instead of vanilla yogurt, crushed cereal instead of sprinkles, and a plastic fork instead of a popsicle stick if you don’t have any.
Instructions
- Line the baking sheet with parchment.
- Peel the bananas and cut each in half.
- Push a popsicle stick into the cut end of each half.
- Dip each banana half into the yogurt, turning to coat.
- Set them on the lined sheet.
- Add sprinkles while the yogurt is still wet.
- Freeze at least 1 hour, until firm.
Kid job: Dipping and sprinkling suits ages 3 and up perfectly. A 6 year old can push in the sticks. Older kids can set up a whole topping station with crushed cookies, chopped nuts, and drizzled chocolate.
Tip: Use bananas that are ripe but still firm. Very soft bananas split when you push the stick in and then fall off it in the freezer.
Heads up: Straight out of the freezer these are rock hard, and a 2 year old cannot bite through the frozen yogurt shell, so give them 3 to 5 minutes on a plate first. They also drip fast and the sprinkle colors bleed into little rainbow streaks down arms, which is why these are an outside food. Don’t keep them in the kitchen freezer if kids are helping themselves, because the door gets opened twenty times and they turn slushy. A cooler with ice packs holds them better on party day.
21. Walking Banana Pudding Bags
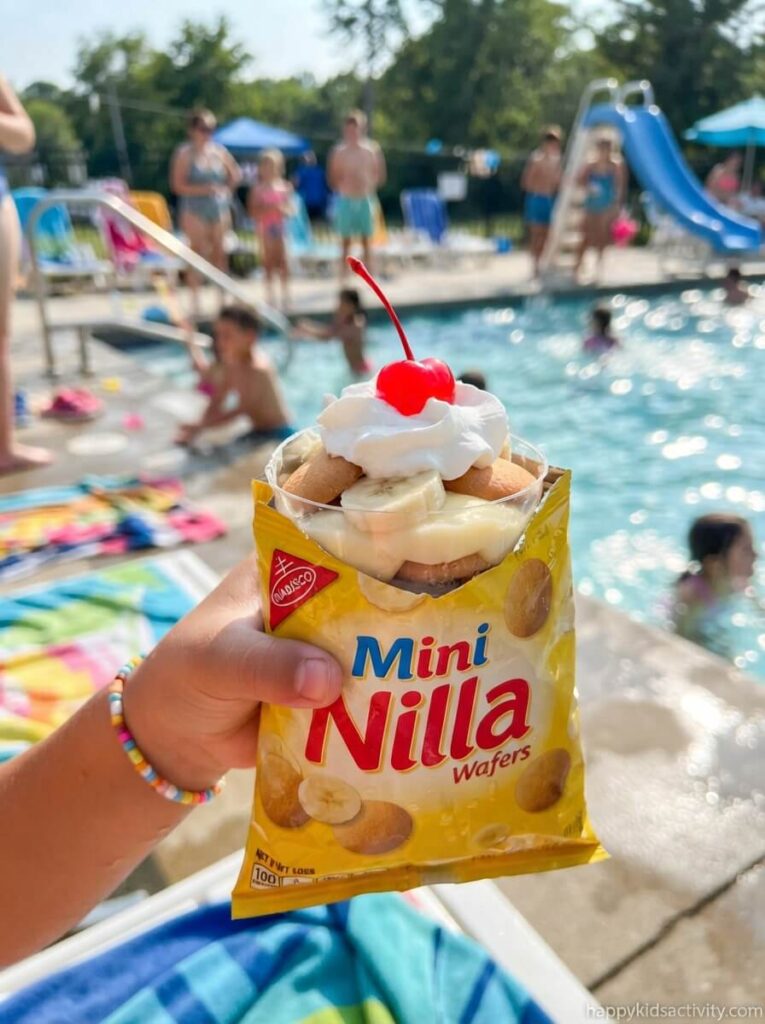
Pudding, banana, and whipped cream layered right into a small bag of Nilla Wafers. No bowls, no spoons to collect, and cleanup is one trash bag.
Ages: 3 and up · Time: 3 min per bag, no cleanup · Mess: Low, as long as the bag stays upright · Supervision: Check in every few minutes, kids build their own · Make ahead: No, this is an assemble at the table item · Yield: 6
Ingredients
- 6 mini bags of Nilla Wafer cookies
- 1 banana
- 3 snack size vanilla pudding cups
- 1 cup whipped cream
- 6 maraschino cherries
Swap to save: Snack size zip bags filled with a handful of vanilla wafers cost far less than individual cookie bags and are much easier to find. Instant pudding you mix yourself is cheaper than pudding cups, and a squirt of whipped topping from a can beats a whole tub you won’t finish.
Instructions
- Open each bag of wafers and push the cookies to one side to make room.
- Spoon pudding into each bag.
- Slice the banana and lay a few slices on the pudding.
- Stir a couple of wafers in for crunch.
- Top with whipped cream and a cherry.
Kid job: This is the best assembly line on the list. Set out the components and let kids 4 and up build their own, which turns a snack into ten minutes of activity. Older kids can run the station for the younger ones.
Tip: Stand each bag inside a plastic cup while kids build. Otherwise the bag tips, the pudding runs out, and you’ve got a puddle on the table.
Heads up: Those mini Nilla Wafer bags are genuinely hard to find in most stores, so plan on zip bags instead. Maraschino cherry juice stains swimsuits and towels, and it will not come out, so hand them out with a napkin or leave them off. Banana slices brown within about 20 minutes, and the whipped cream deflates in the heat, so build these on demand rather than in advance. Keep a trash bag right at the table or you’ll be picking sticky bags off the deck all afternoon.
Savory Snacks Kids Will Devour
Kids who have been swimming for an hour are starving, and no amount of fruit fixes that. You need at least two savory things, or they’ll fill up on cookies and crash before cake.
22. Mini Pepperoni Calzones
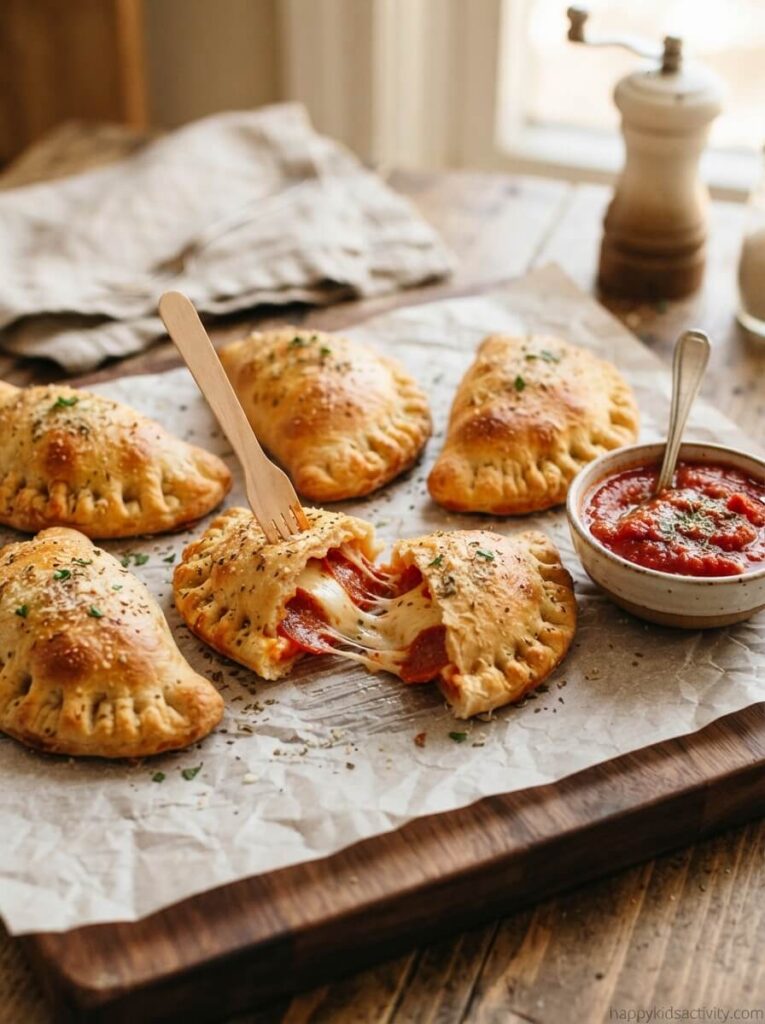
Pizza pockets stuffed with pepperoni and mozzarella, sealed and baked golden. Nothing on this list holds up better to wet hands, and they’re just as good at room temperature.
Ages: 3 and up · Time: 10 min prep, 30 min dough resting, 15 min baking, 10 min cleanup · Mess: Low, some flour on the counter · Supervision: Adult at the oven, kids can fill and seal · Make ahead: Yes, bake ahead and reheat, or freeze unbaked · Yield: 8
Ingredients
- 1 pound frozen bread dough, thawed
- 24 slices pepperoni
- 3 ounces string cheese, cut into thirds
- 1/4 cup marinara, plus more for dipping
- 1 egg plus 1 tablespoon water, for the egg wash
- Flour for dusting
Swap to save: Refrigerated pizza dough saves the 30 minute rest, and a can of crescent or biscuit dough works too. String cheese is often cheaper than a block of mozzarella and it portions itself. Skip the egg wash and brush with a little oil or melted butter.
Instructions
- Heat the oven to 425°F and line a baking sheet with parchment.
- Cut the dough into 8 pieces, roll into balls, and let them rest 30 minutes.
- While they rest, cut the cheese, count out the pepperoni, and whisk the egg wash.
- Roll each ball into a 5 inch circle.
- Put pepperoni, cheese, and about a teaspoon of marinara on one half, leaving a clean border, and brush the edge with egg wash.
- Fold over, seal firmly with a fork, and poke two vent holes in the top.
- Brush the tops with egg wash and bake 15 minutes until golden.
Kid job: Filling and folding is a great job for a 4 year old, and crimping with a fork is oddly satisfying at any age. Kids 8 and up can roll out the circles. Let older kids design their own fillings.
Tip: Keep the marinara inside to a teaspoon and serve the rest as dip. More sauce than that turns the inside soggy and pushes out the seams as it bakes.
Heads up: Frozen bread dough needs to thaw overnight in the fridge, which is the step people miss and then find themselves waiting three hours on party day. Melted cheese inside a sealed pocket stays scalding for a good ten minutes after baking, so let them rest before you hand one to a kid. If the seal isn’t tight, cheese escapes and welds to the pan, so press hard with the fork.
23. Pepperoni Crescent Rolls
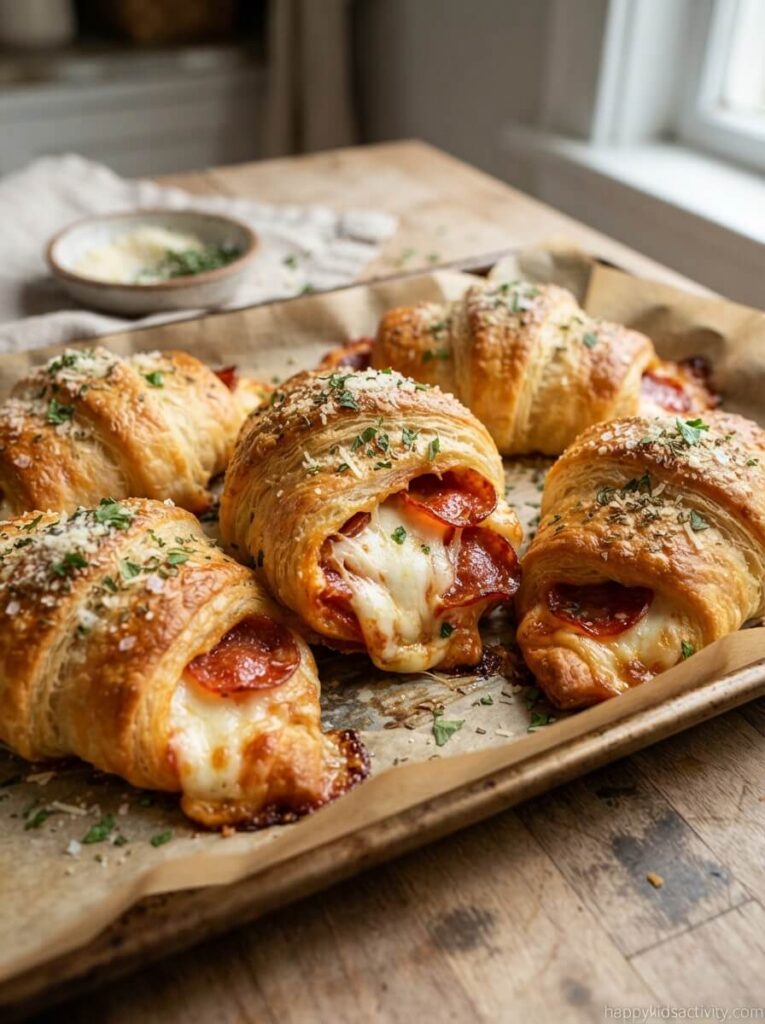
Pillsbury crescent dough wrapped around mozzarella and pepperoni. Ten minutes of work, and this is the one I make when I’ve run out of both time and patience.
Ages: 2 and up · Time: 10 min prep, 15 min bake, 5 min cleanup · Mess: Low · Supervision: Adult at the oven · Make ahead: Yes, reheat 5 minutes at 350°F · Yield: 16 rolls
Ingredients
- 2 packages Pillsbury crescent rolls
- 8 mozzarella cheese sticks, halved
- 1 package pepperoni slices
- 1 teaspoon garlic powder
- 1 teaspoon dried oregano
- 1 teaspoon dried basil
- 1 egg, beaten
- 2 tablespoons grated Parmesan
- Pizza or marinara sauce for dipping
Swap to save: Store brand crescent dough is usually a dollar less per can and behaves the same. Italian seasoning replaces the three separate herbs. A block of mozzarella cut into sticks costs less than string cheese if you’re making a double batch.
Instructions
- Heat the oven to 375°F and mix the garlic powder, oregano, and basil in a small bowl.
- Unroll the dough into triangles and lay half a cheese stick at the wide end of each.
- Layer pepperoni over the cheese, then roll from the wide end.
- Set them seam side down, brush with egg, and sprinkle with the herb mix.
- Bake 15 minutes until golden, then dust with Parmesan straight out of the oven.
Kid job: Rolling these is easy enough for a 3 year old with a little help, and the ugly ones taste the same. A 6 year old can brush on the egg wash. Older kids can run the whole thing except the oven.
Tip: Don’t skip the egg wash. It’s the difference between pale, doughy looking rolls and the bakery colored ones kids actually reach for.
Heads up: Cheese escapes from the ends no matter what, and it burns onto the pan, so use parchment and accept a little leakage. Seam side up means they unroll in the oven. These are greasy in a good way, which also means greasy fingerprints on pool towels, so keep napkins at the table. Serve them warm if you can, since cold mozzarella turns rubbery.
24. Sheet Pan Nachos
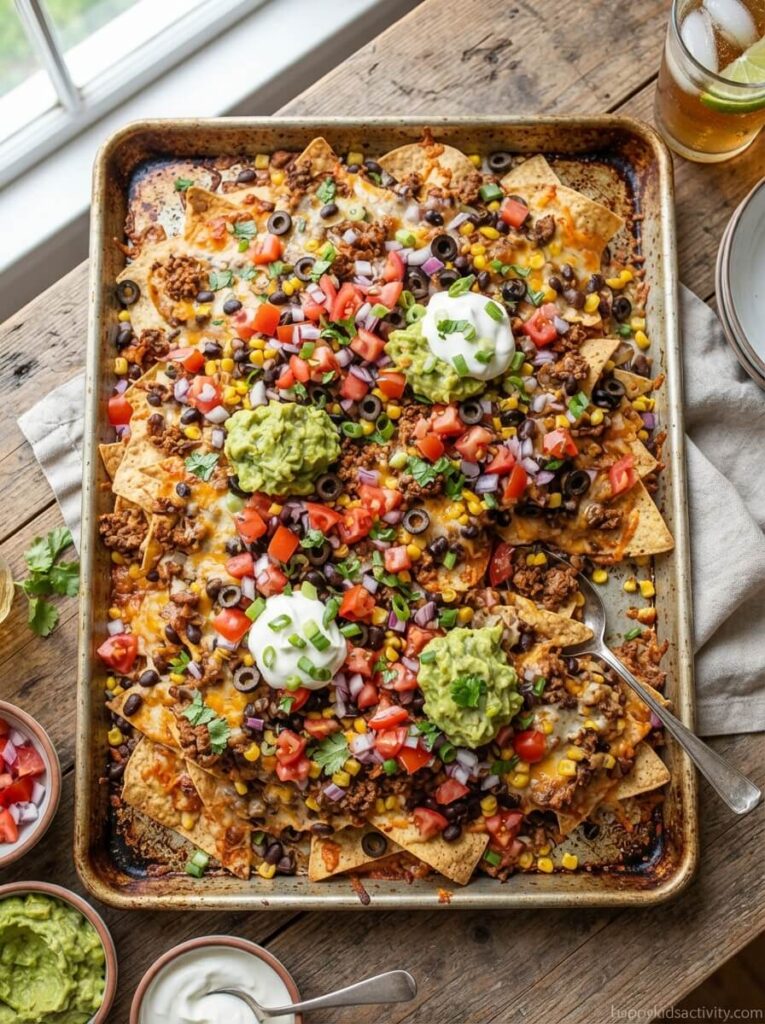
When you need to feed a big group fast, nachos do the job. Fifteen minutes start to finish, and one pan feeds ten.
Ages: 5 and up · Time: 10 min cooking, 6 min baking, 10 min cleanup · Mess: Medium, and it’s a fork or plate food, not a one hand food · Supervision: Adult at the stove and oven · Make ahead: No, these have to be served immediately · Serves: 10
Ingredients
- 1 tablespoon olive oil
- 1 pound ground beef
- 1 packet taco seasoning
- 1 jar salsa
- 1 bag corn or tortilla chips
- 1 can black beans, drained and rinsed
- 1 can corn, drained
- 1 small can sliced black olives, drained
- 1.5 cups shredded Mexican cheese blend
- Toppings: diced tomato, diced red onion, jalapeño, cilantro, sour cream
Swap to save: Skip the beef entirely and double the beans, which cuts the cost by more than half and nobody complains. Shred your own cheese from a block, make taco seasoning from chili powder, cumin, garlic powder, and paprika, and buy the store brand chips.
Instructions
- Heat the oven to 400°F and line a sheet pan with foil.
- Brown the beef in the olive oil, then stir in the taco seasoning and salsa.
- Spread the chips on the pan and top with the beef, beans, corn, olives, and cheese.
- Bake 5 to 6 minutes, just until the cheese melts.
- Add the fresh toppings right after it comes out and serve with sour cream on the side.
Kid job: Sprinkling cheese and scattering toppings is fun for a 4 year old. Older kids can brown the beef with you at the stove. Nobody under 8 should be carrying a hot sheet pan.
Tip: Keep the wet toppings off until the pan is out of the oven, and serve portions in paper cups instead of straight off the tray. Nacho cups actually work with one wet hand, while a loaded plate does not.
Heads up: This is the least pool friendly recipe here, and I want to be straight about that. Nachos go soggy within about 10 minutes and they need two hands and a plate, so make them when kids are out of the water and sitting, or make them for the adults. Don’t make a full pan unless it’ll all get eaten, because reheated nachos are grim. Keep the jalapeños in a separate bowl, since jalapeño oil on fingers plus rubbing your eyes after swimming is a miserable combination for a kid. Cooked beef is perishable, so it follows the 1 hour rule in hot weather.
25. Mini Corn Dogs
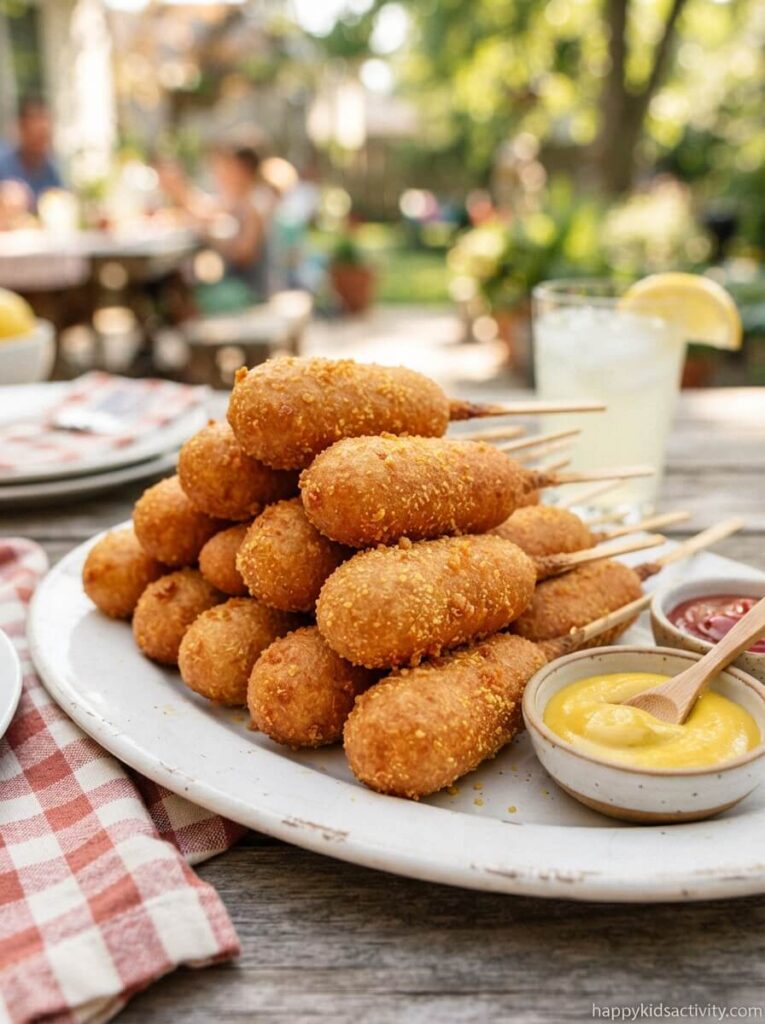
Fair food in your own backyard, and they taste nothing like the freezer aisle version. They’re also the only recipe here involving three inches of 375°F oil, so read the note before you commit.
Ages: 3 and up, cut small for under 4 · Time: 10 min batter, 20 min resting, 15 min frying, 15 min cleanup · Mess: Medium in the kitchen, plus hot oil to deal with · Supervision: Adult only at the pot, kids out of the kitchen entirely · Make ahead: Yes, fry ahead and hold at 200°F · Yield: 10 servings
Ingredients
- 1 pound hot dogs
- 1/2 cup yellow cornmeal
- 1/2 cup all purpose flour
- 2 tablespoons granulated sugar
- 2 teaspoons baking powder
- 1/4 teaspoon sea salt
- 1 egg
- 1/2 cup buttermilk
- Vegetable or canola oil for frying
- Food grade popsicle sticks
Swap to save: A box of corn muffin mix replaces the dry ingredients, milk with a teaspoon of lemon juice replaces buttermilk, and store brand hot dogs work fine here. For a no fry version, press corn muffin batter into a greased mini muffin pan, push a piece of hot dog into each, and bake at 375°F for about 15 minutes.
Instructions
- Cut each hot dog in half, pat them completely dry, and push a stick into each piece.
- Whisk the cornmeal, flour, sugar, baking powder, and salt, then stir in the egg and buttermilk.
- Pour the batter into a tall glass, which makes dipping far easier, and let it rest 15 to 20 minutes.
- Heat 2.5 to 3 inches of oil to 375°F in a Dutch oven or heavy pot.
- Dip each hot dog fully in the batter and lower it carefully into the oil, away from you.
- Fry in small batches 2 to 3 minutes until golden, then drain on paper towels.
Kid job: Honestly, none at the frying stage. A 6 year old can push sticks into the hot dogs beforehand and whisk the batter. Kids 12 and up can fry with you standing right there, and not while other kids are in the pool.
Practical note: Do not deep fry during the party. Fry these an hour before guests arrive, then hold them on a rack in a 200°F oven, where they stay crisp for a good hour. A pot of 375°F oil in a yard full of wet, running kids is the one setup I won’t do, and if a grease fire ever starts, you smother it with a lid or baking soda, never water.
Heads up: Wet hot dogs make the batter slide right off, which is the classic first attempt problem, so dry them well and dust them lightly with flour if it still won’t stick. Use food grade sticks, not craft sticks from the art bin. Coin shaped pieces of hot dog are a choking risk for young kids, so for anyone under 4, pull the stick out, cut the corn dog lengthwise and then into small pieces, and skip the stick altogether.
How Many Pool Party Finger Foods Do You Actually Need?
Four to six recipes is plenty. I’ve made nine before and half of it came back inside untouched, because swimming kids graze instead of eating a meal.
Here’s the amount I plan on, based on my own parties rather than any official chart: four to six small bites per kid in the first hour, then two or three per kid for every hour after that. Double whatever the frozen item is, because every kid wants a second popsicle.
A menu that works for 12 kids over three hours
- Two savory: pepperoni crescent rolls (double batch) and mini pepperoni calzones.
- Two fruit: rainbow fruit skewers and fruit salad portioned into cups.
- One grazing snack: aquarium trail mix, pre bagged.
- One frozen: banana yogurt popsicles.
- One showstopper: jello cups or berry crumble bars.
Scaling down for 5 or 6 kids: One savory, one fruit, one frozen, one dessert. That’s it. Halve the recipes and you’ll still have leftovers.
Drinks matter more than food at a pool party. Kids in the sun ask for a drink two or three times as often as they ask for food, so put out a big dispenser of ice water plus one fun option, and keep the drinks on a separate table from the food so nobody is reaching across the fruit with dripping arms. If you want ideas beyond lemonade, we’ve got a whole list of fun summer drinks for kids.
Tips for a Stress-Free Pool Party Food Setup
The menu is the easy half. This is the part that decides whether you spend the afternoon in the pool or at the counter.
Plan for wet hands
Assume every kid arrives at the table dripping. That rules out anything needing a fork, anything on a flimsy paper plate, and anything that has to be scooped from a shared bowl. Individual portions solve almost all of it. My rule now is that if a kid can’t take it and walk away in three seconds, it doesn’t go on the table.
Prep as much as possible the day before
The jello cups, energy bites, berry bars, cheesecake bites, hummus, and both trail mixes all taste the same or better after a night in the fridge. Get those done and party day becomes assembly, not cooking. Write your two remaining party day jobs on a sticky note so you’re not standing in the kitchen trying to remember what’s left.
Set up a dedicated food station away from the pool
Put the table in the shade, at least a few feet back from the splash zone, and out of the main running path between the pool and the house. Splashed pool water carries chlorine straight into an open bowl of fruit, and a kid sprinting past a folding table takes the whole thing down. Label each dish with allergens on an index card.
Keep cold food cold
Anything with dairy, pudding, whipped cream, cut melon, or cooked meat goes on ice or comes out in shifts. Set the trays inside larger pans of ice, put out half at a time, and refresh from the fridge. In 90 degree heat, an hour out is the limit. When in doubt, throw it out, since a stomach bug after a party is worse than wasted fruit.
Portion grab-and-go snacks ahead of time
Trail mix, fruit, and dips all work better in individual cups and bags than in big bowls. It cuts refill trips, it stops double dipping, and it means the kid who touched everything with pool water hands only affected their own cup.
Put a hand rinse bin at the food table
A dishpan of clean water, a bar of soap, and a stack of towels, or a pack of baby wipes in a bowl. Kids will not walk inside to wash their hands, so give them a way to do it two feet from the food. This one small thing changed my parties more than any recipe here.
Give the water watcher job to someone who isn’t cooking
Say it out loud: “You’re on the water for the next twenty minutes.” Then hand it off out loud when you swap. Whoever is plating food, refilling drinks, or pulling a tray from the oven is not watching the pool, and everyone assuming someone else is watching is exactly how bad afternoons start.
Common Mistakes to Avoid
Every one of these is something I’ve done, most of them more than once.
- Setting the food out before the party starts. Kids go straight into the water and don’t eat for the first 40 minutes, so everything you laid out at noon is warm and soggy by the time anyone is hungry. Put out one grazing snack at the start and bring the rest out when the first kid asks for food.
- Making five desserts and one savory dish. Hungry swimmers go for the savory food first, then the sugar, and then they crash right before cake. Two savory options minimum.
- Using cream cheese frosting or whipped cream outdoors. Both slide, deflate, or go greasy within half an hour in the sun. Save them for indoor parties and use a powdered sugar glaze outside.
- Serving fruit in one big shared bowl. Twelve kids reaching in with pool water running off their arms is how a beautiful fruit salad becomes a chlorine soup. Cups take five extra minutes.
- Forgetting to ask about allergies until guests are at the gate. By then the nuts are already in the trail mix. One line in the invite fixes it.
- Leaving skewers and toothpicks unaccounted for. Snip the points, count them out, count them back. A bamboo skewer on a wet deck finds a bare foot every time.
- No trash can at the food table. Without one you’ll spend the evening peeling sticky cups and pudding bags off the patio. Put a bag right next to the table, with a rock or a brick in it so it doesn’t blow over.
- Relying on the kitchen freezer for the frozen treats. Kids open that door twenty times looking for popsicles and everything turns slushy. Use a cooler with ice packs instead.
- Putting the drinks on the food table. Kids reach across the food for drinks constantly. Separate table, separate cooler, fewer knocked over cups on your dessert tray.
Read Next
If you’re building out the rest of the party, these two are the natural next stops.
- pool games and water activities for kids for the stretch between eating and cake, when kids have energy and no plan. Food buys you twenty minutes, games buy you an hour.
- easy summer party ideas and decorations on a budget if you’re the parent who has the menu handled but hasn’t thought about anything else yet. Most of it uses the same dollar store run as the recipes above.
Frequently Asked Questions
Which of these are safe for a 3 year old?
Most of them, with three adjustments: quarter the grapes lengthwise, skip the popcorn and whole nut trail mixes, and take the food off any skewer or stick before handing it over. Cut hot dogs lengthwise rather than into rounds, and cut giant marshmallows into thirds.
What are the best pool party finger foods for kids with wet hands?
Anything that holds together in one hand and needs no utensil: pepperoni crescent rolls, mini calzones, blueberry hand pies, fruit skewers with the fruit slid off, energy bites, berry crumble bars, and pre bagged trail mix. Skip nachos, jello cups, and anything with custard for the poolside table, since all three need a plate or a spoon.
How long can pool party food sit out in the heat?
The USDA limit for perishable food is 2 hours at room temperature, and 1 hour once it’s above 90°F. Put out half your dairy and meat based items, keep the rest in the fridge, and swap the trays at the halfway mark.
What can I make for a pool party with no oven?
Jello cups, sand pudding cups, marshmallow beach balls, fruit salad, fruit skewers with cheesecake dip, energy bites, both trail mixes, yogurt dip, banana sushi wraps, banana split bites, banana yogurt popsicles, and walking pudding bags. That’s twelve of the twenty five, which is more than enough for any party.
How do I keep wasps and bugs off the food outdoors?
Mesh food tents over every open bowl, lids or cups with straws for the drinks, and the trash bag moved well away from the table. Sugary drinks left open in cans are the biggest wasp magnet at a pool party, so pour into cups and cover them.
How do I get blue Jello stains out of towels and off the patio?
Rinse the fabric with cold water from the back of the stain as soon as you notice it, then work in a little dish soap and let it sit before washing. Hot water sets the dye, and on light concrete a paste of baking soda and dish soap left for 15 minutes lifts most of it, though a deep stain may not come out completely.
Your Party Day Game Plan
Pick four recipes from the table near the top: one savory, one fruit, one frozen, and one that looks impressive. Make three of them the night before. That’s the whole strategy, and it’s the difference between watching the party and running it.
If you’re planning a late season party this September, lean on the frozen items and the fruit, since afternoons are still hot enough that nobody wants a warm dessert. And if you only make one thing from this list, make the berry crumble bars. Nothing melts, nothing needs a spoon, and they’re just as good the next morning with coffee while you’re still finding pool toys in the yard.