This post contains affiliate links. Please see our disclosure for more details.
The Magna Tiles ideas that actually work are the ones matched to your kid’s age. Flat, two-dimensional pictures (animals, faces, rockets, dinosaurs) hold a 3 to 5 year old. Three-dimensional builds (houses, castles, ball runs, marble mazes) are where 5 and up want to be. Most builds here need 40 to 100 tiles, run 15 to 40 minutes, and make no mess at all. The one rule that prevents the most tears: build any box flat on the floor first, then fold the walls up, because a cube assembled wall by wall collapses inward almost every time.
The first rainy Saturday of the school yearLast weekend was the first proper rainy Saturday since school went back. By 9:40am my two had already fought over the tablet twice, and I had done the thing every parent does, which is stand in the doorway of a room full of toys saying “there is so much in here you could play with.”
So I dumped the tile basket out on the rug and said nothing. Ten minutes of silence. Then my 8 year old announced she was building a hotel with a working elevator, which is not a thing our tiles can do, and my 4 year old started laying triangles in a line because that is what 4 year olds do.
That is the honest picture of magnetic tiles. They are the most reliable open-ended toy in our house, and they still stall out. Not because the toy is bad, but because “build whatever you want” is a big ask for a tired kid. Handing over one specific starting point is usually all it takes.
Everything below is a starting point, with the parts nobody tells you: how many tiles it really needs, what age it actually works for, and what falls over on the first try.
How many tiles you actually need
Nobody tells you this part, and it is the reason half of these builds end in frustration. A 32-piece starter set will do about five of the 17 ideas below. Around 100 tiles is where the whole list opens up.
Here is roughly what each type of build takes in our house:
| Build type | Tiles needed | Why |
| Flat picture (animal, face, rocket) | 10 to 25 | One layer, no gravity to fight |
| Small 3D house with a roof | 10 to 15 | Four walls, a floor, four roof triangles |
| Village of houses | 50 to 80 | Kids want six houses, not one |
| Castle with towers and a courtyard | 60 to 120 | Walls eat squares fast |
| Barn plus animal pens | 40 to 70 | The pens are what run you dry |
| Ball run on the fridge | 20 to 40 | Ramps only, no walls needed |
| Flat marble maze | 20 to 40 | More tiles means more dead ends |
| Domino line | 20 to 40 | You need the length to be worth it |
| Standing robot | 25 to 40 | The torso box uses most of them |
Practical note: you will run out of small squares and equilateral triangles long before you run out of right triangles. Most sets are heavy on right triangles, which are the least useful shape for anything that has to stand up. If you are adding to a collection, buy a square pack, not a mixed pack.
What you actually need, and the cheap version
- Magnetic tiles. Magna-Tiles (made by Valtech) are the original and the toughest. PicassoTiles and Connetix are the usual cheaper routes, and they are close enough in size to mix. Cheap swap: buy secondhand. Tiles show up constantly on Facebook Marketplace and in thrift shops, and they clean up fine. Just inspect every tile for cracks before it goes in the basket.
- A metal baking sheet. This is the single best accessory. It turns any floor into a magnetic base, makes builds portable, and holds walls upright. Cheap swap: the cookie sheet already in your kitchen, or a Dollar Tree one for a dollar.
- A magnetic vertical surface. The fridge, a magnetic whiteboard, or a metal door. Cheap swap: prop that baking sheet against the wall or the sofa.
- Small figures and animals. Safari Ltd TOOBs and any bag of plastic farm animals turn a build into a game. Cheap swap: wooden clothespins with faces drawn on, or the toys already in the bottom of the toy box.
- Painter’s tape. ScotchBlue or any low-tack tape, used for the outline activities. Cheap swap: a marker and a sheet of paper for younger kids to fill in.
- A big ball. For ball runs and mazes, one bigger than 1.75 inches across (a tennis ball works). Cheap swap: a rolled ball of socks, seriously, it works on gentle ramps.
Benefits of Magna Tiles Designs
I am not going to pretend a plastic square teaches your kid calculus. But there are a handful of things I have watched these tiles do, over and over, that other toys in our house do not.
- Fine motor work that does not feel like work. Lining up an edge and feeling the magnets grab takes a pincer grip and a steady hand. My 4 year old will do that a hundred times in an afternoon and never once thinks of it as practice. If that is the part you care about, these fine motor activities work the same muscles.
- Open-ended creativity, with a real caveat. There is no wrong answer, which is the whole appeal, and also why kids stall. Creativity shows up faster when you hand them a constraint, like “build something with a door” or “use only blue.”
- Problem solving you can see happening. Towers fall. Kids figure out that the heavy part goes at the bottom, usually after three collapses and one thrown tile.
- Hand-eye coordination under pressure. Placing a tile on a wobbly structure without knocking it over is genuinely hard, and the stakes feel high to them.
- Independent play. This is the benefit I care about most. Tiles are intuitive enough that a 5 year old needs nothing from me, which buys real time.
- Planning ahead. Building a specific object forces a kid to decide what goes first. That is a different skill from stacking, and you can hear them talking themselves through it.
- Shape and color sorting. Digging for “the little triangle” means sorting by shape and size dozens of times without being asked to.
- Early math, hands on. Two right triangles make a square. Six squares make a cube. Kids find that out by doing it, which sticks better than being told.
Safety rules that actually matter
Magnetic tiles are one of the safer toys in the house, and there is exactly one hazard that deserves your full attention.
A cracked tile goes in the trash the day you find it. Not in the basket for flat builds, not taped up, not saved. The danger is not the plastic, it is the magnet inside. If a child swallows two magnets, or one magnet plus anything metal, they can pull toward each other through separate loops of bowel, pinch off the blood supply, and cause an obstruction or a perforation. That is documented in the pediatric surgery literature, and it is why the CPSC put a federal magnet standard in place in 2022 that requires loose magnets small enough to swallow to be either too big to fit down a child’s throat or too weak to do that damage.
Practical note: if you think your child has swallowed a magnet, do not wait to see if it passes. Call Poison Control (1-800-222-1222 in the US) or head to the ER. Multiple magnets get treated as urgent, and the window matters.
The rest of the list is short:
- Age 3 and up is the real label. Magna-Tiles and the main competitors are all rated 3+. The reason is not that 3 year olds stop putting things in their mouths, because plenty of them do not. It is that an intact 3 inch tile is far too big to choke on, and the risk only appears if the casing breaks. Check your tiles every few months, especially the ones that get stepped on.
- The add-on sets are a separate check. Standard flat tiles are big. Sets with wheels, rods, marbles or small connectors are not. Read the age label on each expansion set instead of assuming it matches your classic set.
- The choking risk is what you add, not the tiles. Pom poms, wooden beads, peg people, glass gems and marbles are all small enough to choke on. Marbles and balls under 1.75 inches across are banned from toys intended for children under 3 and carry choking warnings for older kids. If an item fits through a toilet paper tube, it is out for anyone still mouthing things.
- Skip water beads entirely. They turn up in every light table post on Pinterest, including the version of this article I started from. The CPSC knows of at least one child who died after swallowing a water bead and another who went through months of surgeries, because the beads keep swelling inside the body and are easy to miss until the damage is done. There is a better swap in idea 17.
- No coin-cell lights. Tea lights and slim push lights often run on button batteries, which burn through a child’s esophagus fast if swallowed. Reese’s Law tightened the rules on those compartments in 2022, but the old light in your junk drawer predates it. Use something that takes AA or AAA batteries.
- Adults do the cutting. If you use a can as a rocket body, use one with a smooth rolled rim, or one you opened with a safety can opener. A jagged lid edge on a food can is genuinely sharp.
- One medical check. If anyone in the house has a pacemaker, cochlear implant or a programmable shunt, ask their clinician how close magnets can get. It is a two minute question with a clear answer.
- For sensory-sensitive kids, the sound is the problem, not the toy. A hundred tiles collapsing on a hard floor is loud. Build on a rug, a towel or a foam mat and it drops to almost nothing.
Pick a Magna Tiles build in 30 seconds
Scan the table, pick by whatever you have least of today, which is usually patience.
| # | Build | Real ages | Tiles | Time (prep + play + cleanup) | Mess | Supervision |
| 1 | Robot | 3+ flat, 5+ standing | 20 to 40 | 2 + 20 + 3 min | None | Check in |
| 2 | Rocket ships | 3+ flat, 5+ tall | 15 to 40 | 2 + 20 + 3 min | None | Arm’s reach if using a can |
| 3 | Dinosaur | 3+ flat, 6+ for 3D | 15 to 40 | 2 + 25 + 3 min | None | Check in |
| 4 | Castles | 4+, 5+ with a courtyard | 60 to 120 | 2 + 45 + 5 min | None | Check in |
| 5 | Animals | 3+ | 10 to 25 | 1 + 15 + 2 min | None | Check in |
| 6 | Boat | 3+ flat, 5+ for 3D | 12 to 30 | 2 + 20 + 3 min | None | Check in |
| 7 | Train | 4+ | 30 to 45 | 2 + 30 + 4 min | None | Check in |
| 8 | Houses | 4+ | 10 to 15 each | 2 + 30 + 4 min | None | Check in |
| 9 | Color sorting | 2.5 to 5 | 15 to 25 | 5 + 20 + 5 min | Low, things scatter | Arm’s reach under 3 |
| 10 | Barn | 4+ | 40 to 70 | 2 + 30 + 4 min | None | Check in |
| 11 | Playground slide | 6+ | 30 to 50 | 2 + 40 + 4 min | None | Check in |
| 12 | Dominoes | 6+, and it is the hardest one here | 20 to 40 | 2 + 25 + 3 min | None | Check in |
| 13 | Making faces | 3+ | 10 to 20 | 1 + 15 + 2 min | None | Check in |
| 14 | Early math outlines | 3+ | 15 to 30 | 10 + 20 + 5 min | Low, tape scraps | Hands on for the taping |
| 15 | Marble maze | 4+ flat, 6+ for 3D, no mouthers | 20 to 60 | 2 + 30 + 4 min | None | Arm’s reach with a marble |
| 16 | Ball run | 4+ to build, 2+ to enjoy | 20 to 40 | 2 + 25 + 3 min | None | Check in, closer near a stove |
| 17 | Light table | 3+ | 20 to 40 | 10 + 30 + 5 min | Low | Arm’s reach |
Must Visit🎁

|

|

|
|
Our Rating:
4.7
|
Our Rating:
4.8
|
Our Rating:
4.5
|
|
N/A
|
N/A
|
N/A
|
17 Easy Magna Tiles Ideas
Let them build whatever they want most of the time. That is the point of the toy. But on a rainy afternoon, or the fourth day of a long weekend, having a few ideas in your pocket is what gets you 30 quiet minutes.
Before you start, learn the fold-up trick. This one technique is behind almost every 3D build below, and it is the difference between a house and a pile.
- Lay four squares flat in a row on the floor, edges touching, so the magnets grab.
- Add a fifth square below the second one in the row. That is your floor.
- Pinch the two end tiles and fold the row upward into a box, bringing the ends together until they snap.
- Add roof triangles last, one at a time, going around the top rather than building one side up.
Assembling a box wall by wall, standing each one up on its own, fails almost every time. The walls have nothing to lean on until the last one goes in, and the last one is the one that knocks the rest over.
1. Magna Tiles Robot
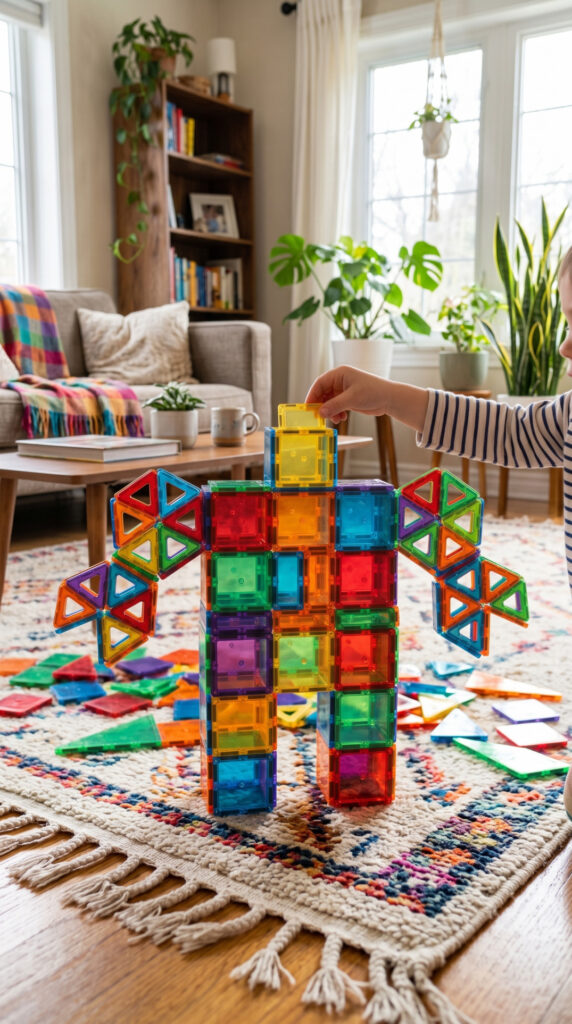
Ages: 3+ flat on the floor, 5+ for one that stands | Time: 2 min setup, 20 min build, 3 min cleanup | Mess: none | Supervision: check in every few minutes
You’ll need: 20 to 40 tiles, heavy on squares.
Cheap swap: Draw a robot outline on paper with a marker and let a younger kid lay tiles on top of your lines.
What goes wrong the first time: The arms. Everybody builds a tall torso and sticks long arms straight out at shoulder height, and the arms peel off within a minute. The magnet holds the joint fine, but a two tile arm sticking out sideways is a lever, and physics beats magnets every time.
Skip it if: Your kid is under 3, or is in a phase where anything that falls over ends the session.
Build it:
- Fold up a box for the torso using the trick above. Weight at the bottom is what keeps it standing.
- Sit a smaller box or a single square on top for the head.
- Attach arms low on the torso, close to the middle, and keep them to one tile each.
- Add triangles as claws, antennas and feet last.
For a 3 or 4 year old, do the whole thing flat on the floor instead. Sketch a robot on paper first using only squares and triangles, then let them copy it tile by tile. Copying a simple drawing is a real skill at that age and it feels like a puzzle rather than a test.
Mine names every robot. The current one is called Bin, which is not short for anything.
2. Rocket Ships
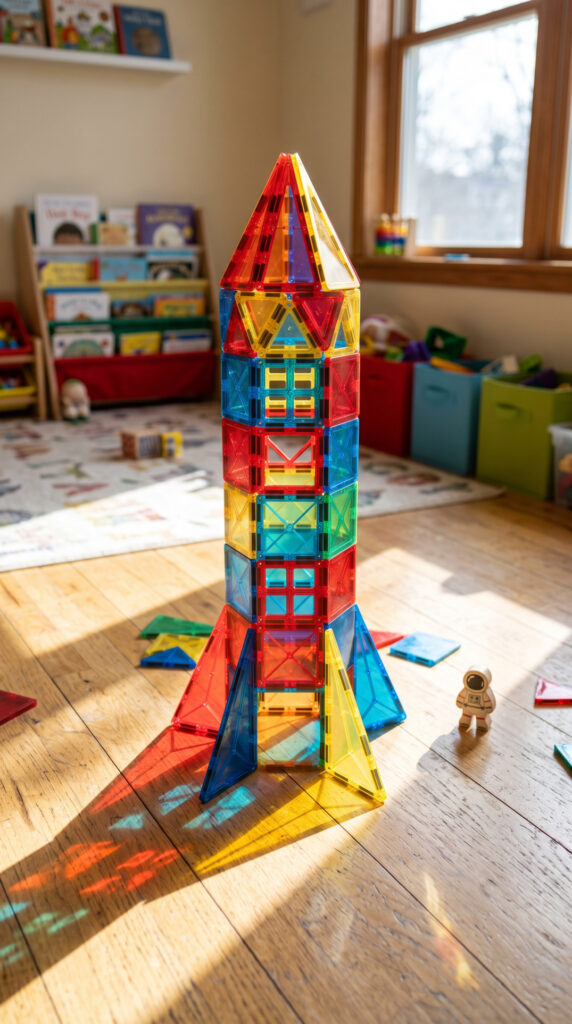
Ages: 3+ for a flat rocket, 5+ for a tall one | Time: 2 min setup, 20 min build, 3 min cleanup | Mess: none | Supervision: arm’s reach if you use a can
You’ll need: 15 to 40 tiles.
Cheap swap: A clean, empty steel food can as the fuselage, which also saves you 12 tiles.
What goes wrong the first time: a four sided tube of squares slowly banana-bends. Every seam acts like a hinge, so the stack leans a little more with each tile until it drops. Build a three sided tower instead. Three sides brace each other and hold up roughly twice as tall.
Skip it if: Te only can you have is aluminum. Soda cans are not magnetic, so nothing sticks. Test any can with a fridge magnet first, and check the rim: a lid edge opened with a standard can opener is sharp enough to cut, so use a can with a smooth rolled rim or one opened with a safety opener. That step is yours, not theirs.
Build it:
- Stand three squares in a triangle so each one leans against the next.
- Stack a second and third ring of three on top, pressing each seam.
- Add four right triangles at the base as fins, angled outward.
- Finish with equilateral triangles pinched into a nose cone.
The can version is the one my kids actually prefer, because tiles stick to it at any angle and you get a rocket with a curved body, which is impossible with flat tiles alone. Wrap the can in a strip of paper first if the label is peeling.
3. Dinosaur Magna Tiles
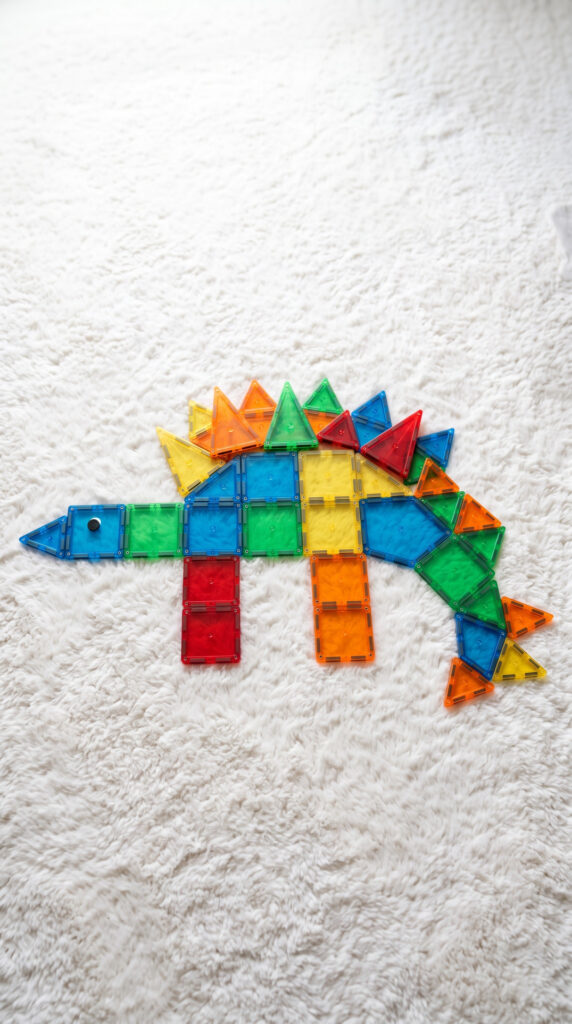
Ages: 3+ for flat dinosaurs, 6+ for anything freestanding | Time: 2 min setup, 25 min build, 3 min cleanup | Mess: none | Supervision: check in every few minutes
You’ll need: 15 to 40 tiles, plus as many triangles as you own.
Cheap swap: A plastic dinosaur from the toy box set beside the build as a reference, which turns it into an observation exercise for free.
What goes wrong the first time: The head. A standing T-Rex has a heavy head out front, no counterweight, and two thin legs, so it tips forward the second the last tile goes on. The fix is the tail. Run the tail down to the floor so it becomes a third contact point, exactly the way a tripod works.
Skip it if: Your kid is under 6 and wants a 3D dinosaur specifically. Steer them to a flat one or to a relief build stuck to the fridge, where the wall does the load bearing.
Build it:
- Lay a flat Stegosaurus first: two squares for the body, a square for the head, right triangles for legs, and a row of triangles along the back.
- For 3D, fold a box for the body using the fold-up trick.
- Add legs as short triangle braces, then run a long tail from the back down to the floor.
- Cantilever the head over the front legs, not out past them.
One thing I did not expect: kids want the dinosaur to be as big as they are. About 100 tiles gets you roughly knee height on a 4 year old, so it helps to say that out loud before they start planning a life-size one.
4. Castles
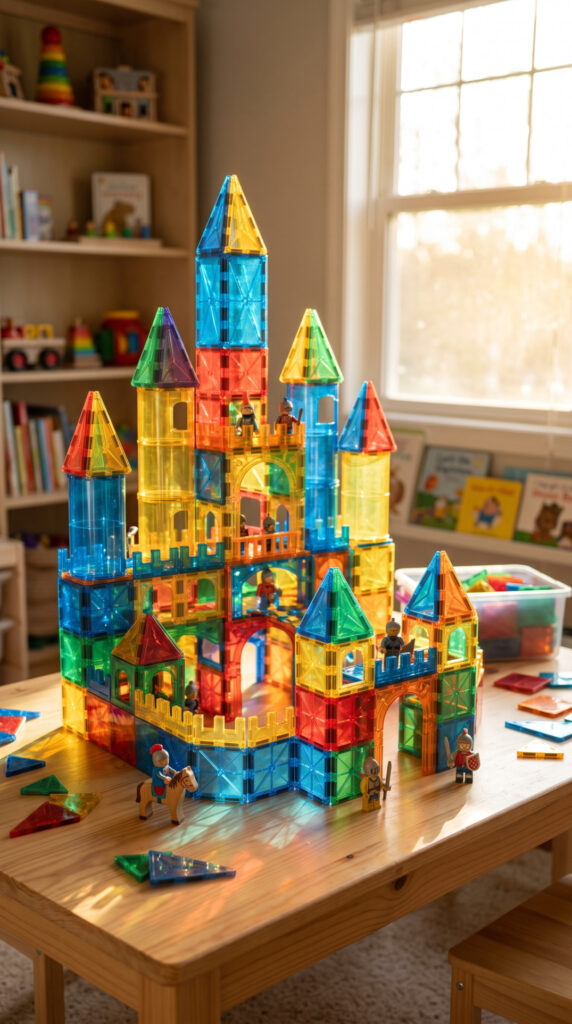
Ages: 4+ for a simple square keep, 5+ once courtyards and towers come into it | Time: 2 min setup, 45 min build, 5 min cleanup | Mess: none | Supervision: check in every few minutes
You’ll need: 60 to 120 tiles for anything that looks like a castle.
Cheap swap: Knights and dragons are optional. Clothespins with faces drawn on them work, and so do the plastic animals you already have.
What goes wrong the first time: Long straight walls. Kids build an impressive 8 tile wall, it stands for a second, then folds over in the middle. A straight wall has no bracing. Put a 90 degree corner in every three or four tiles so the wall zig-zags, and it will hold up towers.
Skip it if: You own fewer than 40 tiles. A castle that small reads as a box with a pointy hat, and kids know it.
Build it:
- Mark the footprint first. Lay squares flat on the floor in the shape of the outer wall, then build up from that outline.
- Build the walls in a zig-zag, not a straight line.
- Fold up separate small boxes for the corner towers and set them on the wall corners.
- Cap the towers with equilateral triangles pinched into points.
The drawbridge deserves an honest warning. A single square hanging off one edge does hinge, but it also snaps flat against the wall as soon as it swings up, because the magnets grab. It works as a door. It does not work as a drawbridge that stays half open.
Castles are also where the sibling gap disappears in our house. The 8 year old runs the build, the 4 year old is in charge of “putting flags on,” and both of them are happy for 40 minutes.
5. Magnetic Tile Animals
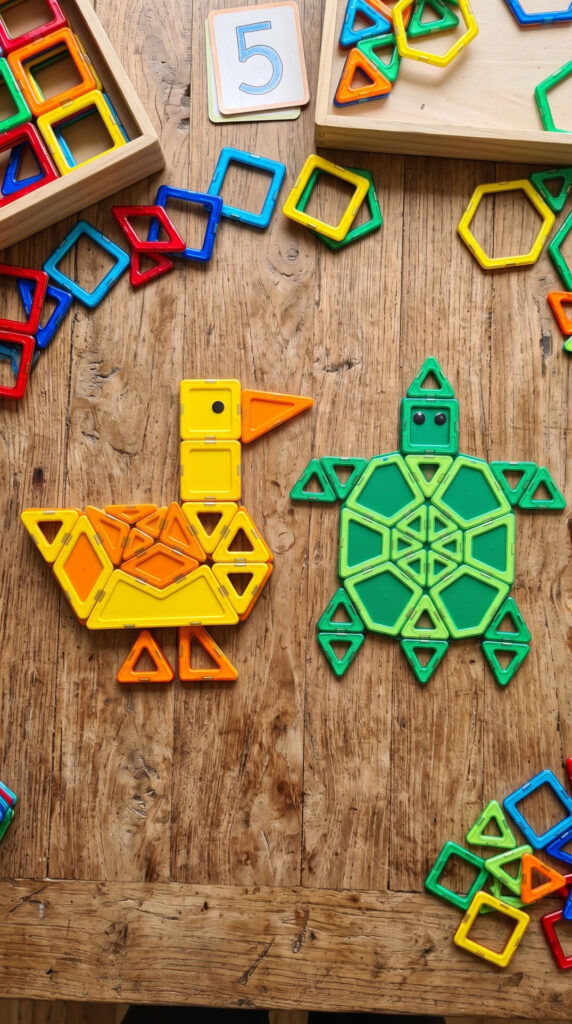
Ages: 3+ | Time: 1 min setup, 15 min build, 2 min cleanup | Mess: none | Supervision: check in every few minutes
You’ll need: 10 to 25 tiles, ideally with some translucent ones.
Cheap swap: None needed. This is the one build that works with a 32 piece starter set and nothing else.
What goes wrong the first time: not much, which is why this is the best starting point for a 3 year old. The only stumble is kids trying to make the animal look realistic. Say “silhouette” or “shadow shape” and they relax.
Skip it if: Your kid is 7 or older and bored by flat builds. Give them a rule instead, like build a bug using exactly 12 tiles.
Build it:
- Pick an animal with a simple outline. Fish, turtle, cat, butterfly.
- Lay the body first as one or two big squares.
- Add triangles for ears, tails, fins and legs.
- Use translucent tiles for anything that should look see-through, like wings.
The housefly is the one that surprised me. My daughter used two clear tiles for wings, and it looked far more like a fly than anything I would have built. Leaving them to work out the shapes alone gets better results than helping, which is hard to remember in the moment.
6. Boat
Ages: 3+ for a flat sailboat, 5+ for a 3D hull | Time: 2 min setup, 20 min build, 3 min cleanup | Mess: none | Supervision: check in every few minutes
You’ll need: 12 to 30 tiles.
Cheap swap: A paper sail taped to a chopstick, stuck between two tiles, for a mast taller than your tile supply allows.
What goes wrong the first time: The hull shape. Most guides tell you to use a trapezoid, and most classic sets do not include one. Magna-Tiles Classic sets are squares and triangles, and trapezoids and hexagons usually come in separate shape expansion packs. Build the hull from one square with a right triangle on each side instead, which gives you the same sloped shape.
Skip it if: Your kid immediately wants to put it in water. Which brings me to the warning below.
Build it:
- Lay a square flat, then add a right triangle on the left and right to make a hull shape.
- Stand one tall right triangle upright on the hull as the sail.
- Add a small square at the back as the cabin.
- For 3D, fold up a shallow box for the hull and stand the sail inside it.
Practical note: Magnetic tiles do not go in water. Not the bath, not the sink, not a paddling pool. Water works its way in around the rivets and rusts the magnets from the inside, and you will not notice until a tile stops holding. Save this one for later if bath toys were where your brain went, because it is the mistake most parents make once.
7. Train
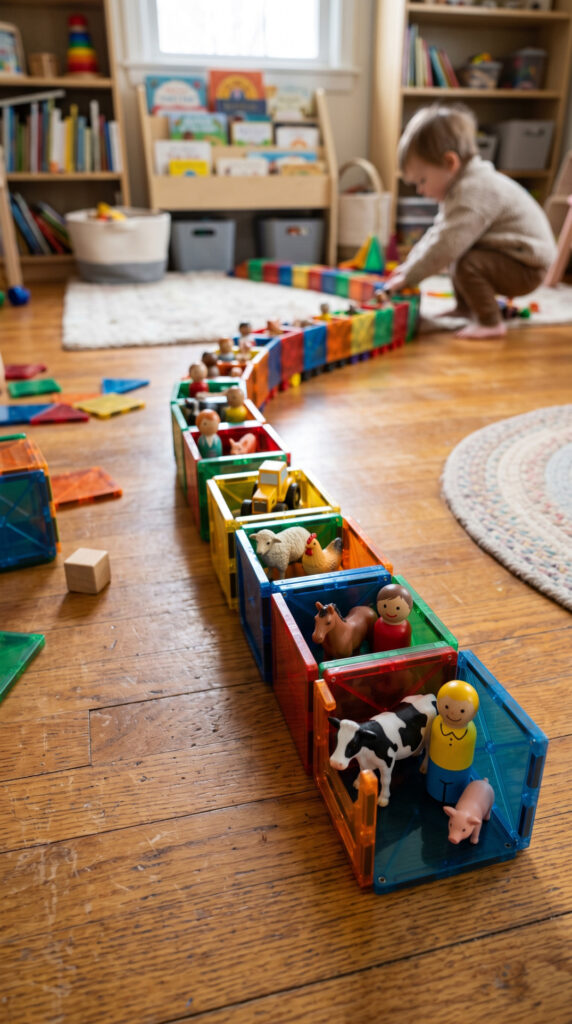
Ages: 4+ | Time: 2 min setup, 30 min build, 4 min cleanup | Mess: none | Supervision: check in every few minutes
You’ll need: 30 to 45 tiles, plus small figures or animals as passengers.
Cheap swap: Wooden clothespins, corks or bottle caps as cargo, all free.
What goes wrong the first time: They push it. A tile carriage shoved along the carpet loses its walls immediately, because sideways force pops the magnets right off. Build the carriages on a metal baking sheet and slide the sheet, or push from the base of the carriage rather than the top.
Skip it if: Your kid wants the train to run on their wooden or plastic track. The scale is completely different and the tiles will not sit on the rails.
Build it:
- Fold up an open topped box for the engine, about four tiles per carriage.
- Build two or three more open boxes as freight cars.
- Snap the carriages together edge to edge. The magnets act as couplings, which is the best part.
- Load them with peg people, animals or anything small enough to sit inside.
Then extend it. Ramps from right triangles, a bridge made from two towers with a flat tile across, a tunnel from a folded box with both ends open. The build stops being the activity and turns into the setting for the game, which is when you get your longest stretch of quiet.
8. Houses for Imaginative Play
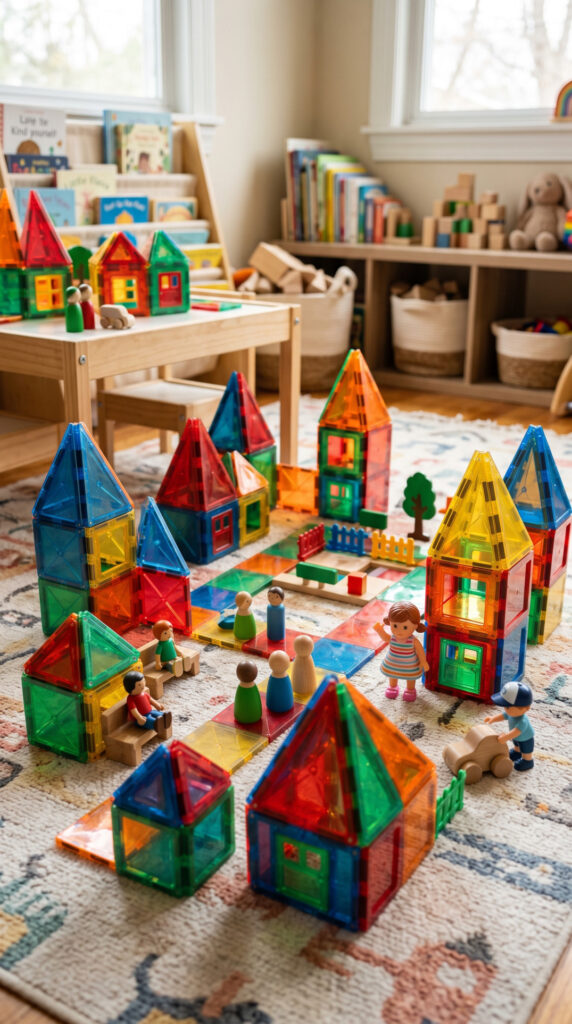
Ages: 4+ | Time: 2 min setup, 30 min build, 4 min cleanup | Mess: none | Supervision: check in every few minutes
You’ll need: 10 to 15 tiles per house, 50 to 80 for a village.
Cheap swap: Furniture. Bottle caps are tables, a matchbox is a bed, a folded index card is a rug. Doll furniture is the one thing you never need to buy for this.
What goes wrong the first time: The roof slides off. Four right triangles will not sit on a cube, because their points do not meet over the middle. Equilateral triangles do, since their base matches the square exactly. If your set is short on equilaterals, lean two squares against each other into an A-frame instead.
Skip it if: Your kid is under 4 and gets upset at collapses. A single folded box with no roof still works as a house, and it stays up.
Build it:
- Fold up a cube using the fold-up trick, leaving the top open.
- Set one square aside as a hinged door, attached on one edge only.
- Add four equilateral triangles around the top for a pyramid roof, working around rather than up one side.
- Build two or three more and space them out into a street.
Older kids turn this into architecture. Mine has built two stories with a staircase made of stacked right triangles, and separate rooms with internal walls. Younger siblings sit and copy, which is the quiet benefit of a toy that spans this many ages.
9. Color Sorting with Magna Tiles

Ages: 2.5 to 5 | Time: 5 min setup, 20 min play, 5 min cleanup | Mess: low, small items scatter | Supervision: arm’s reach for anyone under 3
You’ll need: 15 to 25 tiles in distinct colors, plus a bin of small items to sort.
Cheap swap: Skip the craft supplies. Sort colored socks, bottle caps, plastic spoons, LEGO bricks, or crayons.
What goes wrong the first time: The boxes get knocked over and everything spills into everything. Build the sorting boxes on a metal baking sheet so the base holds them in place, and they will survive an enthusiastic 3 year old.
Skip it if: Your child still mouths things. Pom poms, wooden beads and peg people all fit through a toilet paper tube, which makes them a choking risk. Sort bigger items instead, like blocks and socks, and the activity works exactly the same.
Build it:
- Fold up three or four open topped boxes, each one a single color.
- Line them up on a baking sheet.
- Tip out a bin of mixed items and let them sort by color.
- Add a matching tile as a lid, then stack the boxes into a tower.
To make it harder, hand over tongs. Kitchen tongs are usually too long and too springy for small hands, so plastic tweezers work better. Learning Resources Handy Scoopers are the ones that have survived our house, and a dollar store pair of mini tongs does the same job.
10. Barn for Farmyard Play
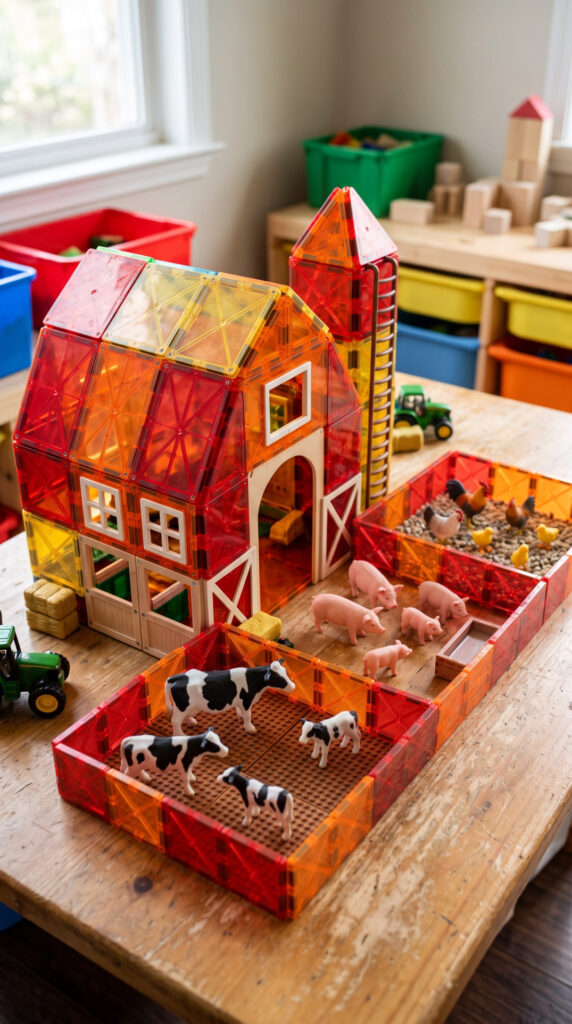
Ages: 4+ | Time: 2 min setup, 30 min play, 4 min cleanup | Mess: none | Supervision: check in every few minutes
You’ll need: 40 to 70 tiles, plus toy animals. Cheap swap: the animals are the only extra, and a bag of plastic farm animals from a dollar store or a Safari Ltd Farm TOOB both work. Paper animals your kid draws and cuts out work too, and take longer to make, which is a bonus.
What goes wrong the first time: The pens. Kids build single wall pens sticking out from the barn, then drag a plastic horse into one and knock the whole thing down. Make each pen a closed square that shares one wall with the barn, so it braces itself.
Skip it if: You have fewer than 40 tiles. A barn plus pens is one of the hungriest builds on this list.
Build it:
- Fold up a large open topped box for the barn.
- Add a pitched roof from two squares leaned together.
- Build closed square pens off the barn walls, sharing a wall each time.
- Sort the animals in, matching pen size to animal size.
The sorting is the actual learning here. A kid has to look at a toy chicken and a toy horse and work out that one needs a pen twice the size, which is size comparison without a worksheet in sight.
11. Slide from the Playground
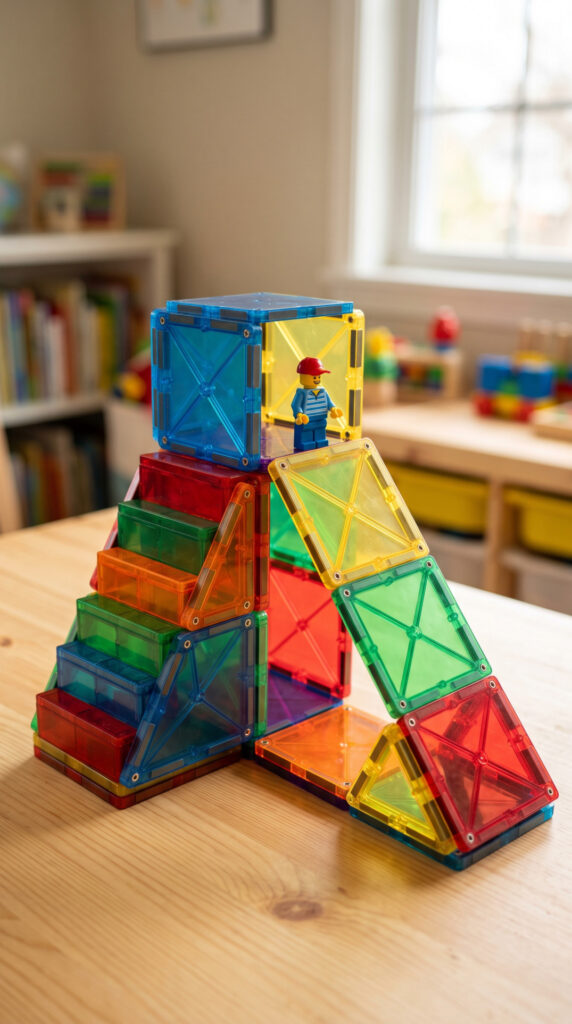
Ages: 6+ | Time: 2 min setup, 40 min build, 4 min cleanup | Mess: none | Supervision: check in every few minutes
You’ll need: 30 to 50 tiles, plus small figures or toy cars. Cheap swap: a stack of books or a shoebox as the platform, which saves 15 tiles and holds far more weight.
What goes wrong the first time: The toy will not slide. Every tile has a slightly raised frame, so each seam in your ramp is a little bump that stops a figure dead. Overlap the tiles so the uphill tile sits on top of the downhill one, and the lip faces away from the direction of travel. Better still, use one large square as the whole slide surface.
Skip it if: Your kid is under 6. This one takes real trial and error, and the failure mode is subtle enough to be frustrating rather than interesting.
Build it:
- Fold up a box as the platform, or use a stack of books.
- Build stairs from stacked right triangles up one side.
- Rest the ramp against the platform edge at roughly a 30 degree angle. Steeper and the toy flies off the end.
- Test with one figure, adjust the angle, test again.
This is the build where I have watched actual physics happen. Too shallow and nothing moves, too steep and the toy launches across the room and the ramp shears apart. Somewhere in the middle it works, and the kid who found that angle knows exactly what they did.
12. Playing Dominos with Magna Tiles
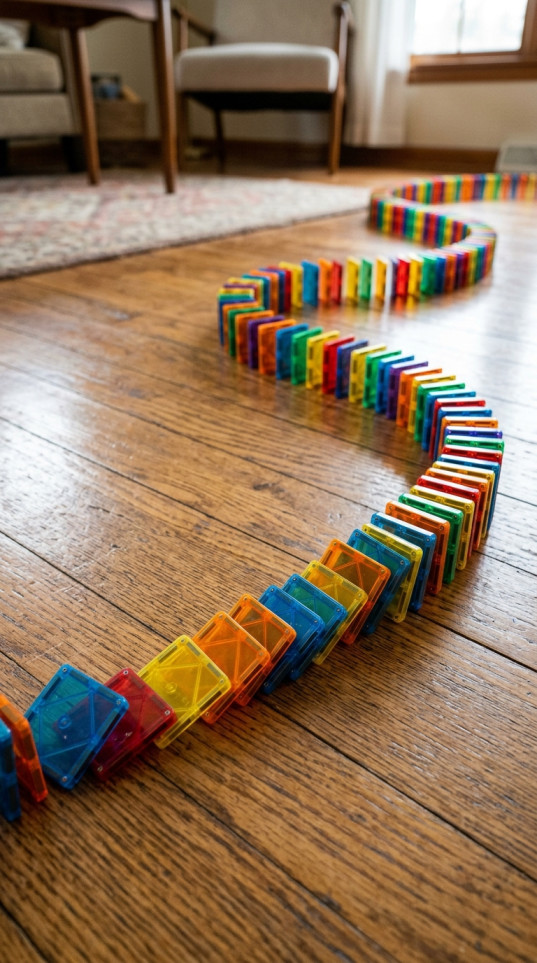
Ages: 6+, and this is the hardest thing on the list | Time: 2 min setup, 25 min play, 3 min cleanup | Mess: none | Supervision: check in every few minutes
You’ll need: 20 to 40 tiles and a hard floor.
Cheap swap: Actual dominoes, or a deck of cards, both of which behave far better. Use the tiles for the color patterning and switch materials if the falling part is the goal.
What goes wrong the first time: The magnets. Stand two tiles too close and they snap together face to face into a clump instead of falling in sequence. Stand them too far apart and the chain dies. The working gap is narrow, roughly two fingers wide, and finding it takes a few tries.
Skip it if: Your kid is under 6, or has a low tolerance for resetting things. A single early collapse knocks the whole line down and you start again.
Build it:
- Test three tiles first. Stand them on edge, two fingers apart, and tip the first one.
- Once the spacing works, keep it identical down the whole line.
- Build away from yourself, so your reaching arm is never over the finished part.
- Add a curve or a color pattern once a straight line works.
Two honest notes. Tiles standing on edge are top-heavy, so a footstep across the room can drop the lot. And I would not sell this as a physics lesson. What it actually teaches is patience under pressure, which is a real skill, just not the one on the box.
13. Making Faces
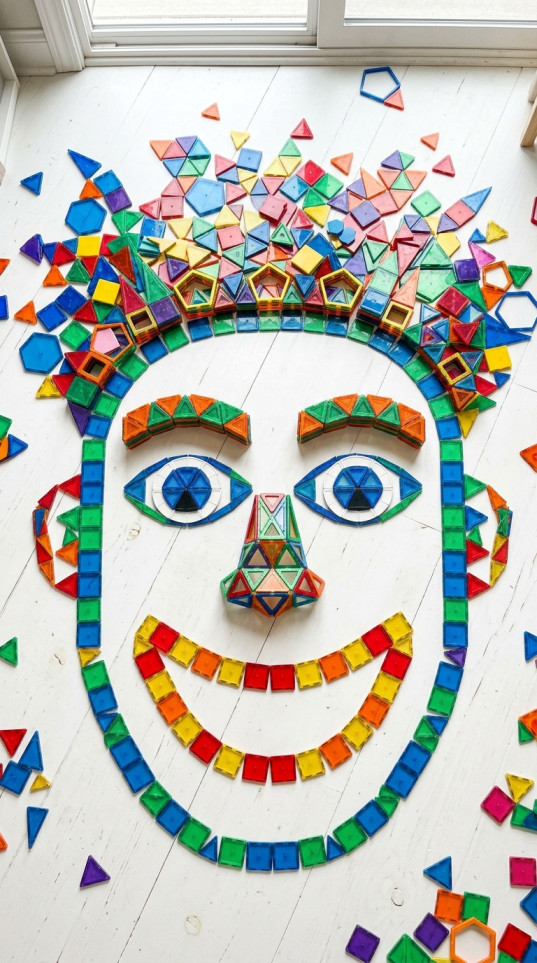
Ages: 3+ | Time: 1 min setup, 15 min build, 2 min cleanup | Mess: none | Supervision: check in every few minutes
You’ll need: 10 to 20 tiles.
Cheap swap: Nothing at all. This is the lowest cost, lowest effort idea here, and it works with the smallest set.
What goes wrong the first time: Scale. Kids build a face the size of a doormat, then have no tiles left for hair or ears. Give them a boundary, like a hula hoop, a laundry basket lid, or a taped square on the floor.
Skip it if: Your child finds direct talk about feelings uncomfortable. It still works as a pure shape activity, so drop the emotions angle and just build faces.
Build it:
- Mark a boundary on the floor for the head, or use a large square as the face.
- Add eyes, then a nose, then a mouth curved from small squares.
- Use small triangles for eyebrows, since the angle is what carries the expression.
- Change only the eyebrows and mouth, then ask what the face is feeling now.
The eyebrow trick is the part that works. Hold up your phone camera so your kid can see their own face, ask them to look surprised, then ask them to copy their eyebrows with the tiles. That connection between a shape and a feeling lands much better than naming emotions from a chart.
14. Learning Early Maths Concepts
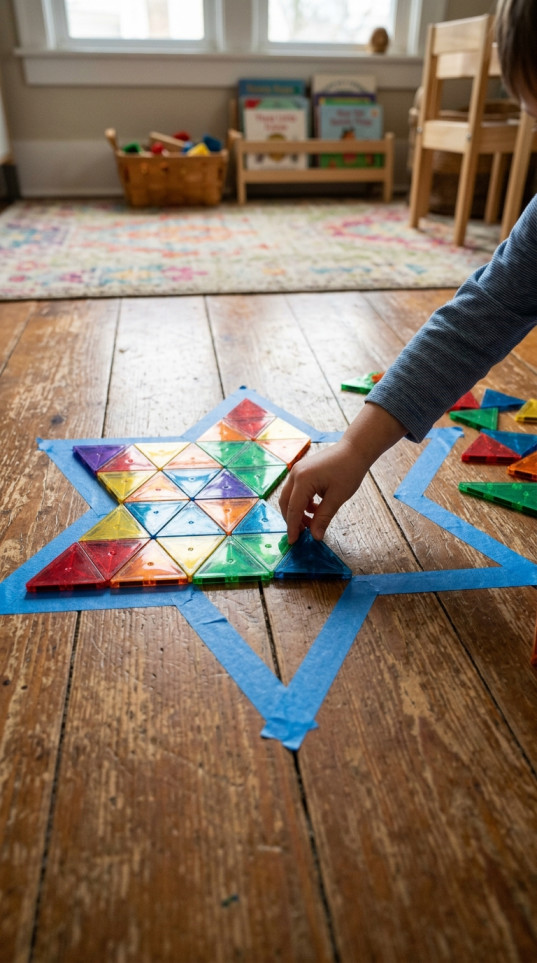
Ages: 3+ | Time: 10 min prep, 20 min play, 5 min cleanup | Mess: low, tape scraps | Supervision: hands on for the taping, then check in
You’ll need: 15 to 30 tiles and a roll of low-tack painter’s tape. ScotchBlue is the one that peels off cleanly. Cheap swap: draw the outlines on a large sheet of paper or a cardboard box flap with a marker instead, no tape needed.
What goes wrong the first time: The outline does not fit the tiles. Parents tape a lovely shape freehand, the kid tries to fill it, and nothing lines up, which reads to a 3 year old as failure. Use a tile as your ruler while you tape, so every side is a multiple of one tile.
Skip it if: You are taping onto an older painted wall or a delicate finish. Test one corner first, and never leave tape up for days in direct sun, because it bakes on.
Build it:
- Pick a surface: the floor, the fridge door, or a metal baking sheet for a portable version.
- Tape a hollow outline, measuring each side against an actual tile.
- Hand over the tiles and let them fill the shape like a puzzle.
- Once it is full, ask how many squares it took, then how many triangles it would take instead.
Good shapes to tape out, in the order they actually work:
- A large square, which is the easiest win
- A house
- A boat
- An arrow or a rocket
- A star or a flower, which look great but cannot be filled cleanly with squares and triangles, so save them for older kids who enjoy the gaps
That last point matters. Two right triangles make a square, so anything built from squares and rectangles fills perfectly. Curves do not, and telling a kid that up front turns a dead end into a discovery.
15. Make a Marble Maze
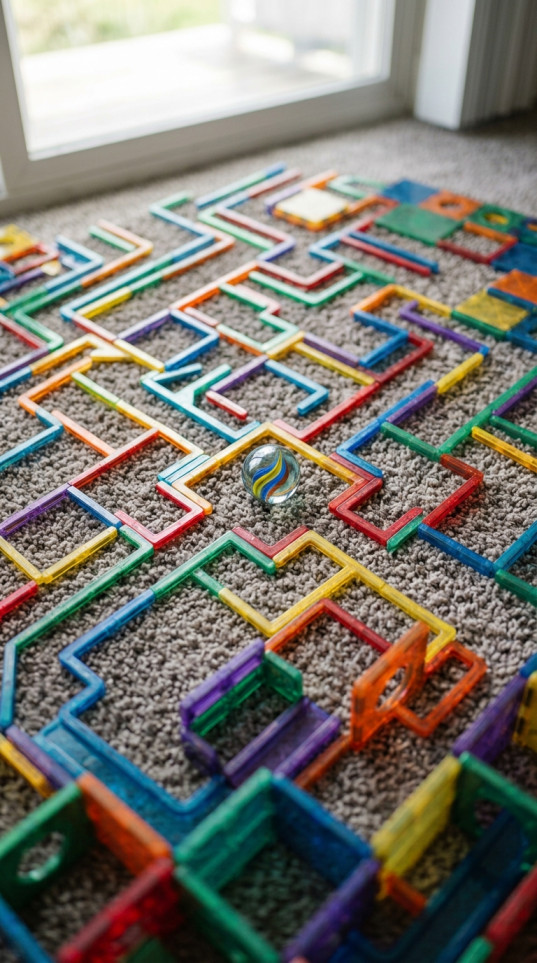
Ages: 4+ for a flat maze, 6+ for multi-level, and not for any child who still mouths things | Time: 2 min setup, 30 min play, 4 min cleanup | Mess: none | Supervision: arm’s reach any time a marble is out
You’ll need: 20 to 60 tiles, a metal baking sheet, and one ball.
Cheap swap: A tennis ball, a ball of socks, or a wooden bead the size of a golf ball.
What goes wrong the first time: The ball knocks the walls apart. Tiles standing on a rug or a bare floor have nothing holding their base. Build the maze on a metal baking sheet and the base is magnetically locked, which changes this build completely.
Skip it if: Your child is under 3, or under 4 and still puts things in their mouth. Marbles are banned from toys intended for under 3s, and any ball under 1.75 inches across carries the same warning. A ping pong ball is only about 1.57 inches, so it is not the safe alternative people assume. Go bigger than a tennis ball’s width and you are fine.
Build it:
- Lay the baking sheet flat and stand tiles on edge to form corridors, one tile high.
- Make the corridors wider than your ball, then add dead ends.
- Mark a start and a finish with a different color.
- Tilt the whole sheet to move the ball, which is far more satisfying than pushing it with a finger.
Tilting is the upgrade nobody mentions. Once the maze is locked to a metal tray, your kid can lift it and steer, which uses both hands together and turns a static build into a game they will replay ten times.
16. Ball Run
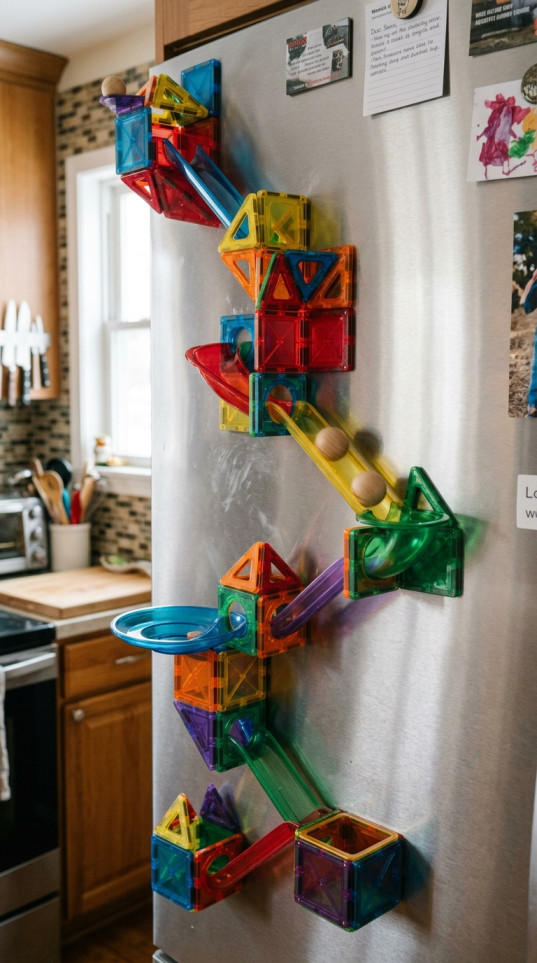
Ages: 4+ to build it, 2+ to enjoy dropping the ball | Time: 2 min setup, 25 min play, 3 min cleanup | Mess: none | Supervision: check in every few minutes, closer if the surface is near the stove
You’ll need: 20 to 40 tiles, a magnetic vertical surface, a basket at the bottom, and a light ball.
Cheap swap: A ball of aluminum foil squeezed to about the size of a plum. Free, light enough for tile ramps, and big enough to be safe around a 3 year old.
What goes wrong the first time: Your fridge is not magnetic. Most stainless steel fridge fronts will not hold a magnet at all, which is the reason this activity fails for half the people who try it. Test with a fridge magnet before you promise anything. If the front is dead, check the side panel, which usually works, or use a magnetic whiteboard or a metal door instead.
Skip it if: Your only magnetic surface is the fridge and your stove is right beside it. Two ideas here for a 2 year old are not compatible with a hot pan, so move the play surface, not the child.
Build it:
- Test the surface with a magnet first.
- Stick large squares to the wall at a slight downward angle, alternating left and right.
- Brace each ramp by sticking a second tile underneath its low edge, or the ramp slowly creeps down the fridge.
- Put a laundry basket or a plastic tub at the bottom to catch the ball.
The bracing step is what makes this last. A single tile holds to the fridge fine on its own, but add a rolling ball and it slides a little with every pass until the run falls apart. Two tiles per ramp fixes it, and it is the difference between five minutes and half an hour.
17. Use a Light Table with your Magna Tiles
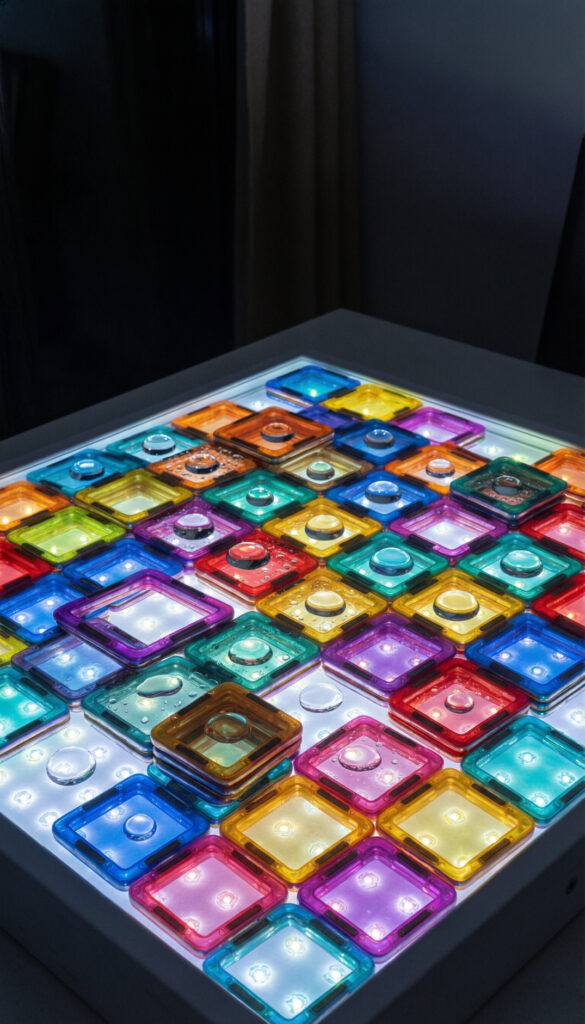
Ages: 3+ | Time: 10 min setup, 30 min play, 5 min cleanup | Mess: low | Supervision: arm’s reach
You’ll need: Translucent tiles, a clear plastic storage bin, and a battery light that takes AA or AAA batteries.
Cheap swap: S sunny window. Stick the translucent tiles straight onto the glass and you get the same stained glass effect for nothing, which is how we did it for two years.
What goes wrong the first time: Most parents grab the wrong add-ons. Water beads and glass gems are all over Pinterest for this activity, and both are a bad idea. See the note below.
Skip it if: Your set has no clear or translucent tiles. Solid colors block the light and the whole effect disappears.
Build it:
- Put a battery powered LED light inside a clear plastic bin and turn the bin upside down.
- Turn off the overhead lights.
- Lay translucent tiles flat on the lid and let them overlap, which makes new colors where two tiles cross.
- Add flat translucent extras, then build a small tile wall around the edge so the light glows through it.
Practical note: no water beads, and no coin-cell lights. The CPSC knows of at least one child who died after swallowing a water bead, and another who needed months of surgery, because the beads keep swelling inside the body. Button batteries in slim push lights and tea lights burn through tissue fast if swallowed. Use a light with a screwed or latched AA compartment, and swap the beads for translucent color paddles, cellophane scraps, or clear plastic cups.
The overlapping is the bit that lands. Slide a red tile halfway over a blue one and your kid sees purple appear out of nothing. My 4 year old spent 20 minutes doing only that, no building at all, which counts as a win on a dark evening.
Fun Things to Build with Magna Tiles
Using magnetic blocks to conceptualize and execute creative designs is one of the most simple, reliable, and enjoyable ways to keep your children actively engaged. The open-ended nature of the toy means that the possibilities truly are endless, limited only by the number of tiles in the box and the boundaries of a child’s imagination.
They remain one of the safest and most versatile play options on the market, consistently encouraging creativity, independent thought, and spatial awareness for children across a wide range of ages. Whether they are building towering castles, sorting colors, or engineering a complex ball run on the refrigerator, these tiles provide immense educational value disguised as pure fun. It is no wonder that they continue to be a massive hit with educators, parents, and kids alike.
Common Mistakes To Avoid
These are the ones I have made, or watched other parents make, not the generic list.
Announcing the project. “Today we are going to build a castle” gets you a no. Building the first two tiles of something yourself and then walking away gets you a kid who finishes it and thinks it was their idea.
Storing them in a deep bin. Magnetic tiles in a tall bucket fuse into one solid brick, and a 4 year old will stand there yanking at it and then go find a screen instead. Ours live in a shallow under-bed box, squares at one end, triangles at the other. Cleanup takes 30 seconds longer and setup takes two minutes less.
Practical note: if your kid has stopped playing with their tiles, the problem is usually storage or boredom, not the toy. Put half the set away for a month, then bring it back out with one new surface, like a baking sheet or the side of the fridge. That costs nothing and works better than buying more tiles.
Helping too fast. When the tower falls, the instinct is to jump in and rebuild it. The collapse is the entire lesson. Sit on your hands for ten seconds and most kids start diagnosing it themselves.
Putting weak tiles at the bottom. If you have mixed brands, the thinner or weaker tiles belong up top. A soft magnet in a load-bearing wall will let go under weight and take the whole build with it.
Using carpet for anything that rolls or stands. Marble mazes, ball runs and domino lines all need a hard floor or a metal tray. Carpet is better for tall builds you expect to fall.
Keeping a cracked tile in the basket. Covered above, and it is the only mistake on this list that matters medically. Bin it the day you spot it.
Letting them get wet. No bath, no sink, no water table. Water gets in around the rivets and rusts the magnets from the inside.
Fun Things To Build With Magna Tiles
Once these 17 are used up, the pattern for finding more is simple: pick something your kid is already into and build the container for it. A garage for the cars. A stage for the figures. A zoo. A hospital. A rocket launch pad. The tiles are rarely the game, they are the set.
Two things they cannot do, so you stop fighting them. Curves, because squares and triangles do not make circles. And anything that has to hold real weight or get wet.
Heading into fall and winter, the two upgrades that get the most play in our house cost nothing. Move the tiles to a vertical surface, because building sideways on the fridge is a completely different problem to solve. And add a light source once it is dark at 5pm, which turns the same tiles into something worth sitting down for.
Frequently Asked Questions
What age is appropriate for Magna Tiles?
Magna-Tiles and the main alternatives are all labeled 3 years and up. The reason is not that 3 year olds stop mouthing things, because many do not. It is that an intact tile is far too big to swallow, and the hazard only appears if the casing cracks and frees the magnet inside, so the real rule is to inspect tiles regularly no matter your child’s age.
Are Magna Tiles safe for young children?
Yes, with one condition: the magnets have to stay sealed inside the plastic. Throw away any tile that is cracked, split or rattling on the day you find it, because swallowing two magnets, or one magnet plus something metal, can trap and perforate the bowel and needs emergency care. Inspect the tiles that get stepped on most, and keep an eye on any expansion set with smaller pieces.
How do you clean magnetic tiles?
Wipe them with a damp cloth and a little mild dish soap, then dry them right away. Do not soak them, run them through the dishwasher, or let a kid take them into the bath, because water works in around the rivets and rusts the magnets from the inside. For a sick-day clean, wiping plus leaving them untouched for a few days does more than scrubbing.
Can Magna Tiles be used alongside other brands of magnetic tiles?
Usually yes. PicassoTiles and Connetix use the same 3 inch base size and compatible polarity, so they stack and click together with Magna-Tiles, which is a cheap way to grow a collection. The catch is strength: mixed sets are only as strong as the weakest tile, so put the sturdiest tiles at the bottom of anything tall.
How many Magna Tiles do I need to start?
A 32 to 37 piece set is enough for flat pictures and one small house, and it is where most families should start. Around 100 tiles is the point where castles, ball runs, barns and multi-level builds all become possible, and that is the number worth working toward, whether you get there with one big set or by adding a square pack at a time.
Why won’t my Magna Tiles stick to my fridge?
Because most modern stainless steel fridge doors are not magnetic. Check the side panel instead, which usually is, or use a magnetic whiteboard, a metal interior door, or a baking sheet propped against the wall. Test with any fridge magnet before you promise your kid a ball run.
Read next
If the tiles bought you 30 minutes today and you need the same trick tomorrow, these two are the natural follow-ons.
- Best screen-free toddler activities indoors, for the rainy days when the tiles have already been out twice this week.
- Low prep quiet time activities for toddlers that encourage independent play, if what you actually want is the version that runs without you in the room.
One last thing before you go and tip the basket out. Pick the build by how much patience you have today, not by how impressive it looks. A flat tile dinosaur that a 4 year old finishes on their own beats a castle you end up building yourself, every single time.