
Ice cube painting is a taste-safe toddler art activity where you freeze water tinted with food coloring in an ice tray, anchor a craft stick in each cube, then let your child drag the colored ice across thick watercolor paper. It works from roughly 18 months through age 5, needs about 10 minutes of prep plus an overnight freeze, and gives you 10 to 20 minutes of real play. Set it up on a rimmed tray away from carpet, and stay within arm’s reach, because a loose ice cube is a true choking hazard for children under 4.
It was the third rainy Saturday in a row. My 3 year old had dumped the toy bin twice, I had a headache, and there were roughly nine minutes of patience left in the tank.
What I did have was an ice tray, a four pack of McCormick food coloring, and a bag of craft sticks from Dollar Tree. That’s how ice cube painting got into our rotation, and it has stayed there through two summers and one very long winter.
Here’s what most tutorials skip: this is not a 45 minute activity, and it is not mess-free. It is a genuinely good 15 minutes that costs you about two dollars, and if you set it up wrong you spend longer cleaning blue dye off your grout than your kid spent painting. Below is the version that actually works, including the parts that go sideways.
Ice Cube Painting at a Glance: Age, Mess, and Time
Five versions of the same idea, ranked by how much of your afternoon they cost.
| Version | Best ages | Mess level | Prep | Active play | Cleanup | Supervision |
| Big frozen blocks, no stick | 6-18 months | Low to medium | 5 min + 6 hr freeze | 5-10 min | 5 min | Arm’s reach, the whole time |
| Classic stick cubes on paper | 18 months – 4 years | Medium | 10 min + overnight freeze | 10-20 min | 10 min | Arm’s reach |
| Paint-the-ice sensory bin | 3-5 years | Medium to high | 5 min | 15-30 min | 15 min | Check every 2-3 minutes |
| Layered rainbow cubes | 4-7 years | Medium | 15 min + 3 freeze rounds | 20 min | 10 min | Check in every few minutes |
| Salt and ice science version | 5-8 years | Low | 5 min | 15 min | 5 min | Check in |
If you only have tonight to prep and a toddler to entertain tomorrow, do row two. If you have zero prep time and a preschooler, buy a bag of ice and do row three.
Why Ice Painting is a Must-Try Activity for Kids
Take the paintbrush away and a kid has to solve the problem differently. That’s most of the value right there. The rest is that it costs almost nothing and buys you a quiet stretch on a day that needs one.
Engages the Senses
The cold is the whole hook. Your child feels the sting of it, watches the color bleed out ahead of their hand, and hears that faint squeak as ice drags across wet paper.
Here’s the thing nobody warns you about: bare fingers can only hold a cube for about 60 to 90 seconds before it genuinely hurts. Kids drop it, shake their hand, and look at you like you tricked them.
Tip: Wrap the top of each craft stick in a small square of felt or fold a paper towel around it. Two seconds of prep, and you get triple the painting time out of the same kid.
If your child is sensory sensitive, do not hand them the cube. Put out a small spoon or a pair of kitchen tongs and let them push the ice around without touching it. Some kids will move to bare hands within a few minutes on their own. Some never will, and that is fine.
Introduces Early Science Concepts
Let’s be honest about the level here. Your 2 year old is not learning thermodynamics. They are learning that cold things get smaller, and that is a real and useful thing to learn.
What makes it stick is you talking through it. “Look, it’s getting smaller. Where did it go?” Then point at the puddle. That connection between the shrinking cube and the growing puddle is the actual lesson, and it lands better around age 3 than age 2.
For a 5 to 8 year old, sprinkle table salt over the leftover ice when the painting is done. Salt lowers the freezing point of water, so you get melted tunnels and pits carving through the cubes within a couple of minutes. Bring out a second bowl with plain ice as a control and you have a real experiment on your hands.
Builds Fine Motor Skills
Fine motor skills are the small hand movements behind writing, zipping a coat, and using a fork. Pinching a craft stick and steering a slippery cube works those muscles harder than a crayon does, because the tool keeps changing shape under their hand.
There is a trade-off in cube size that matters more than it sounds. A big frozen block is safer and lasts far longer, but a child has to fist it, which does nothing for pencil grip. A standard cube on a stick gives you a proper three finger pinch, but it melts down into a swallowable chunk in about 10 minutes.
So: big blocks for under 2s and for long outdoor sessions, standard stick cubes for 2 to 4 year olds when grip practice is the point, and end the session when the cubes get small either way.
Encourages Creative Expression
There is no wrong way to do this, which is exactly why it works for kids who freeze up when they are asked to draw a cat.
Now the part that surprises first timers: the finished paper is usually brown. All colors, all mixing, all on one sheet equals mud. Every single time.
If you have a child who cares how it looks, and plenty of 4 and 5 year olds do, hand them two or three colors that mix cleanly instead of six. Red and yellow gives you orange. Blue and yellow gives you green. Red and blue gives you purple. Skip green next to red unless you want brown.
5 Key Benefits of DIY Ice Play Activities
The section above is the why. This one is the how: what to actually say and do while your kid is painting, so the developmental part is not accidental.
Teaches Sensory Attributes
The vocabulary is the win here, and it only happens if you narrate. Words worth using out loud: cold, slippery, smooth, wet, dripping, shrinking, melting, freezing, hard, slushy.
What makes ice better than regular watercolor for this is that the tool changes while they hold it. It starts hard and smooth, ends slushy and small. Very few art materials do that, and it gives you something to talk about for the whole session.
For a child who hates wet or cold on their hands, put the ice in a shallow tray with a spoon and let them watch first. Pushing is participating.
Develops Fine Motor Skills
Most of the hand work happens before the painting starts, so let them help with prep if you can spare the time.
Squeezing the food coloring bottle takes real pressure control. Stirring each well with a stick takes a steady wrist. Both are better practice than the painting itself.
Trade-off, and it’s a real one: a 2 year old helping with food coloring means dyed fingers before you’ve even started, plus at least one spill. If that will bother you, do prep after bedtime and hand them the finished cubes in the morning. Nobody loses anything.
Tip: If your toddler is helping, mix the colors in a muffin tin instead of a narrow ice tray. Wider wells, far fewer spills, and you can pour into the tray yourself once it’s mixed.
Aides Creative Development
Color mixing on wet paper is the most satisfying part of this activity for a preschooler, because it happens on its own while they watch.
Give them a plan if they want one: paint one color across the page, then drag a second color straight through it and watch the line where they meet. That single move teaches more about color than a worksheet does.
Practices Hand-Eye Coordination
Aiming a slippery, melting cube at a specific spot is much harder than aiming a crayon, which is what makes it useful.
For 3 and up, pencil a big circle, a letter, or their initial on the watercolor paper first and ask them to trace it with the ice. Expect them to stay roughly in the neighborhood, not on the line. Under 3, skip the target entirely and let them scribble.
Promotes Process-Based Art
Process art means the making matters and the finished sheet does not. No model to copy, no right answer, no adult stepping in to improve it.
The hard part is you. When your kid smears everything into one gray blob you will want to suggest a fix. Don’t. The blob is the point.
One practical bit: wet ice paintings need 30 to 60 minutes to dry and they curl at the corners as they go. Press the dry sheet flat under a stack of books overnight if you want to keep it, or photograph it wet and recycle it. The wet photo usually looks better anyway.
The best sheet we ever made got recycled by accident and nobody noticed for a week. Take the picture at minute three, when the colors are still separate, and let the paper go.
Taste-Safe Ice Cube Painting: A Fun and Mess-Free DIY for Toddlers
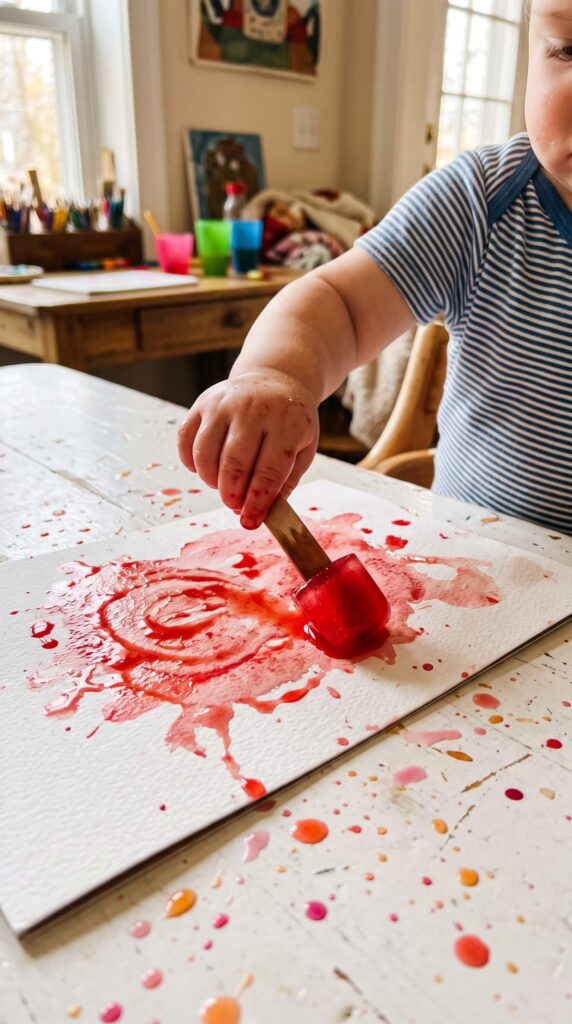
Straight talk about the “mess-free” part: this is a low mess activity if you set it up on a rimmed tray on a hard floor, and a genuine problem if you set it up on carpet. Food coloring plus melting water goes exactly where gravity sends it.
Set up right and cleanup is one wipe and one towel. Set up wrong and you are treating a rug.
Materials and Supplies Needed
Everything here is either already in your kitchen or under two dollars. The swap column is what I use when I don’t want to buy anything.
| What you need | Where to get it | Free or cheap swap |
| Ice cube tray, silicone if possible | Dollar Tree, or a silicone mini muffin pan you own | Clean applesauce or yogurt cups, or a regular metal muffin tin |
| Liquid food coloring | McCormick 4 pack, about $4 at any grocery store | Turmeric, beet water, or red cabbage water for dye-free color (pale, and turmeric stains hard) |
| Craft or popsicle sticks | Bag of 100 at Dollar Tree | Plastic spoons, handle up, work just as well |
| Heavy duty aluminum foil | Reynolds Wrap Heavy Duty | Skip it entirely and use the two-stage freeze in step 4 below, which is more reliable anyway |
| Thick watercolor paper | Canson XL 140 lb pad, about $10 and lasts months | Flattened cereal box, brown paper grocery bag, or coffee filters (colors bloom beautifully on filters) |
| Rimmed baking sheet or plastic tray | Already in your kitchen | The lid of a plastic storage bin |
| Painter’s tape | Hardware aisle | Masking tape, or any tape you have |
| Smock or old clothes | Anywhere | An adult t-shirt worn backwards, or just a diaper if you’re outside |
Practical note: do not use your good metal baking sheet outdoors in summer sun. Dark metal heats up fast and your cubes will be puddles in about four minutes. Use a plastic tray in the shade.
How to Make Ice Cube Paint
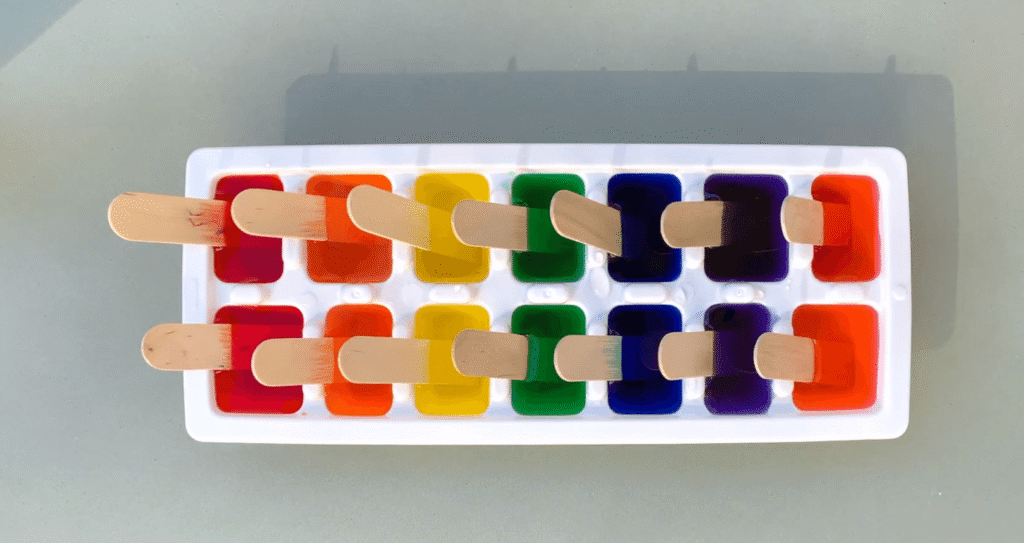
Prep is about 10 minutes of your time plus freezer hours, so make these the night before. Trying to do it same day is how you end up with sticks that slide right out.
- Fill the tray about three quarters full with cool tap water. Leave room at the top, because water expands as it freezes and an overfull tray gives you one fused sheet of ice instead of separate cubes.
- Add 2 to 3 drops of food coloring per well and stir each one with a stick or toothpick. One drop looks fine in the tray and comes out disappointingly pale on paper. Three drops of blue or red is plenty.
- Freeze flat for 60 to 90 minutes, until the tops are firm and slushy but not solid through.
- Push a craft stick into the center of each well now. The half frozen slush holds the stick upright by itself. This two-stage method beats the foil trick and costs nothing.
- Freeze at least another 3 to 4 hours, overnight if you can. The stick needs to be locked in ice, not just sitting in it.
- Release the cubes. Let the tray sit on the counter for two minutes, then run warm water over the underside for about five seconds. Twist the cube out with a gentle turn. Never yank the stick straight up, because it pulls free and you’ve lost your handle.
- Tape the paper down. Painter’s tape on all four corners, paper on a rimmed tray. Untaped paper curls into a taco the second it gets wet and then slides around the table.
- Hand over two or three cubes at a time and leave the rest in the freezer. A full tray on the table melts into one colored lake while your child uses one cube.
Tip: the classic foil method still works if you prefer it. Cover the filled tray tightly with heavy duty foil, then pierce the foil over each well with a stick so the foil holds it upright. Thin store-brand foil tears and lets the sticks tilt, which is exactly why I switched to the two-stage freeze.
Mess level: medium. Expect dyed fingertips for a day, a few drips past the tray, and one cube on the floor. Prep the space: hard floor, old clothes, a towel under the tray, and a damp cloth within reach. No carpet, no rugs, no upholstered chairs. Supervision: within arm’s reach the entire time for under 4s. This is not a check-in-from-the-kitchen activity. Realistic timing: 10 minutes prep, overnight freeze, 10 to 20 minutes of play, 10 minutes cleanup.
Discouraging Eating During Taste-Safe Play
Taste-safe means “will not hurt them if it ends up in a mouth,” not “snack.” Worth teaching the difference early, because art supplies as a category are not food.
Most kids lick a cube once and lose interest fast, because it tastes like nothing but cold water. That is the quiet advantage of plain water and food coloring over anything flavored.
If it goes in the mouth, stay flat about it. “Not for eating. This one paints.” Then guide their hand back to the paper. A big exaggerated yucky face works well on 2 year olds and gets ignored by 4 year olds.
If they keep going back to it, pack it up without making it a fight and try again in a week. Some kids are in a heavily oral phase and no amount of redirecting beats that.
One thing to skip: flavored swaps like Kool-Aid, juice, or drink powder. They smell like a drink, which invites licking, and powdered mixes bring sugar plus real allergen questions to something you wanted to be simple.
Ice Painting Bin Setup for Preschoolers
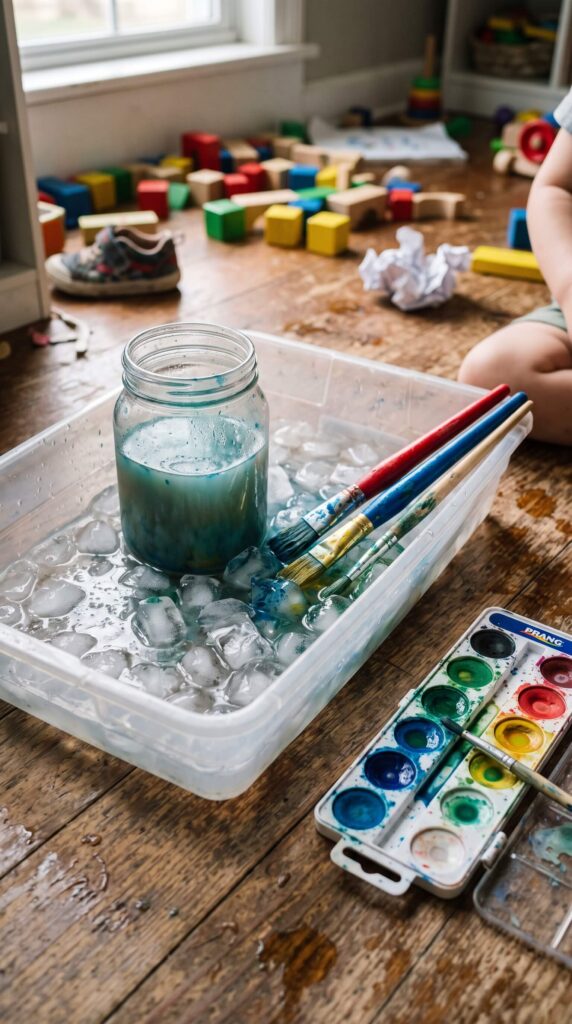
Flip the whole thing around: instead of freezing the paint, freeze the canvas. Kids paint directly onto a bin of ice with regular brushes and a cheap watercolor set.
This is the zero prep version. A $2 bag of ice from the gas station gets you further than a week of saving your own trays. It’s also the better choice for a group, a sibling pair, or a snow and winter theme in a preschool room.
Gathering Supplies for the Sensory Bin
| What you need | Where to get it | Free or cheap swap |
| Large shallow bin | Sterilite under-bed storage box, about $10 at Walmart | A roasting pan, a dish tub, or the bottom drawer of an old fridge crisper |
| Bag of ice, or your own cubes | Any gas station or grocery store, $2 to $3 | Freeze water in loaf pans, yogurt tubs, or balloons for big fun shapes |
| Medium-thick paintbrushes | Dollar Tree craft aisle | Cotton swabs, an old toothbrush, or a basting brush from the kitchen drawer |
| Watercolor palette | Crayola Washable Watercolors pan set, about $2 to $4 | Any dried out watercolor set you already own, they reactivate with water |
| Heavy glass jar of water | Kitchen cupboard | A wide mug, a mason jar, or a small ceramic bowl |
| Towel for underneath | Linen closet | An old beach towel or a plastic tablecloth from the party aisle |
Skip liquid watercolors and artist grade paint here. The dry cakes in a basic kids’ set activate the moment a wet brush hits them, and they rinse out of clothes far better than food coloring does.
Simple Setup And Execution
Dump the ice into the bin. That’s the setup.
Then nestle the jar of rinse water deep into the middle of the ice so it can’t tip. A tipped rinse cup floods the bin and turns your ice into gray soup, and it will happen within the first five minutes if the jar is just sitting on top.
Set the watercolor pans around the edges of the bin, one per child, and give each kid their own brush. Shared pans cause more squabbling than shared space does.
Medium-thick brushes work best on ice. Anything too fine skates off the slick surface without leaving color, and a big easel brush is clumsy on a small cube. A standard half inch craft brush is the sweet spot.
Mess level: medium to high, but almost all of it stays in the bin. Do this outdoors, in a garage, or on a kitchen floor you can mop.
Prep the space: towel under the bin, sleeves pushed up, short sleeves ideally. Colored meltwater runs down forearms and into cuffs.
Supervision: check in every two or three minutes for ages 3 and up. Stay closer if a younger sibling is circling.
Realistic timing: 5 minutes setup, 15 to 30 minutes of play, 15 minutes cleanup including draining.
Drain the bin outside or in the shower, not the kitchen sink. Colored slush splashes higher than you expect when a solid block of ice drops out of a tub.
Managing Group Play
Four kids per standard bin. Two on each long side, elbows clear. Add a fifth and you get bumped arms, brushes knocking together, and someone crying about their spot.
Watch the floor. Cubes get flicked out of the bin, land underfoot, and a kid running past a stray ice cube on a tile floor goes down hard. Sweep escapees back into the bin as you go, and keep socks off.
The top layer will go muddy brown within about 10 minutes. When it does, scoop the clean ice from the bottom of the bin up to the top with a big spoon. Colors read bright again and you buy another 10 minutes without any new supplies.
Keep a second bag of ice in the freezer if you’re running this for a group. Refreshing the bin once is usually the difference between a 15 minute activity and a 30 minute one.
Age Modifications for Ice Painting
Same materials, four different activities depending on who’s holding the cube.
For Babies and Toddlers Under Two
For this age it’s sensory exploration, not art. Nobody is making anything. They’re finding out what cold feels like.
Freeze the water in something big: a small food storage container, a silicone muffin cup, or a yogurt tub. You want a block too large to fit in a mouth, because standard cubes are a choking risk at this age. Skip the sticks entirely.
Your job is talking. “Is it cold? Ooh, it’s slippery. Look, the red is coming off on your hand.” Name the colors, name the feelings, and keep it short. Five to 10 minutes is a full session for a 1 year old.
Strip them to a diaper and do it in the highchair tray or the bathtub. The bathtub version is the single easiest cleanup in this whole article, and colored water rinses straight down the drain.
For Older Toddlers and Preschoolers
From about 18 months to 4 years, the classic stick cube on watercolor paper is the version to run. Hand them a few cubes, stand close, and let them work.
For 4 to 7 year olds, layer the cubes. Fill the tray a third full with red and freeze, add yellow and freeze, top with blue and freeze. Each layer needs 60 to 90 minutes, so the whole batch takes an afternoon of freezer time, but the color shifts as the layers melt through are worth it for a kid who has done this before and needs it to be new.
You can also upgrade the paint itself once your child reliably keeps things out of their mouth, usually around 3 or 4. Swap the food coloring for watered down Crayola Washable Kids’ Paint or washable tempera. Thicker, more opaque, much brighter results.
Practical note: the taste-safe version stains worse than the paint version. Food coloring on a cotton shirt is often permanent, while washable tempera comes out in a normal wash. If your child is past the mouthing stage, washable paint is the safer choice for your laundry.
Important Safety Notes for Parents and Caregivers
Ice painting is low risk, but “low risk” is not “no risk,” and one of these is serious.
Choking is the real hazard. An ice cube is hard, smooth, slippery, and roughly the size of a small child’s airway. Choking guidance for young children consistently flags exactly that combination of traits. Use the toilet paper tube test: if a piece fits through a cardboard tube, it can choke a child under 3. A standard ice cube fits easily.
That gives you three rules. Freeze large shapes for under 2s. Stay within arm’s reach for anyone under 4. And end the activity when the cubes melt down small, which is the moment most parents stop paying attention because the fun is winding down.
Melt speed depends on the room. On a 90 degree patio, a standard cube is gone in about four minutes. In an air conditioned kitchen you get closer to 15. Heading into fall 2026, the outdoor version gets much more forgiving, because anything under about 70 degrees roughly doubles your working time.
Cubes come off sticks. As the ice shrinks, the stick loosens and the leftover chunk drops onto the tray or the floor. Pick it up right away. This happens near the end of nearly every session.
Ice on skin for too long can cause a cold burn. Small children will not tell you their hand hurts until it really hurts. Keep bare-hand contact to short bursts, use the felt-wrapped stick or a spoon, and check for skin that looks white or unusually red. It is not common, but it is real, and toddlers do not self-regulate here.
Ice on the floor is a slip hazard. Hard floors plus a stray cube plus socks is how a kid ends up on their back. Sweep as you go.
Allergens come from swaps, not the base recipe. Water and food coloring are not typical allergens. Once you swap in juice, drink powder, cocoa, or purees, you have introduced real allergen and sugar questions, especially in a group or classroom where you do not know every child’s history. If a child has a known dye sensitivity, freeze plain water and put the color on the paper instead.
Adults handle these steps, not kids: inserting sticks into the tray, running warm water over the tray to release cubes, breaking up large ice blocks, and any cutting or trimming of paper. Also skip glitter entirely. Wet glitter travels everywhere and belongs nowhere near a child who still mouths things.
Never leave a child alone with ice, not even for the length of a phone call. If you need to step away, the activity ends and the ice goes in the sink.
Common Mistakes Parents Make the First Time
Nearly all of these are mine.
- Printer paper. It pulps in about 90 seconds and tears under the cube. Watercolor paper, cardboard, or a cereal box.
- One drop of food coloring. Looks bright in water, paints pale grey on paper. Use 2 to 3 drops per well.
- Setting up on carpet. The one mistake that turns a cheap activity into a cleaning project.
- Standard small cubes for a 1 year old. Too small, and gone in four minutes. Freeze bigger.
- Not taping the paper. It curls, slides, and your kid chases it around the tray.
- Handing over all six colors. Instant brown, and a disappointed 4 year old.
- Same-day prep. Sticks that are not locked in solid ice pull straight out on the first stroke.
- Running it right before nap. Cold, wet, and overtired is a bad combination. Mid-morning is the sweet spot.
- Their favorite shirt. Food dye on cotton is often there for good.
- Planning your own break around it. This buys 15 minutes, and you need to be in the room for all of them.
FAQs
What kind of paper is best for ice painting?Watercolor paper, ideally 140 lb like a Canson XL pad, because a melting cube dumps far more water on a page than a brush does. Printer paper and thin construction paper pulp and tear within a couple of minutes. Free alternatives that hold up well: a flattened cereal box, a brown paper grocery bag, or coffee filters.
Can I use regular paint instead of food coloring?Yes, once your child reliably keeps things out of their mouth, usually around age 3 or 4. Stir a squirt of washable tempera or liquid watercolor into the water before freezing for brighter, more opaque color. Stick with food coloring for babies and young toddlers, and for anyone who still tests materials with their tongue, including many preschoolers or kindergarteners in a group setting.
How long does it take for the ice paint to freeze?Plain colored cubes freeze solid in about 3 to 4 hours, but cubes with sticks need overnight. The stick has to be locked in fully frozen ice or it pulls out on the first stroke. Freeze for 60 to 90 minutes first, insert the sticks into the slush, then leave it overnight.
Is this activity messy?Medium mess, and almost all of it is manageable if you set up on a rimmed tray on a hard floor with old clothes on. The real risk is not splatter, it’s staining: food coloring marks fingertips for a day and can permanently mark cotton. Keep it off carpet and out of good clothes and you’ll clean up with one towel and one wipe.
At what age can my child start ice painting?Supervised ice play can start around 6 to 9 months using a block too big to fit in a mouth, with you within arm’s reach the entire time. Actual cube-on-a-stick painting works from about 18 months, and it hits its stride between 2 and 4. For a 3 year old it is safe with constant supervision, large-ish cubes, and ending the session once the cubes get small.
How do I get food coloring out of clothes and carpet?Blot with cold water immediately, then work in a mix of one teaspoon dish soap and one tablespoon white vinegar in a cup of cold water. Skip hot water and hard scrubbing, both of which set dye and spread it. On skin the color fades within a day, and rubbing alcohol or hand sanitizer speeds it up
Read Next
If the fine motor angle is what sold you on this, the next thing to try is a set of activities built specifically for hand strength: fine motor activities for kids that build hand strength and coordination. Ice painting fits neatly into that rotation on days you want something with a sensory element.
And if you have an older sibling hovering nearby who thinks colored ice is beneath them, summer camp activities for kids age 8-10 has plenty they’ll actually go for while the little one paints.
Conclusion
Two dollars, ten minutes of prep, and a fifteen minute stretch where your kid is busy and you are not refereeing anything. That’s the deal, and on the right afternoon it’s a good one.
The move tonight is small: fill a tray three quarters full, put 2 to 3 drops of color in each well, freeze it for an hour and a half, then push the sticks in and forget about it until morning. Tape the paper down, hand over three cubes, and stay in the room. If it lands, freeze a double batch next time and keep half in a zip bag in the freezer door. Rainy Saturdays turn up without warning.